Thursday 22 October 2015

Microsoft: Setup DHCP Servers with Split Scope - 80/20 Rule


<< 80/20 Rule >>
You will probably install more than one DHCP server so that the failure of any individual server will not prevent DHCP clients from starting. However, DHCP does not provide a way for DHCP servers to cooperate in ensuring that assigned addresses are unique. Therefore, you must carefully divide the available address pool among the DHCP servers to prevent duplicate address assignment.

For balancing DHCP server usage, use the 80/20 rule to divide scope addresses between DHCP servers.


<< 80/20 Rule Model >>
DHCP Server 2 is configured to lease most (about 80 percent) of the available addresses. DHCP Server 1 is configured to lease the remaining addresses (about 20 percent).

This scenario allows the local DHCP server (DHCP Server 2) to respond to requests from local DHCP clients most of the time. The remote or backup DHCP server (DHCP Server 1) assigns addresses to clients on the other subnet only when the local server is not available or is out of addresses. This same rule can be used in a multiple-subnet scenario to ensure the availability of a DHCP server when a client requests a lease.

But how to install this DHCP server. In Windows 2003 it was a lot of work but now with Windows 2008 R2 is is much better,install one serve and get one for free, ok almost. Let me show you how to do this.

First you need two servers in the same domain with the DHCP role on it. Sure You can cluster the DHCP and the management is done on one console and if one DHCP server fails the fail-over will take place and the scopes are running on the second node.

Now two single servers with any scope rule you want.


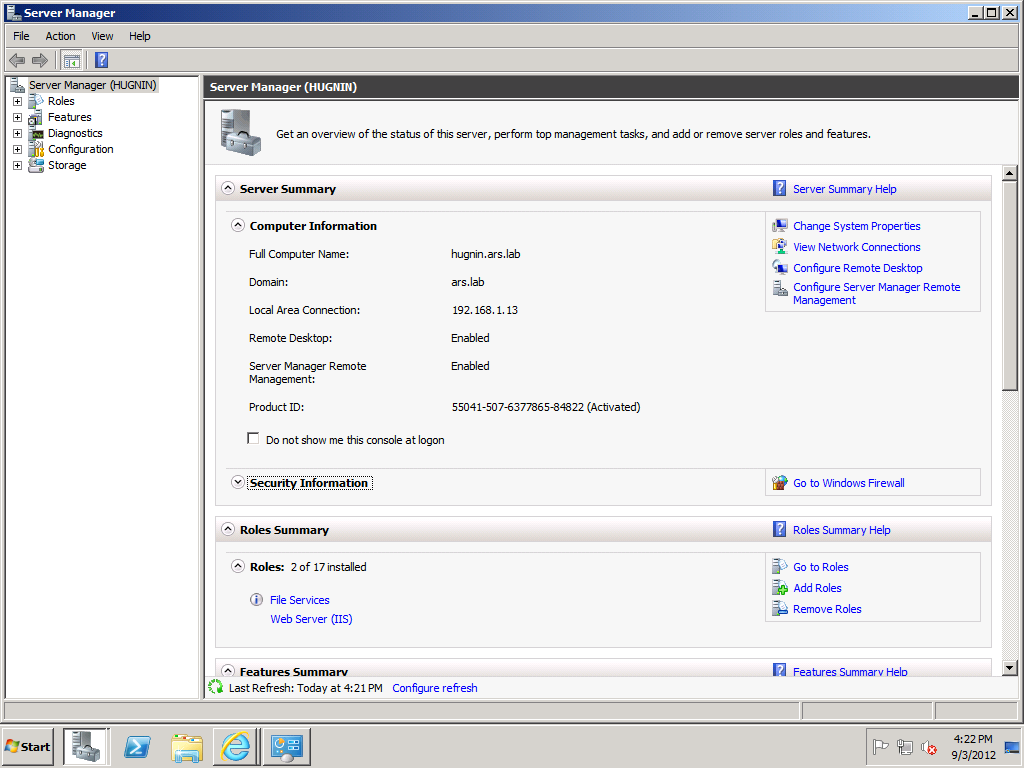
After the add role the wizard popsup and want to configure the DHCP server , the listener address:


If you don’t want to configure the scope right now, do not add scope. Fill in the domain and use IPv6 or WINS if you want it:


Now that the DHCP server is running we do a Split Scope.


Right click on the scope and do a split-scope again the wizard pops-up


Fill in the second DHCP server with or without scopes and select your scope range I choose for the common 80/20 or better 73 /27 scope bet you are all using this.


In the delay time you can make sure that one server is a faster listener than the other.


As you can see there is no scope on the secondary node , now that the wizard is finished the scope is auto configured on the other node.


If you do this, make sure all the settings and reservations are set on the first node because there is no wizard that syncs the servers.

Wednesday 21 October 2015

IT Technology: A New, Easier Way to Start a Skype Conversation and Invite Anyone to Join


We’ve been hard at work and are pleased to announce that now Skype users worldwide can invite anyone to join a Skype chat by sharing a unique link and anyone can join as a Guest on Skype for Web. Make sure you’re on the latest version of Skype for Windows, Mac or Web, click +New and send your unique URL to anyone, even if they’re not on Skype.

In the early days, Skype’s goal was to get the whole world talking for free; we wanted people to share more and to say hello to at least one new person every day. Over the years, our goal has remained the same: to break down communication barriers, making it easier for everyone to come together on Skype. Wherever you are, whatever device you have – from computer and mobile, to tablet and TV – Skype just works. Skype makes it easy to get together and chat one to one or in a group, to hear a friendly voice and see eye to eye, all for free.

Today, we’re excited to announce something new – a small change that will make a big difference to how people use Skype every day. We’ve started to roll-out the ability for users to invite anyone to join a Skype chat by sharing a unique link – send it however you want, in an email, on Facebook, WhatsApp, Messenger or Twitter.

But best of all, anyone can join the chat as a guest from their computer using Skype for Web and enjoy one to one or group instant messaging, voice and video calls. No Skype account or app download required. Now you can use Skype to chat with anyone and not just the people in your Skype contact list.

Friday 16 October 2015

Microsoft: Get Mailbox Folder Sizes with PowerShell

The command below allows you to get the folder sizes of a specific mailbox:
Get-MailboxFolderStatistics <user name> | Select Name,FolderSize,ItemsinFolder

Friday 9 October 2015

IT Security: DNS Sinkhole

A DNS sinkhole, also known as a sinkhole server, internet sinkhole, or BlackholeDNS is a DNS server that gives out false information, to prevent the use of the domain names it represents.

A sinkhole is a standard DNS server that has been configured to hand out non-routeable addresses for all domains in the sinkhole, so that every computer that uses it will fail to get access to the real website. The higher up the DNS server is, the more computers it will block. Some of the larger botnets have been made unusable by TLD sinkholes that span the entire Internet. DNS Sinkholes are effective at detecting and blocking malicious traffic, and used to combat bots and other unwanted traffic.

A sinkhole does not need to be a large DNS server, it only needs to be in the DNS lookup chain. The local hosts file on a Windows, Unix or Linux computer is checked before DNS servers, and can also be used to block sites in the same way.

Sinkholes can be used both constructively and destructively, depending on the target.

One use is to stop botnets, by interrupting the DNS names the botnet is programmed to use for coordination. The most common use of a hosts file-based sinkhole is to block ad serving sites.

Microsoft: Unable to Delete Desktop Icon or Keep Coming Back

<< Error Message >>
Are you sure you want to Delete the icon/file/folder from your desktop/folder/drive?
To restore it later, Go to Display in Control Panel.

<< Solution >>
1. Open command prompt
2. Run the following commands:
@echo off
taskkill /F /IM explorer.exe
attrib -h  "%userprofile%\Local Settings\Application Data\IconCache.db"
del "%userprofile%\Local Settings\Application Data\IconCache.db"
start explorer.exe
cls
echo Icon cache cleared!
pause

* Note: The steps above are to rebuild the Windows icon cache.

Wednesday 7 October 2015

Microsoft: View Date and Time of the Emails Moved to Deleted Items

If you know the approximate date when you deleted an item, add the Modified column to the Deleted Items folder view. Here's how:
a. On the View tab, in the Current View group, click View Settings.

b. Click Columns.

c. In the drop down list under Select available columns from, select Date/Time fields.

d. Select Modified and then click Add. If you want, you can change the order that the columns appear.

e. When you're finished, click OK.

Then you can sort by the Modified column to group items deleted on a specific date. This is a good way to find messages from a deleted folder because they would all have the same modified date.

Casper: Configuring Supported Ciphers for Tomcat HTTPS Connections


<< Error Messsage >>
"Server has a weak ephemeral Diffie-Hellman public key" or ERR_SSL_WEAK_EPHEMERAL_DH_KEY

<< Solution >>
1. Open the server.xml file in a text editor
The server.xml file is located in:
    - Mac: /Library/JSS/Tomcat/conf/server.xml
    - Linux: /usr/local/jss/tomcat/conf/server.xml
    - Windows: C:\Program Files\JSS\Tomcat\conf\server.xml
* Note: It is recommended that you create a backup of the server.xml file before replacing the existing ciphers.

2. Search for the ciphers attribute in the Connector element for port="8443"

3. Replace the existing ciphers with the ciphers listed below. If the ciphers attribute is not present, add it to the Connector element
ciphers="TLS_ECDHE_RSA_WITH_AES_256_GCM_SHA384,TLS_ECDHE_ECDSA_WITH_AES_256_GCM_SHA384,TLS_ECDH_RSA_WITH_AES_256_GCM_SHA384,TLS_ECDH_ECDSA_WITH_AES_256_GCM_SHA384,TLS_ECDHE_RSA_WITH_AES_128_GCM_SHA256,TLS_ECDHE_ECDSA_WITH_AES_128_GCM_SHA256,TLS_ECDH_RSA_WITH_AES_128_GCM_SHA256,TLS_ECDH_ECDSA_WITH_AES_128_GCM_SHA256,TLS_ECDHE_RSA_WITH_AES_256_CBC_SHA384,TLS_ECDHE_ECDSA_WITH_AES_256_CBC_SHA384,TLS_ECDHE_RSA_WITH_AES_256_CBC_SHA,TLS_ECDHE_ECDSA_WITH_AES_256_CBC_SHA,TLS_ECDH_RSA_WITH_AES_256_CBC_SHA384,TLS_ECDH_ECDSA_WITH_AES_256_CBC_SHA384,TLS_ECDH_RSA_WITH_AES_256_CBC_SHA,TLS_ECDH_ECDSA_WITH_AES_256_CBC_SHA,TLS_ECDHE_RSA_WITH_AES_128_CBC_SHA256,TLS_ECDHE_ECDSA_WITH_AES_128_CBC_SHA256,TLS_ECDHE_RSA_WITH_AES_128_CBC_SHA,TLS_ECDHE_ECDSA_WITH_AES_128_CBC_SHA,TLS_ECDH_RSA_WITH_AES_128_CBC_SHA256,TLS_ECDH_ECDSA_WITH_AES_128_CBC_SHA256,TLS_ECDH_RSA_WITH_AES_128_CBC_SHA,TLS_ECDH_ECDSA_WITH_AES_128_CBC_SHA"
* Note: In addition, if you are running Java 1.6 or a JDS instance in your environment, you must also include the following cipher:
TLS_RSA_WITH_AES_128_CBC_SHA

5. Save and close the server.xml file

6. Restart Tomcat

Tuesday 6 October 2015

Microsoft: Remove an Email from All Mailboxes by Subject

To remove an email from all the mailboxes by subject, please follow the steps below:
1. Open Exchange Management Shell

2. Type in the commands below:
Add-RoleGroupMember "Discovery Management" -Member "User Name"

* Note: Replace the User Name with the person whom you want to give access to search and delete

3. Add the user in Mailbox Import Export Role by running the commands below in Exchange Management Shell:
New-Managementroleassignment –Role "Mailbox Import Export" –User "User Name"

* Note: Replace the User Name with the person whom you want to give access to search and delete

4. Close and reopen the Exchange Mangement Shell so that the new commands will start working

5. Type in the commands below to search and delete a specific email:
Get-MailBox -resultsize unlimited | Search-Mailbox -SearchQuery "Subject:'virus'" -DeleteContent

* Note: Replace the virus with the subject of the email you would like to search and delete

6. Type in A to search and delete from all the mailboxes

Thursday 1 October 2015

Microsoft: Cannot Connect to Remote Computer from Windows 2008 R2 to Windows 7


You are not allowed to use Server Manager to connect to a Windows 7 client computer. Please see the Remote Management with Server Manager.

Alternatively, you may connect with Computer Management.