
Friday, 27 November 2015
Microsoft: Unexplained NetBIOS Traffic When Doing Traceroute
NBSTAT queries are often used to resolve an IP address to a NetBIOS name. During the Traceroute process, it looks up the NetBIOS name because it appears that a DNS reverse lookup doesn't work:

Microsoft: Microsoft Sysinternals Suite

Microsoft Sysinternals Suite is a bundling of the following selected Sysinternals Utilities:
- AccessChk
- AccessEnum
- AdExplorer
- AdRestore
- Autologon
- Autoruns
- BgInfo
- CacheSet
- ClockRes
- Contig
- Coreinfo
- Ctrl2Cap
- DebugView
- Desktops
- DiskExt
- DiskMon
- DiskView
- Disk Usage (DU)
- EFSDump
- FileMon
- Handle
- Hex2dec
- Junction
- LDMDump
- ListDLLs
- LiveKd
- LoadOrder
- LogonSessions
- NewSid
- NTFSInfo
- PageDefrag
- PendMoves
- PipeList
- PortMon
- ProcessExplorer
- Process Monitor
- ProcFeatures
- PsExec
- PsFile
- PsGetSid
- PsInfo
- PsKill
- PsList
- PsLoggedOn
- PsLogList
- PsPasswd
- PsService
- PsShutdown
- PsSuspend
- RegDelNull
- RegJump
- RegMon
- RootkitRevealer
- SDelete
- ShareEnum
- ShellRunas
- SigCheck
- Streams
- Strings
- Sync
- TCPView
- VMMap
- VolumeID
- WhoIs
- WinObj
- ZoomIt
Google: Allowing Less Secure Apps to Access Your Account
Google may block sign-in attempts from some apps or devices that do not use modern security standards. Since these apps and devices are easier to break into, blocking them helps keep your account safe.
Some examples of apps that do not support the latest security standards include:
1. The Mail app on your iPhone or iPad with iOS 6 or below
2. The Mail app on your Windows phone preceding the 8.1 release
3. Some Desktop mail clients like Microsoft Outlook and Mozilla Thunderbird
<< Change account access for less secure apps >>
To help keep Google Apps users' accounts secure, we may block less secure apps from accessing Google Apps accounts. As a Google Apps user, you will see a "Password incorrect" error when trying to sign in. If this is the case, you have two options:
* Option 1: Upgrade to a more secure app that uses the most up to date security measures. All Google products, like Gmail, use the latest security measures.
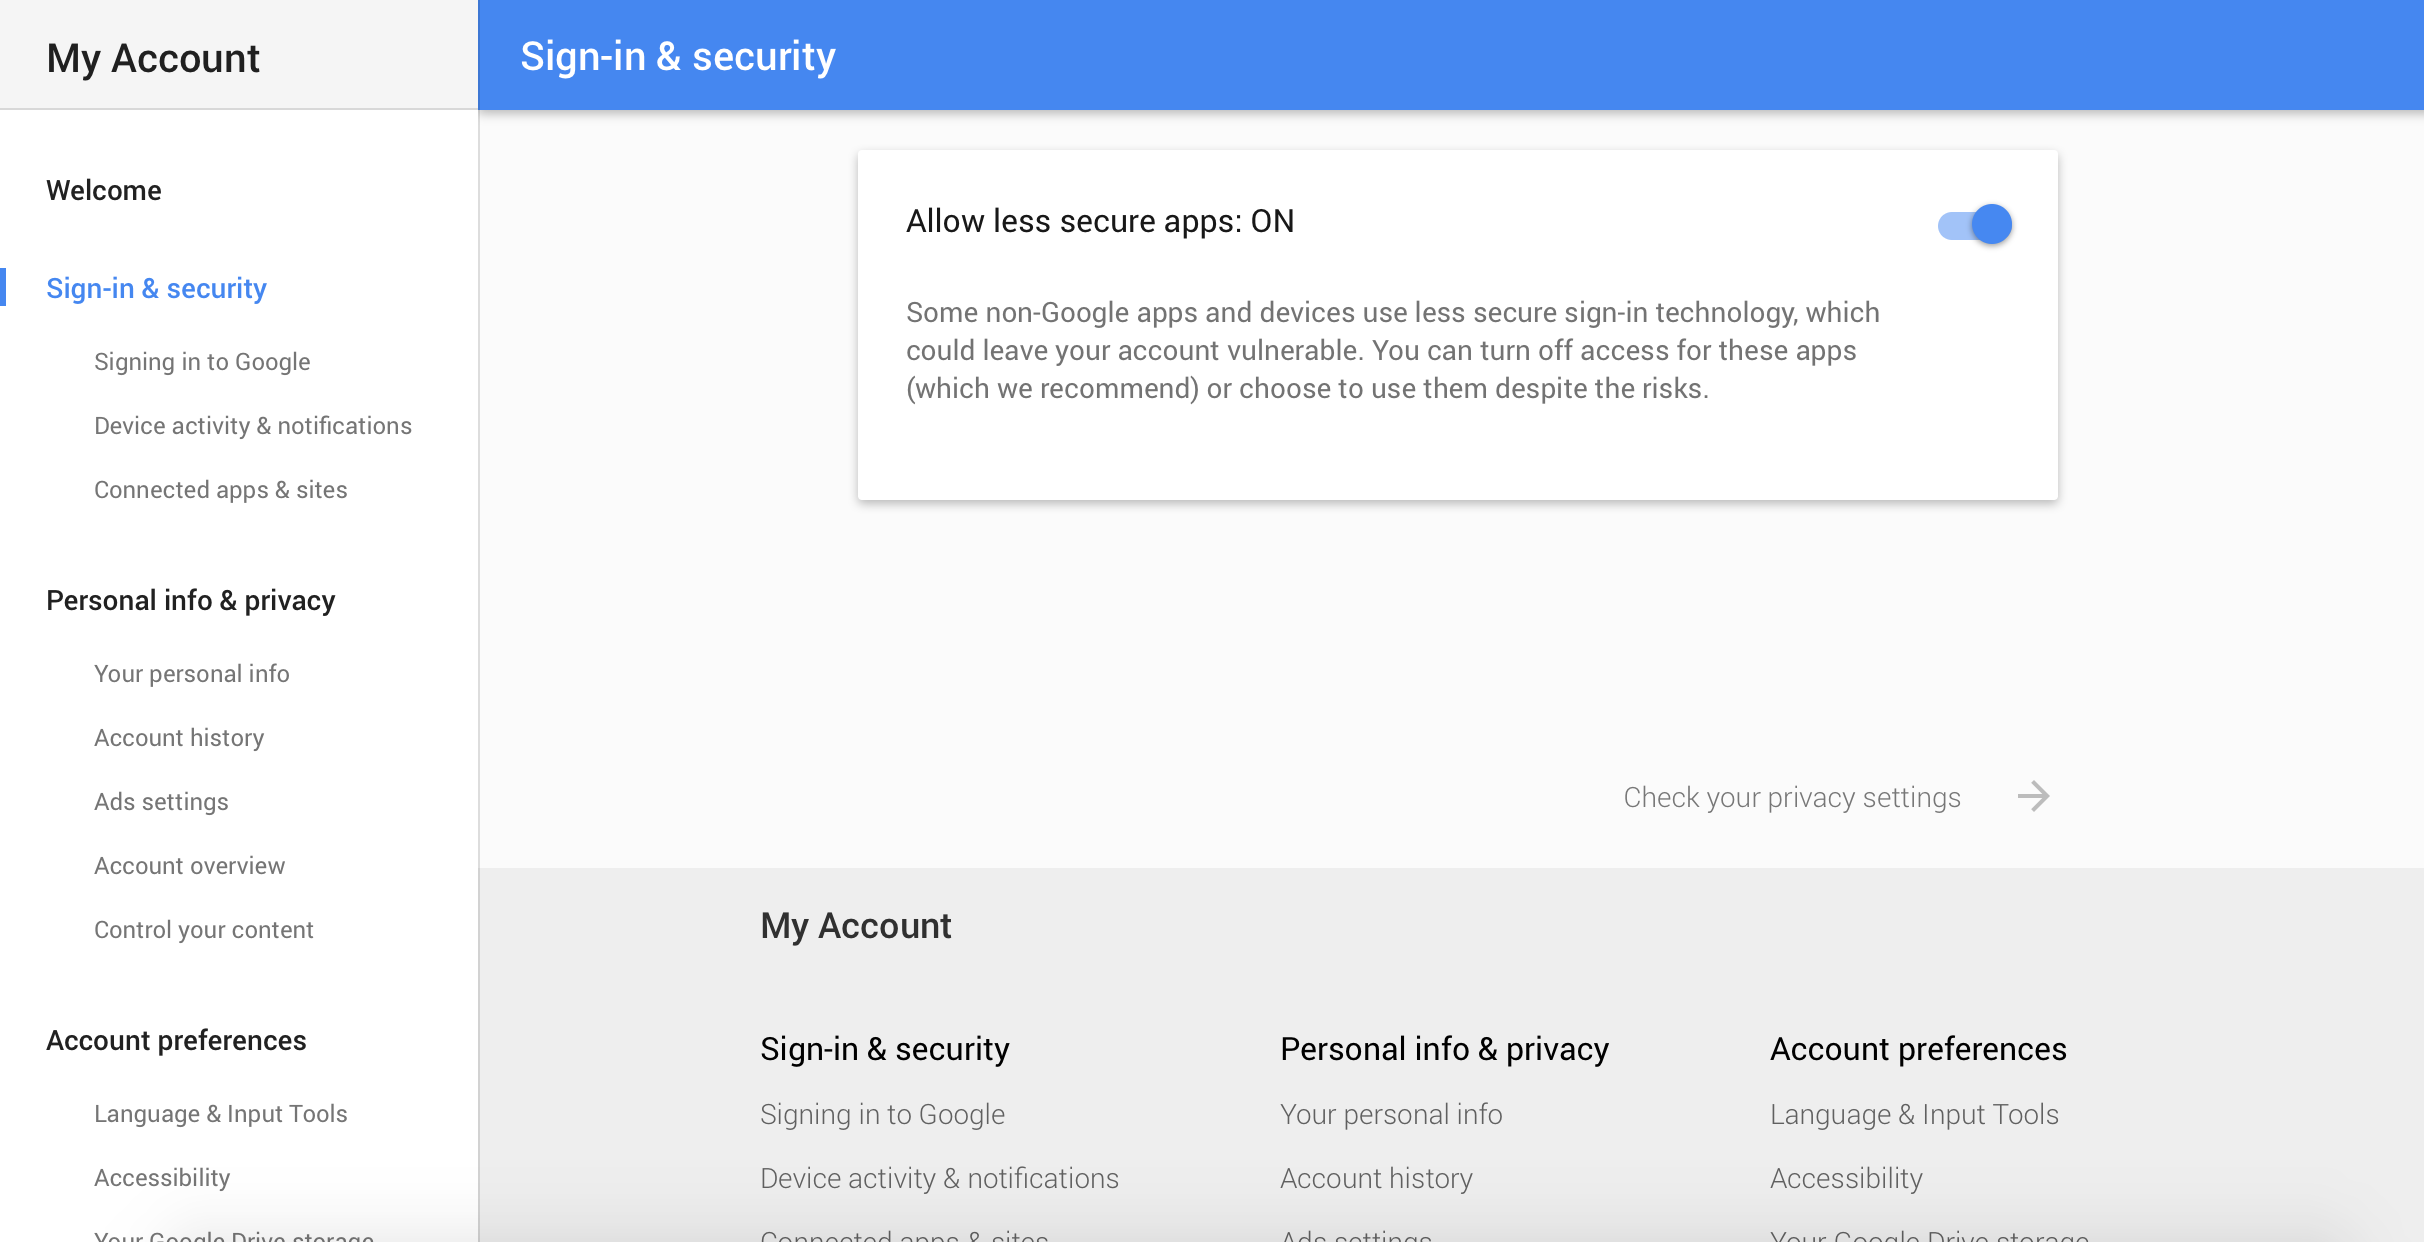
* Option 2: Change your settings to allow less secure apps to access your account. We don't recommend this option because it might make it easier for someone to break into your account. If you want to allow access anyway, follow these steps:
1. Go to the "Less secure apps" section in My Account.
2. Next to "Access for less secure apps," select Turn on. (Note to Google Apps users: This setting is hidden if your administrator has locked less secure app account access.)
Thursday, 26 November 2015
AWS: Regions and Endpoints
To reduce data latency in your applications, most Amazon Web Services offer a regional endpoint to make your requests. An endpoint is a URL that is the entry point for a web service. For example, https://dynamodb.us-west-2.amazonaws.com is an entry point for the Amazon DynamoDB service.
Some services, such as IAM, do not support regions; therefore, their endpoints do not include a region. Some services, such as Amazon EC2, let you specify an endpoint that does not include a specific region, for example, https://ec2.amazonaws.com. In that case, AWS routes the endpoint to us-east-1.
If a service supports regions, the resources in each region are independent. For example, if you create an Amazon EC2 instance or an Amazon SQS queue in one region, the instance or queue is independent from instances or queues in another region.
For information about which regions are supported for each service, please go to here.
Wednesday, 25 November 2015
Microsoft: Enable IMAP4 or POP3 in Microsoft Exchange

Step 1: Start Microsoft Exchange IMAP4 or POP3 Service
1. Click Start, point to Programs, point to Administrative Tools, and then click Services.
2. To start the Microsoft Exchange IMAP4 service, in the results pane, right-click Microsoft Exchange IMAP4 or POP3, and then click Start.
Step 2: Configure IP Addresses and Ports for POP3 and IMAP4 Access
1. In the console tree of Exchange Management Console ( EMC ), navigate to Server Configuration > Client Access.
2. In the work pane, click the POP3 and IMAP4 tab.
3. Select either POP3 or IMAP4, and then under POP3 or IMAP4, click Properties in the action pane.
4. On the Binding tab, under TLS or Unencrypted Connections, click Add.
5. On the TLS or Unencrypted Connection Settings page, under IP address to Use, do one of the following:
a. To use all available IP addresses for a server, select Use all IP addresses available on this server.
b. To manually specify an address, select Specify an IP address, and then enter an IP address in the dialog box.
6. Under Port to Use, in the box next to Port, enter a port number, or accept the default port.
7. Click OK to save your changes.
* Note: Make sure you have allowed the specified IMAP4 port at the firewall.
IT Security: Relevant Knowledge Spyware / Adware

Relevant Knowledge is classified as spyware or adware by some of the anti-virus software vendors, e.g. Symantec, McAfee, CA, BitDefender, F-Secure and some others. Detections: Spyware.Marketscore, Proxy-OSS, Adware.Relevant.0961. Relevant Knowledge monitors browsing habits and purchasing activities. The data collected is sent to the creator of the application or third-parties. It displays surveys in a pop-up window. Relevant Knowledge uses Internet connection in the background without a user's knowledge and in some cases may even affect Internet connection speed because your Internet connections will go through its own proxy. RelevantKnowledge is bundled in many freeware and commercial applications and it is introduced to a user when those commercial or free products are installed. It could be Windows screensavers, themes, games, etc. That's why you should read user agreement very carefully before installing such applications; otherwise you may install Relevant Knowledge or similar spyware/adware without even realizing it. If you recently noticed a Relevant Knowledge icon on your computer task bar which is a gray circle with lines running through it like latitude and longitude lines on a rounded surface and rlvknlg.exe in your process list then your computer is infected with Relevant Knowledge. To remove it from your computer, please follow the removal instructions below.
1. First of all, download recommended anti-malware software and run a full system scan. It will detect and remove this infection from your computer. You may then follow the manual removal instructions below to remove the leftover traces of this browser hijacker. Hopefully you won't have to do that.
2. As this infection is known to be installed by vulnerabilities in out-dated and insecure programs, it is strongly suggested that you use an automatic software update tool to scan for vulnerable programs on your computer.
3. Go to the Start Menu. Select Control Panel → Add/Remove Programs.
If you are using Windows Vista or Windows 7, select Control Panel → Uninstall a Program.
4. Search for Relevant Knowledge in the list. Click Uninstall up near the top of the window.
5. Restart your computer. Relevant Knowledge should be gone. If it's still on your computer, please end RelevantKnowledge's process using Task Manager (rlvknlg.exe) and delete files from C:\Program Files\RelevantKnowledge\ folder manually.
* Note:
Associated Relevant Knowledge files and registry values:
<< Files >>
C:\Program Files\RelevantKnowledge\nscf.dat
C:\Program Files\RelevantKnowledge\rlls64.dll
C:\Program Files\RelevantKnowledge\rlls.dll
C:\Program Files\RelevantKnowledge\rloci.bin
C:\Program Files\RelevantKnowledge\rlservice.exe
C:\Program Files\RelevantKnowledge\rlvknlg64.exe
C:\Program Files\RelevantKnowledge\rlvknlg.exe
<< Registry values >>
HKEY_CURRENT_USER\Software\Microsoft\Windows\CurrentVersion\Explorer\MenuOrder\Start Menu\Programs\RelevantKnowledge
HKEY_LOCAL_MACHINE\SOFTWARE\Microsoft\Windows\CurrentVersion\Run "RelevantKnowledge"
HKEY_CURRENT_USER\Software\Microsoft\Windows\CurrentVersion\RunOnce "OSSProxy" rlvknlg.exe
HKEY_CURRENT_USER\Software\Microsoft\Windows\ShellNoRoam\MUICache Data "RelevantKnowledge"
HKEY_LOCAL_MACHINE\SOFTWARE\Microsoft\Windows\CurrentVersion\Uninstall\{d08d9f98-1c78-4704-87e6-368b0023d831}
HKEY_LOCAL_MACHINE\SYSTEM\ControlSet001\Services\SharedAccess\Parameters\FirewallPolicy\StandardProfile\AuthorizedApplications\List "c:\program files\relevantknowledge\rlvknlg.exe:*:Enabled:rlvknlg.exe"
Microsoft: Disk Cleanup in Windows Server 2008

So in order to use cleanmgr.exe you’ll need to copy two files that are already present on the server, cleanmgr.exe and cleanmgr.exe.mui. Use the following table to locate the files for your operating system.

Once you’ve located the files move them to the following locations:
1. Cleanmgr.exe should go in %systemroot%\System32.
2. Cleanmgr.exe.mui should go in %systemroot%\System32\en-US.
You can now launch the Disk cleanup tool by running Cleanmgr.exe from the command prompt.
Disk Cleanup can now be run by entering Cleanmgr.exe into a command prompt, or by clicking Start and typing Cleanmgr into the Search bar.
Microsoft: Change SharePoint Log Location and Log Retention

Tuesday, 24 November 2015
Palo Alto: Obtain Sessions, Packet Rate and Throughput

You may use the command below to obtain the sessions, packet rate and throughput of your Palo Alto firewall:
show system statistics session
Google: Robots.txt

* Note: You only need a robots.txt file if your site includes content that you don't want Google or other search engines to index.
To test which URLs Google can and cannot access on your website, try using the robots.txt Tester.
Before you build your robots.txt, you should know the risks of this URL blocking method. At times, you might want to consider other mechanisms to ensure your URLs are not findable on the web.
1. Robots.txt instructions are directives only
The instructions in robots.txt files cannot enforce crawler behavior to your site; instead, these instructions act as directives to the crawlers accessing your site. While Googlebot and other respectable web crawlers obey the instructions in a robots.txt file, other crawlers might not. Therefore, if you want to keep information secure from web crawlers, it’s better to use other blocking methods, such as password-protecting private files on your server.
2. Different crawlers interpret syntax differently
Although respectable web crawlers follow the directives in a robots.txt file, each crawler might interpret the directives differently. You should know the proper syntax for addressing different web crawlers as some might not understand certain instructions.
3. Your robots.txt directives can’t prevent references to your URLs from other sites
While Google won't crawl or index the content blocked by robots.txt, we might still find and index a disallowed URL from other places on the web. As a result, the URL address and, potentially, other publicly available information such as anchor text in links to the site can still appear in Google search results. You can stop your URL from appearing in Google Search results completely by using your robots.txt in combination with other URL blocking methods, such as password-protecting the files on your server, or inserting indexing directive meta tags into your HTML.
* Note: Combining multiple crawling and indexing directives might cause some directives to counteract other directives.
Monday, 16 November 2015
Cisco: Configure NetFlow on Cisco Catalyst 6509

Being a switch/router hybrid model, the configuration is a little different from standard Cisco routers models, like the 2811, but not too much.
I would also recommend checking out this great resource directly from Cisco to configure the Catalyst 6509 for NetFlow.
With most Cisco routers, there are two sets of commands used to enable NetFlow. However, with the 6509, there are technically three sets of commands.
To enable NetFlow on the router, you need the following:
switch (config)#ip flow-export source (insert interface name here)
switch (config)#ip flow-export version 5
switch (config)#ip flow-export destination (netflow collector ip address) (port to export flows to)
switch (config)#ip flow ingress layer2-switched vlan (insert vlans X,Y,X)
switch (config)#ip flow-cache timeout active 1
Sample:
switch (config)#ip flow-export source vlan88
switch (config)#ip flow-export version 5
switch (config)#ip flow-export destination 10.10.100.98 2055
switch (config)#ip flow ingress layer2-switched vlan 88
switch (config)#ip flow-cache timeout active 1
Once those are in place, we now need to configure NetFlow for the switched traffic:
switch (config)#mls nde sender version 5
switch (config)#mls flow ip interface-full
switch (config)#mls nde interface
switch (config)#mls aging long 64
switch (config)#mls aging normal 64
After you have configured these global, you now can configure each of the interfaces themselves for NetFlow:
switch (config-if)#ip route-cache flow
or
switch (config-if)#ip flow ingress
* Note:
1. ip route-cache flow will enable flows on the physical interface and all sub-interfaces associated with it.
2. ip flow ingress will enable flows on individual sub-interfaces, as opposed to all of them on the same interface.
You may finally use the show mls nde command to display the NetFlow export information.
Friday, 13 November 2015
Spiceworks: Office 365 Admin Account Cannot Authenticate for Cloud Services

In order for the integration / authentication to work, the Spiceworks host need to have PowerShell 2.0 and .NET 3.5 SP1 installed.
Thursday, 12 November 2015
Paessler: Monitor Google Apps with PRTG

With PRTG, you can now monitor the uptime of Google Apps, free space of Google Drive and data of Google Analytics.
In order to monitor the uptime of Google Apps, you just have to create a device with your Google domain. Then, add the Common SaaS sensor.
For Google Drive and Google Analytics, at first, create a device with your Google domain. Then, add the Google Drive and Google Anaytics sensors. In order to add the sensors, you have to press on the Get Access Code button and get the OAuth code.
Microsoft: Windows Server 2008 End of Life

Here is the information of Windows Server 2008 EOL:
- Lifecycle Start Date: 22 October 2009
- Mainstream Support End Date: 13 January 2015
- Extended Support End Date: 14 January 2020
- Service Pack Support End Date: 9 April 2013
Microsoft: Difference Between End of Mainstream Support and End of Extended Support

Ending mainstream support for a product means Microsoft will no longer be enhancing that product. What it does NOT mean is there will no longer be fixes for security and reliability issues. Microsoft will continue to issue bug fixes and patches for security and reliability issues for Windows 7 and Windows 2008/2008 R2 after January 13, 2015.
When mainstream support ends, this is what occurs:
1. Microsoft no longer supplies non-security hotfixes unless you have an extended support agreement
2. All warranty claims end
3. Microsoft no long accepts requests for new features and design changes
When extended support ends, you can no longer count on any security patches or reliability patches.
Google: End of Chrome's Support

Google has announced the end of Chrome’s support for Windows XP, as well as Windows Vista, and Mac OS X 10.6, 10.7, and 10.8, since these platforms are no longer actively supported by Microsoft and Apple. Starting April 2016, Chrome will continue to function on these platforms but will no longer receive updates and security fixes.
If you are still on one of these unsupported platforms, Google encourages you to move to a newer operating system to ensure that you continue to receive the latest Chrome versions and features.
Wednesday, 11 November 2015
Paessler: Use StatusCake to Monitor Internal Devices with SMS Alert via PRTG
You may use the method below to monitor your internal devices with SMS alerts via PRTG. However, the alerts are the other way round:
StatusCake Alert Backup - PRTG / Internal Device Down
StatusCake Alert Down - PRTG / Internal Device Up
< StatusCake >
1. Add new test


2. Copy the URL

< PRTG >
1. Go to Setup > Account Settings > Notifications
2. Click on Add new notification and type in the necessary information as follows:
* Note: Change the URL of StatusCake from HTTPS to HTTP

3. Click on the respective sensor
4. Click on Notifications > Add State Trigger

Tuesday, 10 November 2015
Paessler: Email Round Trip Monitoring

Two new "Email Round Trip Monitoring" sensors ensure the end-to-end delivery of emails and make it possible to monitor availability and performance of a complete email delivery process.
<< How does it work? >>
There are two new sensor types for this task:
1. SMTP & IMAP Round Trip Sensor
2. SMTP & POP3 Round Trip Sensor
Both initially deliver an email to a mail server using SMTP. Afterwards a mailbox is scanned using POP3 or IMAP until the email arrives. The graph shows a sample configuration:
Step 1: PRTG delivers an email via the SMTP protocol to a mail server (just like an email client).
Step 2: The SMTP server delivers the email to a POP3 server (which can be located at a remote site, in your local LAN or on the same server as well).
Step 3: Every few seconds PRTG retrieves emails from the POP3 server until the test email arrives.
The test email contains a unique code in the topic which is used to identify the email (e.g. "PRTG7 Roundtrip Mail: {6D136420-5A3E-46CF-871A-1DAF0C4F3D5D}").
<< Recommended Configuration >>
Here is a simple concept to check delivery of email out of and into your organization:
1. Create a dedicated email account for this test in your mail system.
2. Set up an external email account (hosted mail server, freemailer, etc.) that delivers all emails back to an email account in your organization.
3. Set up PRTG's round trip sensor to send an email to the external email account using your LAN's mail server and then check for the mailbox on your mail system for arrival of the email.
With this technique you are testing multiple aspects of your email server setup as long as the sensor shows a green light:
1. Your email server accepts emails via SMTP.
2. Emails are being sent to the outside world (which means that your internet connection works, MX lookups for email delivery work, etc.).
3. Emails from external mail server can be delivered into your mail system (this includes that the MX records for your domain are correct, that your mail server can be reached from the outside world, that your email filtering is working, etc.).
4. Emails can be retrieved using POP3 (or IMAP).
<< Conclusion >>
These two new sensor types are a great tool to ensure delivery of email from and to your mail servers. Compared to the standard SMTP, POP3 and IMAP sensors - which only check the availability of these services - the two new sensor types actually monitor the complete transaction from accepting the mail on the first email server to delivery of the mail on the final POP3/IMAP server.
<< Sample Configuration >>
I have configured a SMTP & IMAP Round Trip Sensor between Microsoft Exchange and Google Mail. Here are the steps:
1. Setup the Receive Connector with Exchange Management Console


2. Create an Exchange account
3. Create an Gmail account
4. Change account access for less secure apps by going to My Account. In the "Less secure apps" section, next to "Access for less secure apps," select Turn on.
5. Required settings for the sensor:
-- Email Settings --
From: < Exchange email address >
To: < Gmail email address >
HELO Ident: < Exchange server >
-- Step 1: Send Email to Parent Device Using SMTP --
Port: 25
Timeout for SMTP Connection (Sec.): 300
SMTP Authentication Type: None
Additional Text for Email Subject: IMAP Roundtrip
-- Transport-Level Security --
SMTP Specific: Use Transport-Level Security if available using StartTLS (default)
-- Step 2: Check An IMAP Mailbox Until Email Arrives --
IP Address/DNS Name: imap.gmail.com
Mailbox: Ibox
Port: 993
Connection Interval (Sec.): 10
Maximum Trip Time (Sec.): 300
Username: < Gmail email address >
Password: < Gmail password >
Search Method: Search email directly (default)
-- Transport-Level Security --
SMTP Specific: Use Transport-Level Security if available
Google: Setting Up IMAP or POP Access for Google Mail / Gmail

<< Setting Up IMAP Access >>
Incoming mail (IMAP) server - requires SSL: imap.gmail.com
Incoming mail server Use SSL: Yes
Incoming mail port: 993
Outgoing mail (SMTP) server: smtp.gmail.com (use authentication)
Outgoing mail Use Authentication: Yes
Outgoing mail Use STARTTLS: Yes (some clients call this SSL)
Outgoing mail port: 465 or 587
Account name: ( Email address of your Gmail )
Email Address: ( Email address of your Gmail )
Password: ( Gmail Password )
<< Setting Up POP Access >>
Incoming mail (POP3) server - requires SSL: pop.gmail.com
Incoming mail server Use SSL: yes
Incoming mail port: 995
Outgoing mail (SMTP) server - requires TLS3 or SSL: smtp.gmail.com (use authentication)
Outgoing mail Use Authentication: Yes
Outgoing mail port for TLS/STARTTLS: 587
Outgoing mail port for SSL: 465
Account name: ( Email address of your Gmail )
Email Address: ( Email address of your Gmail )
Password: ( Gmail Password )
Microsoft: Configure a Relay Connector for Exchange Server 2010
In most Exchange Server 2010 environments there will be the need to allow relaying for certain hosts, devices or applications to send email via the Exchange server. This is common with multi-function devices such as network attached printer/scanners, or applications such as backup software that send email reports.
SMTP communication is handled by the Hub Transport server in an Exchange organization. The transport service listens for SMTP connections on it’s default Receive Connector. However, this connector is secured by default to not allow anonymous connections (ie, the type of connection most non-Exchange systems will be making).
You can see this in effect if you telnet to the server on port 25 and try to initiate unauthenticated SMTP communications.

For some Hub Transport servers that are internet-facing, anonymous connections may already be enabled. In those cases relay would still be denied but will behave differently than the first example.

You’ll note that relay is denied if I try to send from an @hotmail.com address to an @gmail.com address, because neither is a valid domain for the Exchange organization. But with Anonymous Users enabled on the Receive Connector I can send from an @hotmail.com address to a valid local address.

However if I try to relay out to an external recipient, the Exchange server does not allow it.

To permit a non-Exchange server to relay mail we can create a new Receive Connector on the Hub Transport server. Launch the Exchange Management Console and navigate to Server Management, and then Hub Transport. Select the Hub Transport server you wish to create the new Receive Connector on, and from the Actions pane of the console choose New Receive Connector.

Give the new connector a name such as “Relay ” and click Next to continue.

You can leave the local network settings as is, or optionally you can use a dedicated IP address for this connector if one has already been allocated to the server. Using dedicated IP addresses for each connector is sometimes required if you need to create connectors with different authentication settings, but for a general relay connector it is not necessary to change it.

Highlight the default IP range in the remote network settings and click the red X to delete it.

Now click the Add button and enter the IP address of the server you want to allow to relay through the Exchange server. Click OK to add it and then Next to continue.

Click the New button to complete the wizard.
The Receive Connector has now been created but is not yet ready to allow the server to relay through it. Go back to the Exchange Management Console, right-click the newly created Receive Connector and choose properties.
Select the Permission Groups tab and tick the Exchange Servers box.

Select the Authentication Tab and tick the Externally Secured box.

Apply the changes and the Receive Connector is now ready for the server to relay through.

Because the remote IP range has been secured to that single IP address, any other servers on different IP addresses still won’t be able to relay through the Exchange Server. From any other IP address not included in the remote IP range on the Receive Connector relay will be denied.

SMTP communication is handled by the Hub Transport server in an Exchange organization. The transport service listens for SMTP connections on it’s default Receive Connector. However, this connector is secured by default to not allow anonymous connections (ie, the type of connection most non-Exchange systems will be making).
You can see this in effect if you telnet to the server on port 25 and try to initiate unauthenticated SMTP communications.

For some Hub Transport servers that are internet-facing, anonymous connections may already be enabled. In those cases relay would still be denied but will behave differently than the first example.

You’ll note that relay is denied if I try to send from an @hotmail.com address to an @gmail.com address, because neither is a valid domain for the Exchange organization. But with Anonymous Users enabled on the Receive Connector I can send from an @hotmail.com address to a valid local address.

However if I try to relay out to an external recipient, the Exchange server does not allow it.

To permit a non-Exchange server to relay mail we can create a new Receive Connector on the Hub Transport server. Launch the Exchange Management Console and navigate to Server Management, and then Hub Transport. Select the Hub Transport server you wish to create the new Receive Connector on, and from the Actions pane of the console choose New Receive Connector.

Give the new connector a name such as “Relay ” and click Next to continue.

You can leave the local network settings as is, or optionally you can use a dedicated IP address for this connector if one has already been allocated to the server. Using dedicated IP addresses for each connector is sometimes required if you need to create connectors with different authentication settings, but for a general relay connector it is not necessary to change it.

Highlight the default IP range in the remote network settings and click the red X to delete it.

Now click the Add button and enter the IP address of the server you want to allow to relay through the Exchange server. Click OK to add it and then Next to continue.

Click the New button to complete the wizard.
The Receive Connector has now been created but is not yet ready to allow the server to relay through it. Go back to the Exchange Management Console, right-click the newly created Receive Connector and choose properties.
Select the Permission Groups tab and tick the Exchange Servers box.
Select the Authentication Tab and tick the Externally Secured box.
Apply the changes and the Receive Connector is now ready for the server to relay through.

Because the remote IP range has been secured to that single IP address, any other servers on different IP addresses still won’t be able to relay through the Exchange Server. From any other IP address not included in the remote IP range on the Receive Connector relay will be denied.

Microsoft: Test SMTP Service
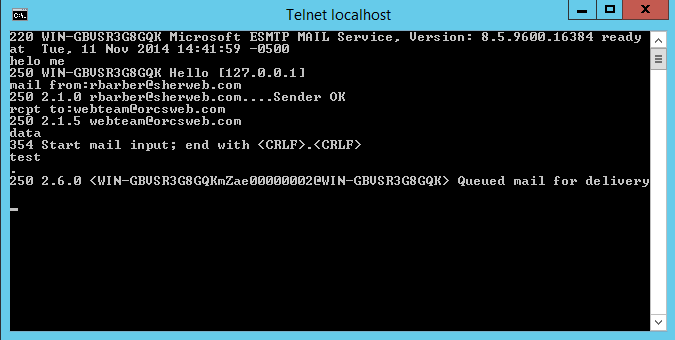
To test the SMTP service, follow these steps:
1. Type Telnet at a command prompt, and then press ENTER.
2. At the telnet prompt, type set LocalEcho, press ENTER, and then type open <machinename> 25, and then press ENTER.
The output resembles the following:
220 computername.microsoft.com ESMTP Server (Microsoft Exchange Internet Mail Service 5.5.2651.58) ready
3. Type helo me, and then press ENTER.
The output resembles the following:
250 OK
4. Type mail from:email@domain.com, and then press ENTER.
The output resembles the following:
250 OK - mail from <email@domain.com>
5. Type rcpt to:youremail@yourdomain.com, and then press ENTER.
The output resembles the following:
250 OK - Recipient <youremail@yourdomain.com>
6. Type Data, and then press ENTER.
The output resembles the following:
354 Send data. End with CRLF.CRLF
7. Type Subject:This is a test, and then press ENTER two times.
8. Type Testing, and then press ENTER.
9. Press ENTER, type a period (.), and then press ENTER.
The output resembles the following:
250 OK
10. Type quit, and then press ENTER.
The output resembles the following:
221 Closing Port / Mail queued for delivery
VMware: Enable or Disable Storage DRS for a Virtual Machine

To enable or disable Storage DRS for a virtual machine, please follow the steps below:
1. Right-click on the Storage DRS cluster
2. Choose Edit Settings
3. Click on Virtual Machine Settings
4. In the Automation Level column, you can see the current Storage DRS settings on a per VM level and change the settings accordingly
Thursday, 5 November 2015
Microsoft: Turn Junk Mail Filters Off via Exchange 2010
There are two recommended methods for you to turn off the junk mail filtering via Exchange 2010.
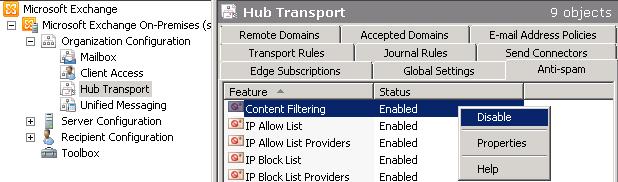
<< Method 1 >>
1. Open the EMC on the Edge Transport server.
2. In the console tree, click Edge Transport.
3. In the work pane, click the Anti-spam tab, and then select Content Filtering.
4. In the action pane, click Enable or Disable as appropriate.
<< Method 2 >>
1. Open the Exchange Powershell
2. Type in Set-ContentFilterConfig -Enabled $false
* Note:
When you disable content filtering, the underlying Content Filter agent is still enabled. To disable the Content Filter agent, run the command: Disable-TransportAgent "Content Filter Agent"
* Note:
To verify that you have successfully enabled or disabled content filtering, do the following:
Run the following command:
Get-ContentFilterConfig | Format-List Enabled
and verify the value of the Enabled property that's displayed.
Wednesday, 4 November 2015
VMware: vSphere HA Initiated a Virtual Machine Failover Action in Cluster - Warning

The solution of this warning is to turn OFF and turn ON the vSphere HA feature as follows:
1. From the vSphere Client, display the cluster in the inventory.
2. Right-click the cluster and select Edit Settings.
3. In the left pane of the Cluster Settings dialog box, select VM Monitoring.
4. Select Cluster Features and then in the right pane, clear Turn on VMware HA.
5. After the task has completed, check Turn on VMware HA.
6. Click OK.
Subscribe to:
Posts (Atom)