Tuesday 29 December 2015

VMware: Quick stats on [SERVERNAME] is not up-to-date


<< Solution >>
1. Connect to the vCenter Server using the vSphere Client and administrator credentials.

2. Select Administration > vCenter Server Settings to display the vCenter Server Settings dialog box.

3. In the settings list, select Advanced Settings.

4. Add the following parameters:
vpxd.quickStats.HostStatsCheck = False
vpxd.quickStats.ConfigIssues = False

5. Restart the vCenter Server services.

Wednesday 16 December 2015

Microsoft: Microsoft Allowing OneDrive Users on Free Tier to Keep 15GB Free Storage and Camera Roll Bonus

Microsoft made the controversial decision to reduce its unlimited OneDrive storage to 1TB for Office 365 Home, Personal and University subscribers starting early next year. OneDrive's free storage will also be reduced from 15GB to 5GB, and the 15GB camera roll bonus will be discontinued.

Microsoft's decision was poorly received by OneDrive customers, who created an online petition called "give us back our storage" with over 70,000 votes. The backlash has prompted the company to apologize and introduce a new offer for OneDrive customers to keep their 15GB free storage and 15GB camera roll bonus.

Microsoft Group Program Manager Douglas Pearce (via The Verge):
" In November we made a business decision to reduce storage limits for OneDrive. Since then, we’ve heard clearly from our Windows and OneDrive fans about the frustration and disappointment we have caused. We realize the announcement came across as blaming customers for using our product. For this, we are truly sorry and would like to apologize to the community. […]

In addition, for our biggest fans who have been loyal advocates for OneDrive, we are adding a new offer that lets you keep your existing 15 GB of free storage when the changes happen next year. If you also have the 15 GB camera roll bonus, you’ll be able to keep that as well. From now until the end of January, you can sign up to keep your storage at the link below.
OneDrive users who sign up by January 31, 2016 will be able to keep their 15GB of free storage and 15GB camera roll bonus, even after Microsoft reduces its free storage tier to 5GB next year. OneDrive customers using more than 5GB of free storage will also receive a free Office 365 Personal subscription with 1TB storage for 12 months. "

Microsoft is not backing down from its larger plans to discontinue unlimited storage, a decision it made because a small number of users exceeded 75 TB storage, or 14,000 times the average, by "backing up multiple PCs and and storing entire movie collections and DVR recordings." The changes take place in early 2016.

Monday 14 December 2015

Microsoft: Install and Configure Google Chrome Silently via SCCM


The following process has been tested and confirmed working with Google Chrome and ConfigMgr / SCCM R2.

It does the following tasks:
- Install Google Chrome silently
- Set Google Search as the default search engine
- Does NOT set Google Chrome as the default browser
- No ‘Getting Started’ page
- No ‘Auto Update’
- Remove desktop shortcut

1. Download the latest version of the MSI install file from http://www.google.com/chrome/eula.html?msi=true

2. Create a text file called install.cmd and copy in the following information:
msiexec /qn /norestart /i "%~dp0GoogleChromeStandaloneEnterprise.msi"
if exist "c:\Program Files\Google\Chrome\Application\master_preferences" copy /y "%~dp0master_preferences" "C:\Program Files\Google\Chrome\Application\master_preferences"
if exist "c:\Program Files (x86)\Google\Chrome\Application\master_preferences" copy /y "%~dp0master_preferences" "C:\Program Files (x86)\Google\Chrome\Application\master_preferences"
reg add HKLM\Software\Policies\Google\Update /f /v AutoUpdateCheckPeriodMinutes /d 0
sc stop gupdate
sc config gupdate start= disabled

3. Create a text file called master_preferences and copy in the following information:
{
"homepage" : "http://www.google.com.au",
"homepage_is_newtabpage" : false,
"browser" : {
"show_home_button" : true,
"check_default_browser" : false,
"window_placement": {
"bottom": 1000,
"left": 10,
"maximized": false,
"right": 904,
"top": 10,
"work_area_bottom": 1010,
"work_area_left": 0,
"work_area_right": 1680,
"work_area_top": 0
}
},
"bookmark_bar" : {
"show_on_all_tabs" : true
},
"distribution" : {
"skip_first_run_ui" : true,
"show_welcome_page" : false,
"import_search_engine" : false,
"import_history" : false,
"create_all_shortcuts" : true,
"do_not_launch_chrome" : true,
"make_chrome_default" : false
}
}

4. Copy the MSI install file, master_preferences and install.cmd to your software package share

5. You can now create your SCCM package or deploy the software by using install.cmd

IT Technology: Java Error 1721 - There is a problem with this Windows Installer Package


<< Error Messages >>
While attempting to install Java, a message box with the following error appears:
Error 1721. There is a problem with this Windows Installer package. A program required for this install to complete could not be run. Contact your support or package vendor

<< Cause >>
Error 1721 is an Install Shield error code which indicates that the installation process has failed.

<< Solution >>
1. Disable/Configure any anti-spyware or anti-virus software on your system during the Java installation process.
2. Check to see if any spyware or adware is installed on your system blocking the completion of install process.
3. Check to see if you find any unwanted entry in Add/Remove Programs or Internet Explorer - Add-ons section (Tools - Internet Options - Programs - Manage Add-ons). If you found one, remove/disable this entry.
4. On Windows Vista, disable UAC (User Account Control) feature for your account and download and install the offline installation package.

IT Technology: Export Facebook Data Including Photos, Messages and ETC.


1. Go to account in your Facebook navigation.
    https://www.facebook.com/editaccount.php
2. Click on Download a copy of your Facebook data.
3. Click on Start My Archive at Download Your Information page.
4. By following the instruction given, you can now download all your information, including your photos and videos, posts on your wall, all of your messages, your friend list and other content you have shared on your profile.

Cisco: Deferred Releases


Deferred releases ( DF ) are not available for downloading because of known defects. These should not be installed on your Cisco devices. Furthermore, Cisco has stopped support on these IOS versions as they have too many bugs.

Friday 11 December 2015

IT Technology: Cisco VS Huawei Commands

CiscoHuawei
EXEC modeuser view
traceroutetracert
terminal length 0screen-length 0 temporary
showdisplay
show versiondisplay version
show history-commanddisplay history-command
show interfacesdisplay interface
show ip interfacedisplay ip interface
show ip routedisplay ip routing-table
show ip bgpdisplay bgp routing-table
show clockdisplay clock
show flashdir flash:
show loggingdisplay logbuffer
show snmpdisplay snmp-agent statistics
show usersdisplay users
show tech-supportdisplay diagnostic-information
write terminal,
show running-config
display current-configuration
more nvram:startup-config,
show startup-config
display saved-configuration
write erasereset saved-configuration
write memory,
copy running-config startup-config
save
clearreset
clear countersreset counters interface
clear interfacereset counters interface
clear access-list countersreset acl counter all
noundo
debug / no debugdebugging / undo debugging
reloadreboot
enablesuper
disablesuper 0
erasedelete
exitquit
configure terminalsystem-view
configuration modesystem view
endreturn
snmp-serversnmp-agent
hostnamesysname
router bgpbgp
router ospfospf
router riprip
shutdown / no shutdownshutdown / undo shutdown

Google: Disable Downloading, Printing and Copying for Any Files Stored in Google Drive

Google rolled out a small but significant addition to Google Drive. In short, you now have more control over the content you distribute via the service: You can now disable downloading, printing, and copying for any shared file.

The new option is available for any file stored in Google Drive, not just documents, spreadsheets, and presentations created with Google Docs. That means if you decide to upload, say, a PDF to Google Drive, you can lock it down before you share it with your friends or colleagues.

To use the feature, open the sharing dialogue from any Google Drive file and click on Advanced in the lower right corner. Check the “Disable options to download, print, and copy for commentators and viewers” box and click “Save changes.”

Note that you can’t choose to limit one or two of the three options: If you’re disabling downloading, you’re also disabling printing and copying. On the flip-side, developers can access this functionality through the Google Drive API.

Next, you can’t enable this feature if you don’t own the file. This makes sense: If a file is shared with you, you can’t then go ahead and disable downloading, printing, and copying for it. Being the file owner is a requirement (though if you really want, you could make a copy of the file, limit it, and then re-share it).

Finally, this feature removes all entry points for downloading, printing, and copying in not just Google Drive, but also Google Docs, Google Sheets, and Google Slides on all platforms. This is very much limited to the Google ecosystem: If you share the file via email, Google can’t help you.

A notification at the top of the File and Edit menus will let the user know a given file has been limited:

Google described the feature as “perfect for when the file you’re sharing contains sensitive information that you don’t want shared broadly or leaked.” That said, remember that you’re still sharing the file: If someone really wants, they can manually reproduce the content, or just screenshot each page.

This feature is meant as a deterrent and a reminder. It’s a way to communicate that the file owner doesn’t want the contents to be shared broadly.

“Disable options to download, print, and copy for commentators and viewers” is a neat addition, but it’s not a foolproof security or privacy feature.

IT Technology: Degradation of Fiber

Degradation is the loss of quality of an electronic signal, which may be categorized as either "graceful" or "catastrophic", and has the following meanings:
1. The deterioration in quality, level, or standard of performance of a functional unit.
2. In communications, a condition in which one or more of the required performance parameters fall outside predetermined limits, resulting in a lower quality of service.

There are several forms and causes of degradation in electric signals, both in the time domain and in the physical domain, including runt pulse, voltage spike, jitter, wander, swim, drift, glitch, ringing, crosstalk, antenna effect (not the same antenna effect as in IC manufacturing), and phase noise.

Degradation usually refers to reduction in quality of an analog or digital signal. When a signal is being transmitted or received, it undergoes changes which are undesirable. These changes are called degradation. Degradation is usually caused by:
1. Weather or environmental conditions
2. Terrain
3. Other signals
4. Faulty or poor quality equipment

A signal has two important factors: frequency and wavelength. If weather is fine and temperature is normal, the signal can be transmitted within given frequency and wavelength limits. The signal travels with velocity c ≤ 3*108 m/s, which is equal to the speed of light. For frequency f Hz and wavelength λ m, we have:

f = c/λ

So, when weather conditions deteriorate, frequency f has to be increased. This causes the wavelength λ to decrease, which means that the signal then travels lesser distance.

IT Technology: Signal Loss Calculation for Fiber

For multimode fiber, the loss is about 3 dB per km for 850 nm sources, 1 dB per km for 1300 nm. (3.5 and 1.5 dB/km max per EIA/TIA 568) This roughly translates into a loss of 0.1 dB per 100 feet (30 m) for 850 nm, 0.1 dB per 300 feet(100 m) for 1300 nm.
For singlemode fiber, the loss is about 0.5 dB per km for 1310 nm sources, 0.4 dB per km for 1550 nm. (1.0 dB/km for premises/0.5 dB/km at either wavelength for outside plant max per EIA/TIA 568)This roughly translates into a loss of 0.1 dB per 600 (200m) feet for 1310 nm, 0.1 dB per 750 feet (250m) for 1300 nm.


So for the estimated loss of a cable plant, calculate the approximate loss as:
(0.5 dB X # connectors) + (0.2 dB X# splices) + (fiber attenuation X the total length of cable)

A basic guideline for loss measurements is to estimate the loss using these approximate values:
Connector loss: 0.5 dB per mated pair
Splice loss: 0.2 dB per splice
Fiber loss:
Multimode: 3 dB/km @ 850 nm, 1 dB/km @ 1300 nm
Singlemode: 0.4 dB/km @ 1300 nm, 0.3 dB/km @ 1550 nm
For example: a 1.5 km multimode link with 3 connections @ 850 nm:
Loss = (1.5 km X 3 dB/km) + (3 conn X 0.5 dB)
Loss = 4.5 dB + 1.5 dB = 6 dB

Thursday 10 December 2015

Cisco: Active Directory Integration for Application Users in Cisco Unified Communications Manager (CUCM)


By default, on a non-integrated Cisco Unified Communications Manager (CUCM), there are two types of users: end users and application users:
1. End users — All users associated with a physical person and an interactive login. This category includes all IP Telephony users, as well as Unified CM administrators when you use the User Groups and Roles configuration (equivalent to the Cisco Multilevel Administration feature in prior Unified CM versions).
2. Application users — All users associated with other Cisco IP Communications features or applications, such as Cisco Attendant Console, Cisco IP Contact Center Express, or Cisco Unified Communications Manager Assistant. These applications need to authenticate with Unified CM, but these internal users do not have an interactive login. This serves purely for internal communications between applications, for example, CCMAdministrator, AC, JTAPI, RM, CCMQRTSecureSysUser, CCMQRTSysUser, CCMSysUser, IPMASecureSysUser, IPMASysUser, WDSecureSysUser, and WDSysUser.

When you integrate Cisco Unified Communications Manager with the Active Directory, the Directory Integration process uses an internal tool called Cisco Directory Synchronization (DirSync) on the Unified CM to synchronize a number of user attributes (either manually or periodically) from a corporate LDAP directory. When this feature is enabled, end users are automatically provisioned from the corporate directory.

* Note: Application users are kept separate and are still provisioned through the Unified CM Administration interface. In other words, application users cannot be synchronized from AD.

In summary, end users are defined in the corporate directory and synchronized into the Unified CM database, while application users are stored only in the Unified CM database and do not need to be defined in the corporate directory.

Cisco: Configure Interdigit Timeout to Reduce Dial Delay


In order to allow sufficient time for a user to dial a telephone number, Cisco CallManager relies on a timer referred to as the interdigit timeout. This parameter indicates the duration Cisco CallManager waits after each digit is entered before it assumes the user has finished entering digits. However, users of Cisco IP phone can encounter instances when Cisco IP phone takes several seconds to connect the call after dialing all the digits in the called party's phone number.

Cisco CallManager contains a service parameter that enables you to change the interdigit timeout value. You can easily configure this parameter. The default timeout is set to 10 seconds. If you do not modify the settings, the system waits 10 seconds after each digit for a new one to be introduced. Consequently, after the last digit has been inserted, the CallManager routes the call after 10 seconds. You can observe this especially on variable-length dialplan configurations. Please change the service parameter by following the steps below:
1. Select Service > Service Parameters to go to Cisco CallManager System Parameters from the Cisco CallManager Administration page.
2. Select the name of your server and service from the Server and Service fields.
3. Select TimerT302_msec.
4. In the Value field, type the timeout you want to configure (specify the time in milliseconds). For example, if you want to configure 7 seconds as the interdigit timeout, type 7000.
* Note: Do not set the interdigit timeout value too low, otherwise the user does not have enough time to enter the digits while calling.
5. Click Update.
6. Restart Cisco CallManager to implement the changes.

Microsoft: Skype for Business Cloud PBX


Most companies manage their telephone communications using a PBX (private branch exchange) system, which is essentially hardware that acts as a private telephone switchboard. Now, with Skype for Business Cloud PBX, you can eliminate separate PBX systems for users and move the functions of the PBX into the cloud, assign and manage phone numbers using Skype controls within your Office 365 admin console, and easily enable dial-in telephone numbers for your Skype meetings.

You can get phone numbers directly from Microsoft or port existing phone numbers into Skype for Business and assign or re-assign them to your users as needed. If your organization has hundreds or thousands of users, all of this can be automated via PowerShell scripting. So all of the communication needs of a new user—from email and collaboration to meetings and phones—can be automated and delivered straight from Office 365. Additionally, with PSTN Conferencing, an administrator can easily enable phone numbers to be added to their users’ Skype meetings, so anyone who receives the meeting request can dial in via a landline or mobile phone.

Cloud PBX also works with your existing carrier circuits with on-premises PSTN connectivity. In this configuration, you connect Skype for Business software to communicate between your existing PBX or PSTN Gateway and Cloud PBX in Office 365. This allows you to continue to use your carrier contract and circuit for phone calls while the users are hosted in Office 365.

Ideally, the connection between anything on-premises and online would be done using Azure ExpressRoute for Office 365, but you can use a normal Internet connection as well. Cloud PBX and PSTN Conferencing are included in Office 365 E5 or can be purchased standalone.

IT Technology: Difference between OTF (Open Type) and TTF (True Type) Font Formats

OTF is more likely to be a “better” font, as it supports more advanced typesetting features (smallcaps, alternates, ligatures and so on actually inside the font rather than in fiddly separate expert set fonts). It can also contain either spline (TTF-style) or Bezier (PostScript Type 1-style) curves, so hopefully you're getting the shapes the font was originally designed in and not a potentially-poorer-quality conversion.

On the other hand, if you're downloading free fonts from shovelware sites, you're unlikely to get any of that. Indeed, you may simple be getting a TTF font renamed to OTF.

IT Technology: Convert SSL Certificate from .PFX to .CRT


You may convert your SSL certificate from .pfx to .crt by following the steps below:
1. Install OpenSSL by going to https://slproweb.com/products/Win32OpenSSL.html
2. Copy the .pfx file you would like to convert in OpenSSL\Bin
3. Open command prompt and cd to the OpenSSL\Bin folder
4. Type in the following command to convert the certificate:
    openssl pkcs12 -in [yourfile.pfx] -clcerts -nokeys -out [certificate.crt]
5. Type in the import passphrase.
6. Done! The converted .crt file is located in OpenSSL\Bin

Wednesday 9 December 2015

Tuesday 8 December 2015

Apple: Unable to Power On Your iMac

<< Symptom >>
The iMac does not power on when you push the "power" button. Nothing happen! It looks like it is not connected to a power source (but it is).

<< Rule Out Display Issues >>
First, rule out the display as the source of the issue. To be sure you're not having a display issue, press your computer's power button. If your computer has power but doesn't have any video:
1. You may hear a startup chime.
2. You may hear fan or drive noise.
3. You may see a light from the Sleep LED (if your Mac has one).
4. Pressing the Caps Lock key on the keyboard causes it to light.

<< Solution >>
1. Verify that you have a good connection from your iMac to the wall outlet by confirming the power cord and adapter are securely connected and plugged in. To check if the wall outlet is working, plug in a lamp or other electrical device.
2. If the wall outlet is working and you continue to have no power, try another power cord or adapter if available. If it works, you might need a replacement cord or adapter.
3. Disconnect all accessories that are plugged in to your computer. This includes things like printers, USB hubs, or mobile devices.
4. Hold down the power button for ten seconds. Then, press the power button again to see if the computer turns on.
5. Reset SMC.
    a. Shut down the computer.
    b. Unplug the power cord.
    c. Wait fifteen seconds.
    d. Attach the power cord.
    e. Wait five seconds, then press the power button to turn on the computer.
6. Reconnect the memory.
    a. Shut down the computer.
    b. Unplug the power cord.
    c. Remove the memory.
    d. Install the memory again.

Thursday 3 December 2015

IT Security: System Explorer


System Explorer is a free, awards winning software for exploration and management of System Internals. This small software includes many useful tools which help you keep your system under control. With System Explorer, you get also fast access to file database which help you to determine unwanted processes or threats. System Explorer is translated into 29 languages and is available for download in installer and portable version.

<< Main Features >>
1. Detailed information about Tasks, Processes, Modules, Startups, IE Addons, Uninstallers, Windows, Services, Drivers, Connections and Opened Files.
2. Easy check of suspicious files via File Database or the VirusTotal service.
3. Easy monitoring of processes activities and System changes.
4. Usage graphs of important System resources.
5. Tray Hint with detailed System and Battery status.
6. WMI Browser and System Additional Info
7. Multilanguage Support

Palo Alto: Antivirus Feature - Prevent Sending SMTP Server from Resending Blocked Message


Palo Alto antivirus feature is able to block viruses via email by sending a SMTP response code of 541 to the sender. Response code 541 is a code with a description as “Recipient Address Rejected – Blacklist, Anti-Spam, Mailfilter/Firewall Block”.

By default, SMTP, POP3 and IMAP have the default action set to ALERT is because in most cases there is already a dedicated Antivirus gateway solution in place for these protocols. Specifically for POP3 and IMAP, it is not possible to clean files or properly terminate an infected file-transfer in-stream without affecting the entire session. This is due to shortcomings in these protocols to deal with this kind of situation.

If no dedicated Antivirus gateway solution is present for SMTP, it is possible to define a custom Antivirus profile and apply the reset-both action to infected attachments. In such case, a 541 response will be sent back to the sending SMTP server to prevent it from resending the blocked message.

Of course, the custom antivirus profile must be used in the appropriate security policy rules for the SMTP mail transfer.

IT Security: Testing Your Virus Protection with EICAR Test File


EICAR Standard Anti-Virus Test File (EICAR) is a safe file developed by the European Institute for Computer Anti-Virus Research (EICAR) for testing anitvirus software. It is commonly used to
1. Confirm that the antivirus software is installed correctly
2. Demonstrate what happens when a virus is found
3. Check internal procedures and reactions when a virus is found

Your antivirus software detects EICAR as if it were a real virus.

EICAR is a good way to get familiar with your antivirus software. The EICAR test file is available in the following four formats:
1. eicar.com: EICAR test file.
2. eicar.com.txt: Copy of eicar.com with a different file name.
3. eicar_com.zip: EICAR ZIP file for testing compressed files.
4. eicarcom2.zip: An archive which contains the eicar_com.zip file for testing nested compressed files.

To download the EICAR test files, visit the EICAR test file page.

Or you may make the test file by copying the following line into its own text file, and then name it EICAR.TXT:
X5O!P%@AP[4\PZX54(P^)7CC)7}$EICAR-STANDARD-ANTIVIRUS-TEST-FILE!$H+H*

When done, you will have a 69-byte or 70-byte virus test file.

Microsoft: Windows Containers


Applications fuel innovation in the cloud and mobile era. Containers, and the ecosystem that is developing around them, will empower software developers to create the next generation of applications experiences.

<< What are Containers >>
They are an isolated, resource controlled, and portable operating environment.

Basically, a container is an isolated place where an application can run without affecting the rest of the system and without the system affecting the application. Containers are the next evolution in virtualization.

If you were inside a container, it would look very much like you were inside a freshly installed physical computer or a virtual machine. And, to Docker, a Windows Server Container can be managed in the same way as any other container.

<< Windows Containers >>
Windows Containers include two different container types, or runtimes.

Windows Server Containers – provide application isolation through process and namespace isolation technology. A Windows Server container shares a kernel with the container host and all containers running on the host.

Hyper-V Containers – expand on the isolation provided by Windows Server Containers by running each container in a highly optimized virtual machine. In this configuration the kernel of the container host is not shared with the Hyper-V Containers.

<< Container Fundamentals >>
When you begin working with containers you will notice many similarities between a container and a virtual machine. A container runs an operating system, has a file system and can be accessed over a network just as if it was a physical or virtual computer system. That said, the technology and concepts behind containers are very different from that of virtual machines.

The following key concepts will be helpful as you begin creating and working with Windows Containers.
Container Host: Physical or Virtual computer system configured with the Windows Container feature. The container host will run one or more Windows Containers.

Container Image: As modifications are made to a containers file system or registry, such as with software installation they are captured in a sandbox. In many cases you may want to capture this state such that new containers can be created that inherit these changes. That’s what an image is – once the container has stopped you can either discard that sandbox or you can convert it into a new container image. For example, let’s imagine that you have deployed a container from the Windows Server Core OS image. You then install MySQL into this container. Creating a new image from this container would act as a deployable version of the container. This image would only contain the changes made (MySQL), however would work as a layer on top of the Container OS Image.

Sandbox: Once a container has been started, all write actions such as file system modifications, registry modifications or software installations are captured in this ‘sandbox’ layer.

Container OS Image: Containers are deployed from images. The container OS image is the first layer in potentially many image layers that make up a container. This image provides the operating system environment. A Container OS Image is Immutable, it cannot be modified.

Container Repository: Each time a container image is created the container image and its dependencies are stored in a local repository. These images can be reused many times on the container host. The container images can also be stored in a public or private registry such as DockerHub so that they can be used across many different container host.

Container Management Technology: Windows Containers can be managed using both PowerShell and Docker. With either one of these tools you can create new containers, container images as well as manage the container lifecycle.

<< Containers for Developers >>
From a developer’s desktop to a testing machine to a set of production machines, a Docker image can be created that will deploy identically across any environment in seconds. This story has created a massive and growing ecosystem of applications packaged in Docker containers, with DockerHub, the public containerized-application registry that Docker maintains, currently publishing more than 180,000 applications in the public community repository.

When you containerize an app, only the app and the components needed to run the app are combined into an "image". Containers are then created from this image as you need them. You can also use an image as a baseline to create another image, making image creation even faster. Multiple containers can share the same image, which means containers start very quickly and use fewer resources. For example, you can use containers to spin up light-weight and portable app components – or ‘micro-services’ – for distributed apps and quickly scale each service separately.

Because the container has everything it needs to run your application, they are very portable and can run on any machine that is running Windows Server 2016. You can create and test containers locally, then deploy that same container image to your company's private cloud, public cloud or service provider. The natural agility of Containers supports modern app development patterns in large scale, virtualized and cloud environments.

With containers, developers can build an app in any language. These apps are completely portable and can run anywhere - laptop, desktop, server, private cloud, public cloud or service provider - without any code changes.

Containers helps developers build and ship higher-quality applications, faster.

<< Containers for IT Professionals >>
IT Professionals can use containers to provide standardized environments for their development, QA, and production teams. They no longer have to worry about complex installation and configuration steps. By using containers, systems administrators abstract away differences in OS installations and underlying infrastructure.

Containers help admins create an infrastructure that is simpler to update and maintain.

Wednesday 2 December 2015

Microsoft: Partitioning and Grooming Has Not Completed Recently in Microsoft System Center Operations Manager ( SCOM )


To solve this problem, you can execute grooming by opening SQL Management Studio, and opening a query window against the OpsDB – and running the grooming procedure “EXEC p_PartitioningAndGrooming”.

Friday 27 November 2015

Microsoft: Unexplained NetBIOS Traffic When Doing Traceroute

NBSTAT queries are often used to resolve an IP address to a NetBIOS name. During the Traceroute process, it looks up the NetBIOS name because it appears that a DNS reverse lookup doesn't work:

Microsoft: Microsoft Sysinternals Suite

Microsoft Sysinternals Suite is all their utilities rolled up into one. This file contains the individual troubleshooting tools and help files. It does not contain non-troubleshooting tools like the BSOD Screen Saver or NotMyFault.

Microsoft Sysinternals Suite is a bundling of the following selected Sysinternals Utilities:
  • AccessChk
  • AccessEnum 
  • AdExplorer 
  • AdRestore 
  • Autologon 
  • Autoruns 
  • BgInfo 
  • CacheSet 
  • ClockRes 
  • Contig 
  • Coreinfo 
  • Ctrl2Cap 
  • DebugView 
  • Desktops 
  • DiskExt 
  • DiskMon 
  • DiskView 
  • Disk Usage (DU) 
  • EFSDump 
  • FileMon 
  • Handle 
  • Hex2dec 
  • Junction 
  • LDMDump 
  • ListDLLs 
  • LiveKd 
  • LoadOrder 
  • LogonSessions 
  • NewSid 
  • NTFSInfo 
  • PageDefrag 
  • PendMoves 
  • PipeList 
  • PortMon 
  • ProcessExplorer 
  • Process Monitor 
  • ProcFeatures 
  • PsExec 
  • PsFile 
  • PsGetSid 
  • PsInfo 
  • PsKill 
  • PsList 
  • PsLoggedOn 
  • PsLogList 
  • PsPasswd 
  • PsService
  • PsShutdown
  • PsSuspend 
  • RegDelNull 
  • RegJump 
  • RegMon 
  • RootkitRevealer 
  • SDelete 
  • ShareEnum 
  • ShellRunas 
  • SigCheck 
  • Streams 
  • Strings 
  • Sync 
  • TCPView 
  • VMMap 
  • VolumeID 
  • WhoIs 
  • WinObj 
  • ZoomIt

Google: Allowing Less Secure Apps to Access Your Account


Google may block sign-in attempts from some apps or devices that do not use modern security standards. Since these apps and devices are easier to break into, blocking them helps keep your account safe.

Some examples of apps that do not support the latest security standards include:
1. The Mail app on your iPhone or iPad with iOS 6 or below
2. The Mail app on your Windows phone preceding the 8.1 release
3. Some Desktop mail clients like Microsoft Outlook and Mozilla Thunderbird

<< Change account access for less secure apps >>
To help keep Google Apps users' accounts secure, we may block less secure apps from accessing Google Apps accounts. As a Google Apps user, you will see a "Password incorrect" error when trying to sign in. If this is the case, you have two options:

* Option 1: Upgrade to a more secure app that uses the most up to date security measures. All Google products, like Gmail, use the latest security measures.

* Option 2: Change your settings to allow less secure apps to access your account. We don't recommend this option because it might make it easier for someone to break into your account. If you want to allow access anyway, follow these steps:
   1. Go to the "Less secure apps" section in My Account.
   2. Next to "Access for less secure apps," select Turn on. (Note to Google Apps users: This setting is hidden if your administrator has locked less secure app account access.)

Thursday 26 November 2015

AWS: Regions and Endpoints


To reduce data latency in your applications, most Amazon Web Services offer a regional endpoint to make your requests. An endpoint is a URL that is the entry point for a web service. For example, https://dynamodb.us-west-2.amazonaws.com is an entry point for the Amazon DynamoDB service.

Some services, such as IAM, do not support regions; therefore, their endpoints do not include a region. Some services, such as Amazon EC2, let you specify an endpoint that does not include a specific region, for example, https://ec2.amazonaws.com. In that case, AWS routes the endpoint to us-east-1.

If a service supports regions, the resources in each region are independent. For example, if you create an Amazon EC2 instance or an Amazon SQS queue in one region, the instance or queue is independent from instances or queues in another region.

For information about which regions are supported for each service, please go to here.

Wednesday 25 November 2015

Microsoft: Enable IMAP4 or POP3 in Microsoft Exchange


Step 1: Start Microsoft Exchange IMAP4 or POP3 Service
1. Click Start, point to Programs, point to Administrative Tools, and then click Services.
2. To start the Microsoft Exchange IMAP4 service, in the results pane, right-click Microsoft Exchange IMAP4 or POP3, and then click Start.

Step 2: Configure IP Addresses and Ports for POP3 and IMAP4 Access
1. In the console tree of Exchange Management Console ( EMC ), navigate to Server Configuration > Client Access.
2. In the work pane, click the POP3 and IMAP4 tab.
3. Select either POP3 or IMAP4, and then under POP3 or IMAP4, click Properties in the action pane.
4. On the Binding tab, under TLS or Unencrypted Connections, click Add.
5. On the TLS or Unencrypted Connection Settings page, under IP address to Use, do one of the following:
    a. To use all available IP addresses for a server, select Use all IP addresses available on this server.
    b. To manually specify an address, select Specify an IP address, and then enter an IP address in the dialog box.
6. Under Port to Use, in the box next to Port, enter a port number, or accept the default port.
7. Click OK to save your changes.

* Note: Make sure you have allowed the specified IMAP4 port at the firewall.

IT Security: Relevant Knowledge Spyware / Adware


Relevant Knowledge is classified as spyware or adware by some of the anti-virus software vendors, e.g. Symantec, McAfee, CA, BitDefender, F-Secure and some others. Detections: Spyware.Marketscore, Proxy-OSS, Adware.Relevant.0961. Relevant Knowledge monitors browsing habits and purchasing activities. The data collected is sent to the creator of the application or third-parties. It displays surveys in a pop-up window. Relevant Knowledge uses Internet connection in the background without a user's knowledge and in some cases may even affect Internet connection speed because your Internet connections will go through its own proxy. RelevantKnowledge is bundled in many freeware and commercial applications and it is introduced to a user when those commercial or free products are installed. It could be Windows screensavers, themes, games, etc. That's why you should read user agreement very carefully before installing such applications; otherwise you may install Relevant Knowledge or similar spyware/adware without even realizing it. If you recently noticed a Relevant Knowledge icon on your computer task bar which is a gray circle with lines running through it like latitude and longitude lines on a rounded surface and rlvknlg.exe in your process list then your computer is infected with Relevant Knowledge. To remove it from your computer, please follow the removal instructions below.

1. First of all, download recommended anti-malware software and run a full system scan. It will detect and remove this infection from your computer. You may then follow the manual removal instructions below to remove the leftover traces of this browser hijacker. Hopefully you won't have to do that.
2. As this infection is known to be installed by vulnerabilities in out-dated and insecure programs, it is strongly suggested that you use an automatic software update tool to scan for vulnerable programs on your computer.
3. Go to the Start Menu. Select Control Panel → Add/Remove Programs.
If you are using Windows Vista or Windows 7, select Control Panel → Uninstall a Program.
4. Search for Relevant Knowledge in the list. Click Uninstall up near the top of the window.
5. Restart your computer. Relevant Knowledge should be gone. If it's still on your computer, please end RelevantKnowledge's process using Task Manager (rlvknlg.exe) and delete files from C:\Program Files\RelevantKnowledge\ folder manually.

* Note:
Associated Relevant Knowledge files and registry values:
<< Files >>
C:\Program Files\RelevantKnowledge\nscf.dat
C:\Program Files\RelevantKnowledge\rlls64.dll
C:\Program Files\RelevantKnowledge\rlls.dll
C:\Program Files\RelevantKnowledge\rloci.bin
C:\Program Files\RelevantKnowledge\rlservice.exe
C:\Program Files\RelevantKnowledge\rlvknlg64.exe
C:\Program Files\RelevantKnowledge\rlvknlg.exe

<< Registry values >>
HKEY_CURRENT_USER\Software\Microsoft\Windows\CurrentVersion\Explorer\MenuOrder\Start Menu\Programs\RelevantKnowledge
HKEY_LOCAL_MACHINE\SOFTWARE\Microsoft\Windows\CurrentVersion\Run "RelevantKnowledge"
HKEY_CURRENT_USER\Software\Microsoft\Windows\CurrentVersion\RunOnce "OSSProxy" rlvknlg.exe
HKEY_CURRENT_USER\Software\Microsoft\Windows\ShellNoRoam\MUICache Data "RelevantKnowledge"
HKEY_LOCAL_MACHINE\SOFTWARE\Microsoft\Windows\CurrentVersion\Uninstall\{d08d9f98-1c78-4704-87e6-368b0023d831}
HKEY_LOCAL_MACHINE\SYSTEM\ControlSet001\Services\SharedAccess\Parameters\FirewallPolicy\StandardProfile\AuthorizedApplications\List "c:\program files\relevantknowledge\rlvknlg.exe:*:Enabled:rlvknlg.exe"

Microsoft: Disk Cleanup in Windows Server 2008


So in order to use cleanmgr.exe you’ll need to copy two files that are already present on the server, cleanmgr.exe and cleanmgr.exe.mui. Use the following table to locate the files for your operating system.

Once you’ve located the files move them to the following locations:
1. Cleanmgr.exe should go in %systemroot%\System32.
2. Cleanmgr.exe.mui should go in %systemroot%\System32\en-US.

You can now launch the Disk cleanup tool by running Cleanmgr.exe from the command prompt.

Disk Cleanup can now be run by entering Cleanmgr.exe into a command prompt, or by clicking Start and typing Cleanmgr into the Search bar.

Microsoft: Change SharePoint Log Location and Log Retention


As shown in the diagram above, you may change the log location and retention of the SharePoint by going to Central Administration: Monitoring > Configure Diagnostic Logging.

Tuesday 24 November 2015

Palo Alto: Obtain Sessions, Packet Rate and Throughput


You may use the command below to obtain the sessions, packet rate and throughput of your Palo Alto firewall:
show system statistics session

Google: Robots.txt

A robots.txt file is a file at the root of your site that indicates those parts of your site you don’t want accessed by search engine crawlers. The file uses the Robots Exclusion Standard, which is a protocol with a small set of commands that can be used to indicate access to your site by section and by specific kinds of web crawlers (such as mobile crawlers vs desktop crawlers).

* Note: You only need a robots.txt file if your site includes content that you don't want Google or other search engines to index.

To test which URLs Google can and cannot access on your website, try using the robots.txt Tester.

Before you build your robots.txt, you should know the risks of this URL blocking method. At times, you might want to consider other mechanisms to ensure your URLs are not findable on the web.

1. Robots.txt instructions are directives only
The instructions in robots.txt files cannot enforce crawler behavior to your site; instead, these instructions act as directives to the crawlers accessing your site. While Googlebot and other respectable web crawlers obey the instructions in a robots.txt file, other crawlers might not. Therefore, if you want to keep information secure from web crawlers, it’s better to use other blocking methods, such as password-protecting private files on your server.

2. Different crawlers interpret syntax differently
Although respectable web crawlers follow the directives in a robots.txt file, each crawler might interpret the directives differently. You should know the proper syntax for addressing different web crawlers as some might not understand certain instructions.

3. Your robots.txt directives can’t prevent references to your URLs from other sites
While Google won't crawl or index the content blocked by robots.txt, we might still find and index a disallowed URL from other places on the web. As a result, the URL address and, potentially, other publicly available information such as anchor text in links to the site can still appear in Google search results. You can stop your URL from appearing in Google Search results completely by using your robots.txt in combination with other URL blocking methods, such as password-protecting the files on your server, or inserting indexing directive meta tags into your HTML.

* Note: Combining multiple crawling and indexing directives might cause some directives to counteract other directives.

Monday 16 November 2015

Cisco: Configure NetFlow on Cisco Catalyst 6509


Being a switch/router hybrid model, the configuration is a little different from standard Cisco routers models, like the 2811, but not too much.

I would also recommend checking out this great resource directly from Cisco to configure the Catalyst 6509 for NetFlow.

With most Cisco routers, there are two sets of commands used to enable NetFlow. However, with the 6509, there are technically three sets of commands.

To enable NetFlow on the router, you need the following:
switch (config)#ip flow-export source (insert interface name here)
switch (config)#ip flow-export version 5
switch (config)#ip flow-export destination (netflow collector ip address) (port to export flows to)
switch (config)#ip flow ingress layer2-switched vlan (insert vlans X,Y,X)
switch (config)#ip flow-cache timeout active 1

Sample:
switch (config)#ip flow-export source vlan88
switch (config)#ip flow-export version 5
switch (config)#ip flow-export destination 10.10.100.98 2055
switch (config)#ip flow ingress layer2-switched vlan 88
switch (config)#ip flow-cache timeout active 1

Once those are in place, we now need to configure NetFlow for the switched traffic:
switch (config)#mls nde sender version 5
switch (config)#mls flow ip interface-full
switch (config)#mls nde interface
switch (config)#mls aging long 64
switch (config)#mls aging normal 64

After you have configured these global, you now can configure each of the interfaces themselves for NetFlow:
switch (config-if)#ip route-cache flow
or
switch (config-if)#ip flow ingress

* Note:
1. ip route-cache flow will enable flows on the physical interface and all sub-interfaces associated with it.
2. ip flow ingress will enable flows on individual sub-interfaces, as opposed to all of them on the same interface.

You may finally use the show mls nde command to display the NetFlow export information.

Friday 13 November 2015

Spiceworks: Office 365 Admin Account Cannot Authenticate for Cloud Services


In order for the integration / authentication to work, the Spiceworks host need to have PowerShell 2.0 and .NET 3.5 SP1 installed.

Thursday 12 November 2015

Paessler: Monitor Google Apps with PRTG


With PRTG, you can now monitor the uptime of Google Apps, free space of Google Drive and data of Google Analytics.

In order to monitor the uptime of Google Apps, you just have to create a device with your Google domain. Then, add the Common SaaS sensor.

For Google Drive and Google Analytics, at first, create a device with your Google domain. Then, add the Google Drive and Google Anaytics sensors. In order to add the sensors, you have to press on the Get Access Code button and get the OAuth code.

Microsoft: Windows Server 2008 End of Life


Here is the information of Windows Server 2008 EOL:
  • Lifecycle Start Date: 22 October 2009
  • Mainstream Support End Date: 13 January 2015
  • Extended Support End Date: 14 January 2020
  • Service Pack Support End Date: 9 April 2013

Microsoft: Difference Between End of Mainstream Support and End of Extended Support


Ending mainstream support for a product means Microsoft will no longer be enhancing that product. What it does NOT mean is there will no longer be fixes for security and reliability issues. Microsoft will continue to issue bug fixes and patches for security and reliability issues for Windows 7 and Windows 2008/2008 R2 after January 13, 2015.

When mainstream support ends, this is what occurs:
1. Microsoft no longer supplies non-security hotfixes unless you have an extended support agreement
2. All warranty claims end
3. Microsoft no long accepts requests for new features and design changes

When extended support ends, you can no longer count on any security patches or reliability patches.

Google: End of Chrome's Support


Google has announced the end of Chrome’s support for Windows XP, as well as Windows Vista, and Mac OS X 10.6, 10.7, and 10.8, since these platforms are no longer actively supported by Microsoft and Apple. Starting April 2016, Chrome will continue to function on these platforms but will no longer receive updates and security fixes.

If you are still on one of these unsupported platforms, Google encourages you to move to a newer operating system to ensure that you continue to receive the latest Chrome versions and features.

Wednesday 11 November 2015

Paessler: Use StatusCake to Monitor Internal Devices with SMS Alert via PRTG

You may use the method below to monitor your internal devices with SMS alerts via PRTG. However, the alerts are the other way round:
StatusCake Alert Backup - PRTG / Internal Device Down
StatusCake Alert Down - PRTG / Internal Device Up

< StatusCake >
1. Add new test


2. Copy the URL


< PRTG >
1. Go to Setup > Account Settings > Notifications
2. Click on Add new notification and type in the necessary information as follows:
* Note: Change the URL of StatusCake from HTTPS to HTTP

3. Click on the respective sensor
4. Click on Notifications > Add State Trigger

Tuesday 10 November 2015

Paessler: Email Round Trip Monitoring


Two new "Email Round Trip Monitoring" sensors ensure the end-to-end delivery of emails and make it possible to monitor availability and performance of a complete email delivery process.

<< How does it work? >>
There are two new sensor types for this task:
1. SMTP & IMAP Round Trip Sensor
2. SMTP & POP3 Round Trip Sensor
Both initially deliver an email to a mail server using SMTP. Afterwards a mailbox is scanned using POP3 or IMAP until the email arrives. The graph shows a sample configuration:
Step 1: PRTG delivers an email via the SMTP protocol to a mail server (just like an email client).
Step 2: The SMTP server delivers the email to a POP3 server (which can be located at a remote site, in your local LAN or on the same server as well).
Step 3: Every few seconds PRTG retrieves emails from the POP3 server until the test email arrives.
The test email contains a unique code in the topic which is used to identify the email (e.g. "PRTG7 Roundtrip Mail: {6D136420-5A3E-46CF-871A-1DAF0C4F3D5D}").

<< Recommended Configuration >>
Here is a simple concept to check delivery of email out of and into your organization:
1. Create a dedicated email account for this test in your mail system.
2. Set up an external email account (hosted mail server, freemailer, etc.) that delivers all emails back to an email account in your organization.
3. Set up PRTG's round trip sensor to send an email to the external email account using your LAN's mail server and then check for the mailbox on your mail system for arrival of the email.
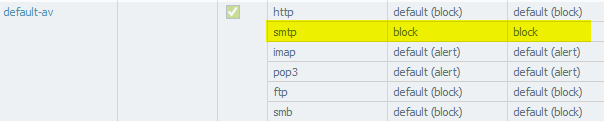
With this technique you are testing multiple aspects of your email server setup as long as the sensor shows a green light:
1. Your email server accepts emails via SMTP.
2. Emails are being sent to the outside world (which means that your internet connection works, MX lookups for email delivery work, etc.).
3. Emails from external mail server can be delivered into your mail system (this includes that the MX records for your domain are correct, that your mail server can be reached from the outside world, that your email filtering is working, etc.).
4. Emails can be retrieved using POP3 (or IMAP).

<< Conclusion >>
These two new sensor types are a great tool to ensure delivery of email from and to your mail servers. Compared to the standard SMTP, POP3 and IMAP sensors - which only check the availability of these services - the two new sensor types actually monitor the complete transaction from accepting the mail on the first email server to delivery of the mail on the final POP3/IMAP server.

<< Sample Configuration >>
I have configured a SMTP & IMAP Round Trip Sensor between Microsoft Exchange and Google Mail. Here are the steps:
1. Setup the Receive Connector with Exchange Management Console


2. Create an Exchange account
3. Create an Gmail account
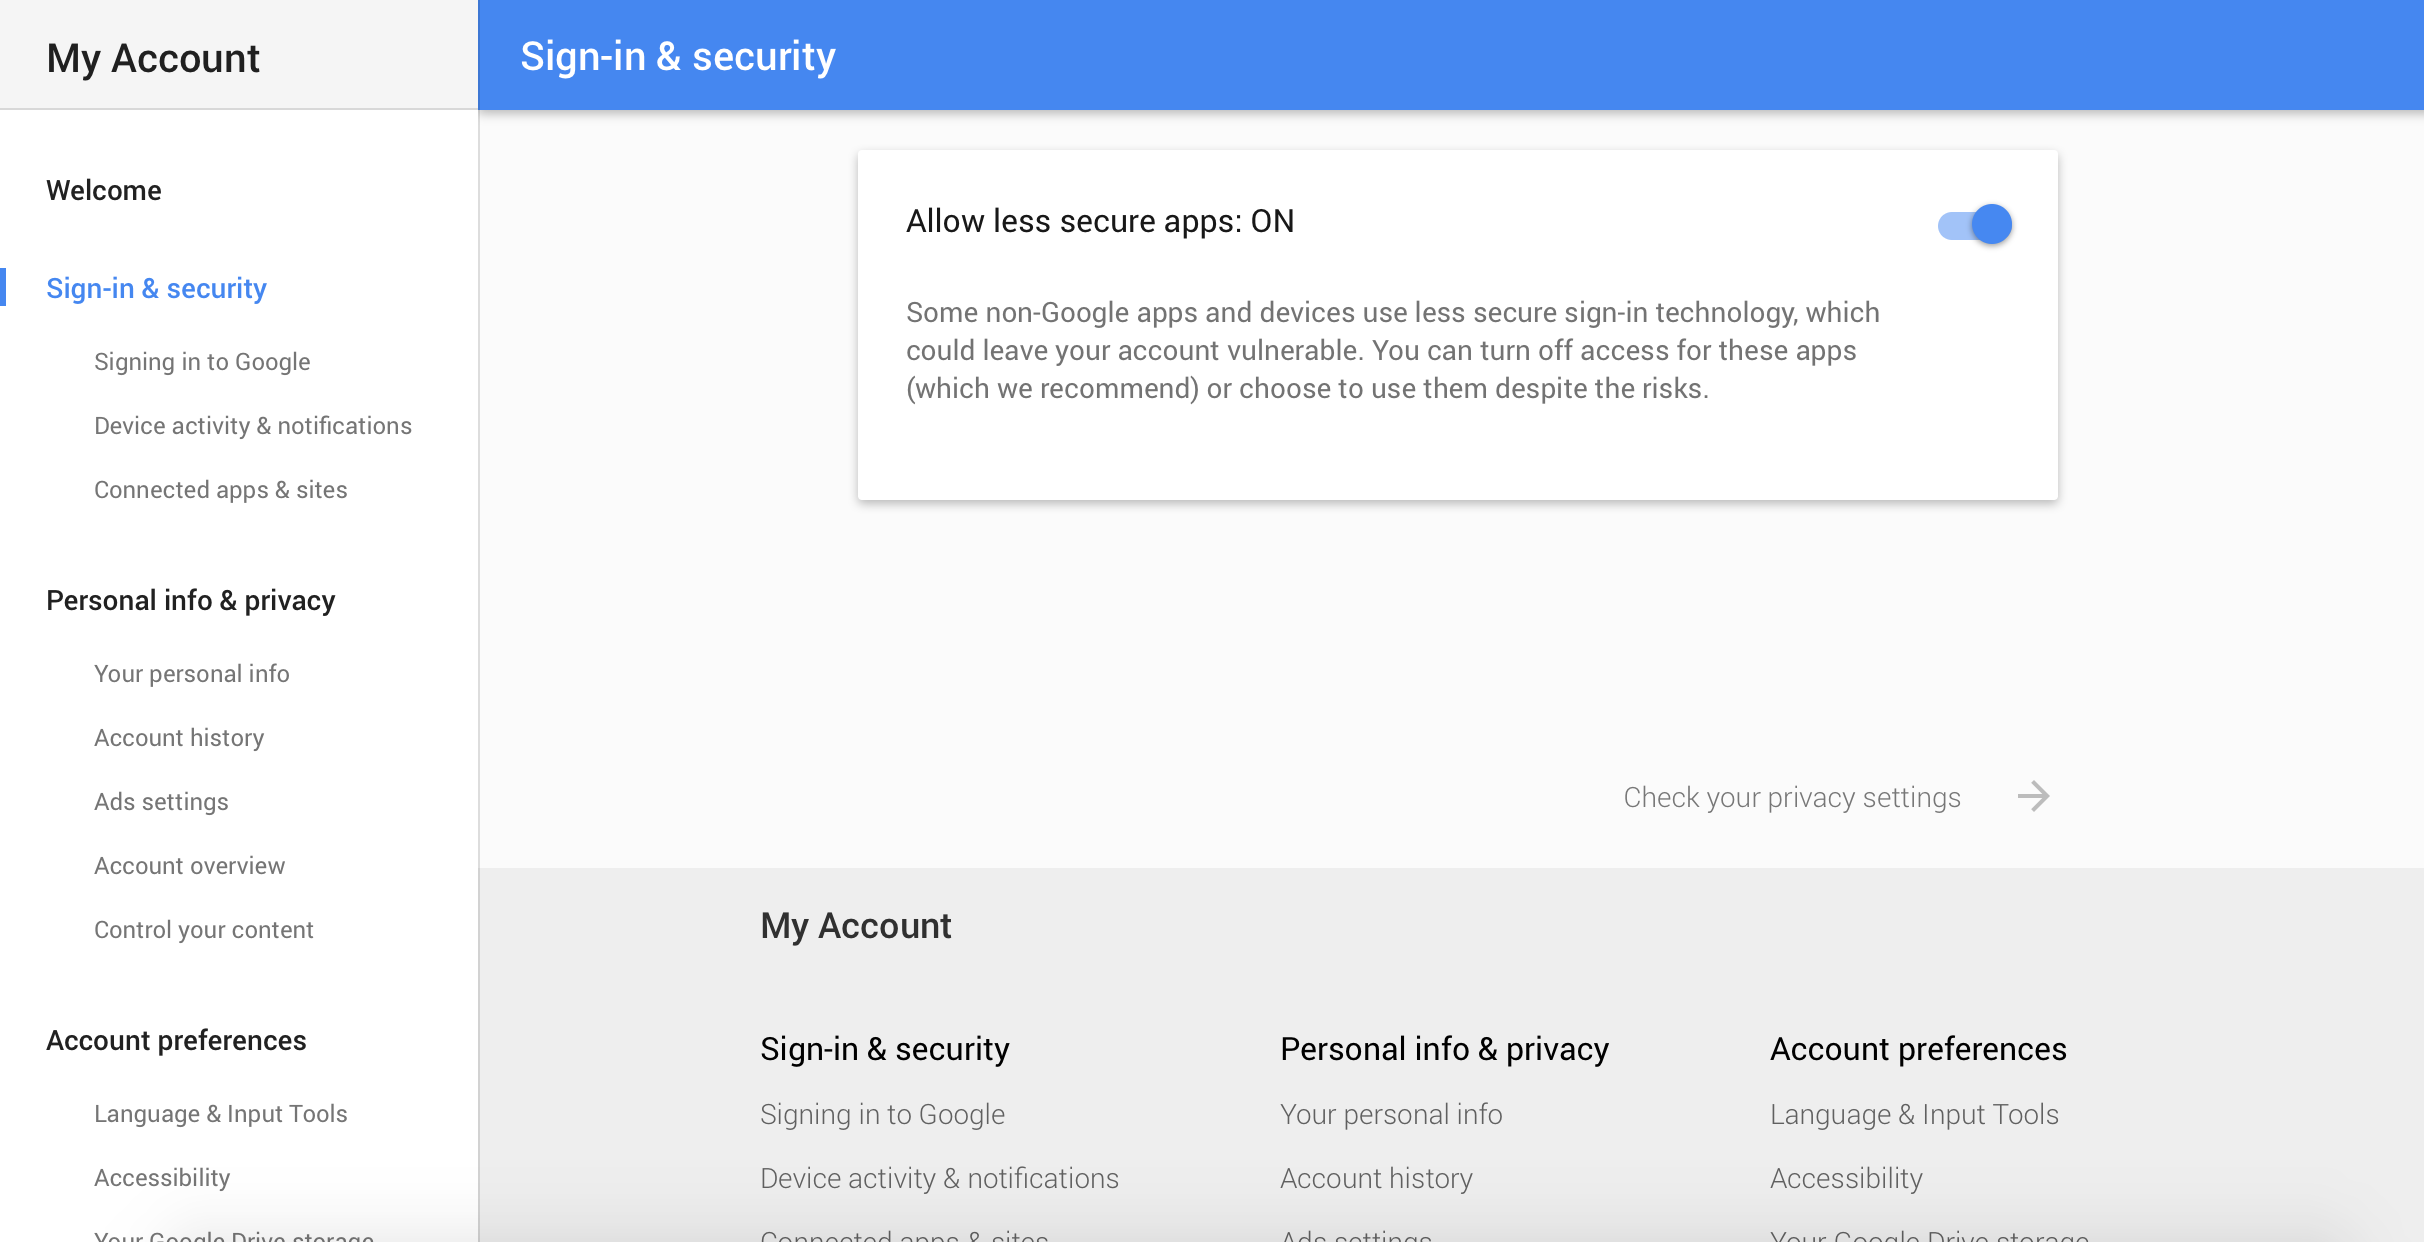
4. Change account access for less secure apps by going to My Account. In the "Less secure apps" section, next to "Access for less secure apps," select Turn on.
5. Required settings for the sensor:
-- Email Settings --
From: < Exchange email address >
To: < Gmail email address >
HELO Ident: < Exchange server >

-- Step 1: Send Email to Parent Device Using SMTP --
Port: 25
Timeout for SMTP Connection (Sec.): 300
SMTP Authentication Type: None
Additional Text for Email Subject: IMAP Roundtrip

-- Transport-Level Security --
SMTP Specific: Use Transport-Level Security if available using StartTLS (default)

-- Step 2: Check An IMAP Mailbox Until Email Arrives --
IP Address/DNS Name: imap.gmail.com
Mailbox: Ibox
Port: 993
Connection Interval (Sec.): 10
Maximum Trip Time (Sec.): 300
Username: < Gmail email address >
Password: < Gmail password >
Search Method: Search email directly (default)

-- Transport-Level Security --
SMTP Specific: Use Transport-Level Security if available

Google: Setting Up IMAP or POP Access for Google Mail / Gmail


<< Setting Up IMAP Access >>
Incoming mail (IMAP) server - requires SSL: imap.gmail.com
Incoming mail server Use SSL: Yes
Incoming mail port: 993
Outgoing mail (SMTP) server: smtp.gmail.com (use authentication)
Outgoing mail Use Authentication: Yes
Outgoing mail Use STARTTLS: Yes (some clients call this SSL)
Outgoing mail port: 465 or 587
Account name: ( Email address of your Gmail )
Email Address: ( Email address of your Gmail )
Password: ( Gmail Password )

<< Setting Up POP Access >>
Incoming mail (POP3) server - requires SSL: pop.gmail.com
Incoming mail server Use SSL: yes
Incoming mail port: 995
Outgoing mail (SMTP) server - requires TLS3 or SSL: smtp.gmail.com (use authentication)
Outgoing mail Use Authentication: Yes
Outgoing mail port for TLS/STARTTLS: 587
Outgoing mail port for SSL: 465
Account name: ( Email address of your Gmail )
Email Address: ( Email address of your Gmail )
Password: ( Gmail Password )

Microsoft: Configure a Relay Connector for Exchange Server 2010

In most Exchange Server 2010 environments there will be the need to allow relaying for certain hosts, devices or applications to send email via the Exchange server.  This is common with multi-function devices such as network attached printer/scanners, or applications such as backup software that send email reports.

SMTP communication is handled by the Hub Transport server in an Exchange organization.  The transport service listens for SMTP connections on it’s default Receive Connector. However, this connector is secured by default to not allow anonymous connections (ie, the type of connection most non-Exchange systems will be making).

You can see this in effect if you telnet to the server on port 25 and try to initiate unauthenticated SMTP communications.

For some Hub Transport servers that are internet-facing, anonymous connections may already be enabled.  In those cases relay would still be denied but will behave differently than the first example.

You’ll note that relay is denied if I try to send from an @hotmail.com address to an @gmail.com address, because neither is a valid domain for the Exchange organization. But with Anonymous Users enabled on the Receive Connector I can send from an @hotmail.com address to a valid local address.

However if I try to relay out to an external recipient, the Exchange server does not allow it.

To permit a non-Exchange server to relay mail we can create a new Receive Connector on the Hub Transport server. Launch the Exchange Management Console and navigate to Server Management, and then Hub Transport. Select the Hub Transport server you wish to create the new Receive Connector on, and from the Actions pane of the console choose New Receive Connector.

Give the new connector a name such as “Relay ” and click Next to continue.

You can leave the local network settings as is, or optionally you can use a dedicated IP address for this connector if one has already been allocated to the server. Using dedicated IP addresses for each connector is sometimes required if you need to create connectors with different authentication settings, but for a general relay connector it is not necessary to change it.

Highlight the default IP range in the remote network settings and click the red X to delete it.

Now click the Add button and enter the IP address of the server you want to allow to relay through the Exchange server. Click OK to add it and then Next to continue.

Click the New button to complete the wizard.

The Receive Connector has now been created but is not yet ready to allow the server to relay through it.  Go back to the Exchange Management Console, right-click the newly created Receive Connector and choose properties.

Select the Permission Groups tab and tick the Exchange Servers box.

Select the Authentication Tab and tick the Externally Secured box.

Apply the changes and the Receive Connector is now ready for the server to relay through.

Because the remote IP range has been secured to that single IP address, any other servers on different IP addresses still won’t be able to relay through the Exchange Server. From any other IP address not included in the remote IP range on the Receive Connector relay will be denied.