Google Translate is already a hugely useful app for anyone who lives overseas or travels regularly, and it just got even smarter on mobile. A new update to the Android and iOS apps that is rolling out today introduces two very spiffy features: real-time voice and sign translation.
The app has already offered image-based translation, but now the magic occurs without any delay at all… and — best of all for regular travelers — it works offline.
The visual translation feature is activated when you select the phone camera option inside the app. You then simply point the camera at the sign that you want translated — ensuring that it is captured fully — and the app will translate it.
Real-time voice translation is equally incredible, and can act as an intermediary for two people holding a conversation using different languages.
You tap the in-app mic once and starting talking in the foreign tongue first. Then — once the first language has been recognized — tap the mic again and both people can begin talking. The app pulls in text-based translations of both sides of the conversation in real-time, helping overcome the language barrier.
Voice translation has been a feature on Google Translate for Android for some time, but now it is coming to iOS and will also be “faster and more natural” on Android, Google says.
The sole caveat is that these instant translation features are somewhat limited at first. They only work for English to and from French, German, Italian, Portuguese, Russian and Spanish, but Google said it has plans to expand support with time.
Interestingly, the company also threw out some new stats about the popularity of Translate. It claimed that 500 million people use the service in some form each month, with more than one billion translations made per day.
Those figures are quite incredible and — with two hugely useful new features now up and running on both iOS and Android — Google Translate is likely to grow into even more of a monster hit.
Reference:
Google Translate Now Does Real-Time Voice And Sign Translations On Mobile
http://techcrunch.com/2015/01/14/amaaaaaazing/
Friday, 16 January 2015
Apple: Aperture and iPhoto are Dead!
Aperture and iPhoto are both being discontinued. They have been updated to run on Yosemite but will not be developed further. They will be replaced by a new app, called Photos.app in this year.
If those have older Aperture or older iPhoto libraries on their older Apple computers and have external drives with images that have ANY value to them whatsoever - you must now take the steps to externally back up those Aperture/iPhoto libraries. You must also then upgrade your systems to Apple OSX 10.10 Yosemite if you can, and then also upgrade your iPhoto libraries to version 9.6 and your Aperture libraries to version 3.6. If you do not - you will be unable to use these "legacy" Aperture and iPhoto libraries in the soon to be released OSX "Photos" software. If you jump ship now and convert your photo libraries to Adobe image processing, you may not be able to convert those same Aperture and iPhoto libraries to the new "Photos" in a few months.
Thursday, 15 January 2015
IT Technology: PUTTY Auto-Login and Send Command to Remote Server
For PUTTY SSH connection, to auto-login, you can simply create a shortcut and pass in these parameters.
1. Create a shortcut on the desktop to putty.exe
2. Rename the shortcut to PuTTY - server.com
3. Right-click shortcut and choose Properties
4. Modify the target similar to: "C:\Program Files\PuTTY\putty.exe" user@server.com -pw password
5. Click OK
To send a command to the remote server, you may perform the steps below:
1. Create a text file containing the commands you like to send to the remote server
2. Add the following parameters at the end of the target: -m <path>\<filename>
For example, "C:\Program Files\PuTTY\putty.exe" user@server.com -pw password -m C:\Temp\Command.txt
1. Create a shortcut on the desktop to putty.exe
2. Rename the shortcut to PuTTY - server.com
3. Right-click shortcut and choose Properties
4. Modify the target similar to: "C:\Program Files\PuTTY\putty.exe" user@server.com -pw password
5. Click OK
To send a command to the remote server, you may perform the steps below:
1. Create a text file containing the commands you like to send to the remote server
2. Add the following parameters at the end of the target: -m <path>\<filename>
For example, "C:\Program Files\PuTTY\putty.exe" user@server.com -pw password -m C:\Temp\Command.txt
Wednesday, 14 January 2015
Google: Chrome Remote Desktop
We have looked at some of the various ways in which remote access of your computer can be achieved, including using TeamViewer and VNC, but if you have Chrome installed you can do the same with nothing more than a browser extension.
It does not matter whether you’re using Windows or OS X (sadly, Linux users are left out in the cold), all you need is the Chrome Remote Desktop extension.
Grab yourself a copy of the add-on from the Chrome Web Store – click the Add To Chrome button followed by Add.
You’ll need to install the extension on both the computer you want to be able to used remotely and any machines you want to be able to use to dial in. Start with the machine you want to be able to control.
This is actually a surprisingly large extension, weighing in at some 22.6MB, but it will install very quickly nonetheless. Once installed, click New Tab and you can access the remote access tool from the list of installed apps.
The first time you launch Chrome Remote Desktop, you’ll need to grant it permission to access your computer. Click Continue, make sure that you are signed into your Google account, and then click ‘Allow access’.
Chrome Remote Desktop can be used in one of two ways – to offer remote assistance to someone or to take remote control of another computer of your own. Click the ‘Get started’ button in the My Computers section. Click the ‘Enable remote connections’ button
As a security measure, you will need to choose a PIN to protect your computer, so enter and confirm a code that is at least six digits in length and then click OK.
You will also need to click Yes in the User Account Control dialog that appears to permit the changes. Once this is done, re-enter your PIN and click Confirm, followed by OK.
Now turn your attention to the machine you’d like to use to take control of your first computer. Run through the same steps to install the necessary extension in Chrome. Make sure that you are signed into the same Google account and then authorize the extension to access it.
Click the Get Started button in the lower portion of the page and you should see an entry for your other computer. By default, this is labeled using the name of the machine, but you can change it by clicking the pencil icon to the right and entering a new name.
To start a remote session, click the name of the computer you would like to connect to, enter the PIN you set up, and hit Connect.
You get to jump in and take control of your remote computer just as if you were sitting in front of it. At the top of the screen, you’ll find a slide-down drawer where there are a limited number of options.
The Disconnect button is self-explanatory, while the ‘Send keys’ menu makes it possible to send keyboard combinations to the remote machine without them being intercepted by the local computer.
From the ‘Screen options’ menu, you can toggle full screen mode on and off as well as choose between viewing the remote desktop at its native resolution or scaled to fit the size of your browser window.
Reference:
How to Use Google Chrome to Remotely Access Your Computer
http://www.howtogeek.com/142146/how-to-use-google-chrome-to-remotely-access-your-computer/
It does not matter whether you’re using Windows or OS X (sadly, Linux users are left out in the cold), all you need is the Chrome Remote Desktop extension.
Grab yourself a copy of the add-on from the Chrome Web Store – click the Add To Chrome button followed by Add.
You’ll need to install the extension on both the computer you want to be able to used remotely and any machines you want to be able to use to dial in. Start with the machine you want to be able to control.
This is actually a surprisingly large extension, weighing in at some 22.6MB, but it will install very quickly nonetheless. Once installed, click New Tab and you can access the remote access tool from the list of installed apps.
The first time you launch Chrome Remote Desktop, you’ll need to grant it permission to access your computer. Click Continue, make sure that you are signed into your Google account, and then click ‘Allow access’.
Chrome Remote Desktop can be used in one of two ways – to offer remote assistance to someone or to take remote control of another computer of your own. Click the ‘Get started’ button in the My Computers section. Click the ‘Enable remote connections’ button
As a security measure, you will need to choose a PIN to protect your computer, so enter and confirm a code that is at least six digits in length and then click OK.
You will also need to click Yes in the User Account Control dialog that appears to permit the changes. Once this is done, re-enter your PIN and click Confirm, followed by OK.
Now turn your attention to the machine you’d like to use to take control of your first computer. Run through the same steps to install the necessary extension in Chrome. Make sure that you are signed into the same Google account and then authorize the extension to access it.
Click the Get Started button in the lower portion of the page and you should see an entry for your other computer. By default, this is labeled using the name of the machine, but you can change it by clicking the pencil icon to the right and entering a new name.
To start a remote session, click the name of the computer you would like to connect to, enter the PIN you set up, and hit Connect.
You get to jump in and take control of your remote computer just as if you were sitting in front of it. At the top of the screen, you’ll find a slide-down drawer where there are a limited number of options.
The Disconnect button is self-explanatory, while the ‘Send keys’ menu makes it possible to send keyboard combinations to the remote machine without them being intercepted by the local computer.
From the ‘Screen options’ menu, you can toggle full screen mode on and off as well as choose between viewing the remote desktop at its native resolution or scaled to fit the size of your browser window.
Reference:
How to Use Google Chrome to Remotely Access Your Computer
http://www.howtogeek.com/142146/how-to-use-google-chrome-to-remotely-access-your-computer/
IT Technology: Single Mode versus Multi-Mode Fiber Optic Cable
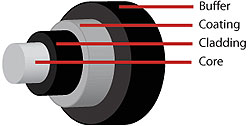
Fiber Optics is sending signals down hair-thin strands of glass or plastic fiber. The light is “guided” down the center of the fiber called the “core”. The core is surrounded by a optical material called the “cladding” that traps the light in the core using an optical technique called “total internal reflection.”
The core and cladding are usually made of ultra-pure glass. The fiber is coated with a protective plastic covering called the “primary buffer coating” that protects it from moisture and other damage. More protection is provided by the “cable” which has the fibers and strength members inside an outer covering called a “jacket”.
<< Single Mode Fiber Optic Cable >>
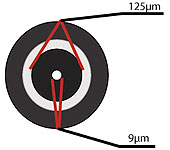
Single Mode fiber optic cable has a small diametral core that allows only one mode of light to propagate. Because of this, the number of light reflections created as the light passes through the core decreases, lowering attenuation and creating the ability for the signal to travel faster, further. This application is typically used in long distance, higher bandwidth runs by Telcos, CATV companies, and Colleges and Universities.
Single Mode fiber is usually 9/125 in construction. This means that the core to cladding diameter ratio is 9 microns to 125 microns.
<< Multimode Fiber Optic Cable >>
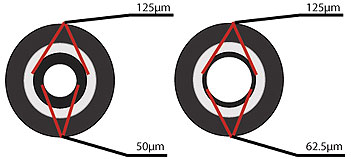
Multimode fiber optic cable has a large diametral core that allows multiple modes of light to propagate. Because of this, the number of light reflections created as the light passes through the core increases, creating the ability for more data to pass through at a given time. Because of the high dispersion and attenuation rate with this type of fiber, the quality of the signal is reduced over long distances. This application is typically used for short distance, data and audio/video applications in LANs. RF broadband signals, such as what cable companies commonly use, cannot be transmitted over multimode fiber.
Multimode fiber is usually 50/125 and 62.5/125 in construction. This means that the core to cladding diameter ratio is 50 microns to 125 microns and 62.5 microns to 125 microns.
Reference:
Single Mode vs. Multi-Mode Fiber Optic Cable
http://www.multicominc.com/training/technical-resources/single-mode-vs-multi-mode-fiber-optic-cable/
Friday, 9 January 2015
VMware: VMware vRealiz Log Insight
VMware vRealiz Log Insight delivers real-time log management for VMware environments, with machine learning-based Intelligent Grouping, high performance search and better troubleshooting across physical, virtual, and cloud environments.
Features:
1. Extends Analytics to Log Data
With huge amounts of machine data generated in dynamic, virtual and cloud infrastructures on a daily basis, there is an acute need to apply analytics-based technologies to solve IT problems. vRealize Log Insight extends VMware’s leadership in analytics capabilities to unstructured data and log management, giving you operational intelligence and deep, enterprise-wide visibility across all tiers of your IT infrastructure and applications.
2. Easy to Use and Accessible Log Management
Unlike command line-based tools or highly specialized solutions that are only available to the largest of enterprises, vRealize Log Insight’s is accessible to everyone. Its log management is fast to deploy and easy to use, with intuitive interactions that get you started with log analytics immediately, without the need to learn a new query language.
3. Optimized for your VMware Environment
Get built-in support for your VMware deployments and the predictable, competitive pricing you expect from VMware.
4. Intelligent Log Analysis Operations
Log Insight adds to the predictive analytics of vRealize Operations Management with machine learning-based Intelligent Grouping, an important new technology that can group related data together to aid you in detecting problems more quickly than the leading solution.
5. Unified Management
Get easy integration with vRealize Operations and many other vendors. In addition, universal unstructured data collection extends operational visibility and proactive management capabilities across infrastructure and applications across physical, virtual and cloud environments.
Reference:
vRealize Log Insight (formerly vCenter Log Insight)
http://www.vmware.com/products/vrealize-log-insight
Thursday, 8 January 2015
VMware: Re-size ( Extend or Shrink ) Virtual Disk
The methods below allow you to extend or shrink your virtual disk.
<< Method 1 – Using vmkfstools and GParted to extend a disk >>
<< Method 2 – Using VMware Converter to shrink or extend a disk >>
<< Method 3 – Using vmkfstools and another Windows virtual machine to extend a disk >>
<< Method 4 – Using vmkfstools and System Rescue CD to extend a disk >>
<< Method 5 – Using Knoppix Live CD with QtPartEd to shrink a disk >>
<< Method 6 – Use Ghost or another 3rd party imaging product to shrink a disk >>
<< Method 1 – Using vmkfstools and GParted to extend a disk >>
- Download the GParted Live CD ISO and make it available so it can be mounted by the virtual machine’s CD-ROM
- Shutdown the virtual machine you want to resize
- Log into the ESX Server console via Putty
- Type “vmkfstools -X /vmfs/volumes/<volume name>/<VM directory name>/<virtual disk file name>” ie. /vmfs/volumes/Storage1/my_vm.vmdk. New disk size can be specified in kilo, mega or gigabytes and will be the total size of the new disk. So if you want to increase a virtual disk from 20GB to 24GB you would specify either 24000m or 24g
- Power on the Virtual Machine and make sure it boots properly, load Disk Management and you will see the new unallocated space
- Now to join the unallocated space to the primary partition, first shutdown the Virtual Machine
- Connect the Virtual Machine to the GParted ISO file and make sure you enable Connected at Power On
- Power on the Virtual Machine
- Press ESC at the Bios screen to get to the Boot Menu
- Select CD-ROM as the Boot device
- Gnome Partition Editor will load, press Enter at the boot screen
- At the Boot option screen select Manual Video Card and then select Done
- Select US English at the Language screen
- Select qwerty/us.map at the Keyboard screen
- Select Generic VESA Compatiable at the Video Driver screen
- Select 8 at the Display Depth screen
- Select 1024×768 at the Resolution screen
- Once the partition editor loads, click on /dev/sda1 in the partition list
- Click the Resize/Move button
- Click and drag the arrow to extend the size of the partition, make sure you do a resize (double arrow) and not a move (four way arrow) so you should 0 free space preceding and following and then click the Resize/Move button
- Next click the Apply button and then the operation will start, you can expand Details to see the progress, once completed click the Close button
- Click the power button in the bottom right corner, then select reboot
- Edit the VM and remove the ISO from the CD/ROM device (change to Client)
- When the server restarts it will do a Check Disk, let this complete, Windows will prompt for a reboot after you login
- Reboot and load Disk Management and your Primary Partion will be the new size without any unallocated space
<< Method 2 – Using VMware Converter to shrink or extend a disk >>
- When you use Converter to copy a VM it will transfer the data to the destination server by one of two ways. If you do not change the disk size or increase the size of your original disks then it does a block level clone of the drive. If you reduce the size of your original disks it instead does a file level clone of the drive.
- Download Converter and install it on the VM that you want to resize the drives, reboot after the install completes
- Start Converter application, click the Import Machine button
- Click Next at the Welcome screen and then Next again at the Source screen
- Select ‘Physical Computer’ and click Next o Select “This Local Machine” and click Next
- At the Source Data screen select your volumes and change “Maintain Size” to “Type Size in GB” and enter your new disk size and click Next
- At the Destination screen click Next
- Select “Import this machine to a Vmware ESX Server or VirtualCenter virtual machine” and click Next
- At the Destination login screen, select your ESX/VC server and enter the login information and click Next
- At the Virtual Machine Name and Folder screen enter a new name for your VM and select a folder and click Next
- At the Host or Cluster screen select a host for your destination and click Next
- At the Datastore screen, select a datastore and click Next
- At the Networks screen, configure your NICs and click Next
- At the Customization screen, click Next
- Click Finish and the conversion will begin
- Once the Conversion is complete, edit the new VM settings and remove any extra hardware that Converter adds (USB/serial/parallel ports, etc.)
- Shutdown your original source VM and power on your new destination VM
- Make sure everything is functioning properly on the new VM and you can delete the original VM
<< Method 3 – Using vmkfstools and another Windows virtual machine to extend a disk >>
- Shutdown the virtual machine you want to resize
- Log into the ESX Server console via Putty
- Type “vmkfstools -X /vmfs/volumes/<volume name>/<VM directory name>/<virtual disk file name>” ie. /vmfs/volumes/Storage1/my_vm.vmdk. New disk size can be specified in kilo, mega or gigabytes and will be the total size of the new disk. So if you want to increase a virtual disk from 20GB to 24GB you would specify either 24000m or 24g
- Shutdown the second helper virtual machine
- Edit the settings of the second VM and add the hard disk from the first VM
- Power on the second VM and load the Disk Management snap-in and verify that the disk from the first VM has un-allocated space on it
- Select Start, Run and enter diskpart.exe
- The command ‘list volume’ will show you all volumes.
- Select your volume based on the results of the list volume command, ie. ‘select volume 1′
- Type the command ‘extend’ to extend the volume
- Check the Disk Management snap-in again and the volume should be extended with a larger capacity
- Shutdown the second VM and remove (not delete) the disk from it
- Power on your first VM and the new space should be there and ready to use
<< Method 4 – Using vmkfstools and System Rescue CD to extend a disk >>
- Download the System Rescue ISO and make it available so it can be mounted by the virtual machine’s CD-ROM
- Shutdown the virtual machine you want to resize
- Log into the ESX Server console via Putty
- Type “vmkfstools -X /vmfs/volumes/<volume name>/<VM directory name>/<virtual disk file name>” ie. /vmfs/volumes/Storage1/my_vm.vmdk. New disk size can be specified in kilo, mega or gigabytes and will be the total size of the new disk. So if you want to increase a virtual disk from 20GB to 24GB you would specify either 24000m or 24g
- Power on the Virtual Machine and make sure it boots properly, load Disk Management and you will see the new unallocated space
- Now to join the unallocated space to the primary partition, first shutdown the Virtual Machine
- Connect the Virtual Machine to the System Rescue ISO file and make sure you enable Connected at Power On
- Power on the Virtual Machine
- Press ESC at the Bios screen to get to the Boot Menu
- Select CD-ROM as the Boot device
- Press Enter at the boot screen
- Press Enter after boot sequence is complete and then type ‘startx’
- Once X-windows loads, double-click the GpartEd icon (drive icon, 3rd down on the right hand side)
- Once the partition editor loads, click on /dev/sda1 in the partition list
- Click the Resize/Move button
- Click and drag the arrow to extend the size of the partition, make sure you do a resize (double arrow) and not a move (four way arrow) so you should 0 free space preceding and following and then click the Resize/Move button
- Next click the Apply button and then the operation will start, you can expand Details to see the progress, once completed click the Close button
- Click the power button in the bottom right corner, then select reboot
- Edit the VM and remove the ISO from the CD/ROM device (change to Client)
- When the server restarts it will do a Check Disk, let this complete, Windows will prompt for a reboot after you login
- Reboot and load Disk Management and your Primary Partion will be the new size without any unallocated space
<< Method 5 – Using Knoppix Live CD with QtPartEd to shrink a disk >>
- Download the Knoppix Live CD ISO and make it available so it can be mounted by the virtual machine’s CD-ROM
- Shutdown the virtual machine you want to resize
- Add a second virtual disk of the new smaller desired size to the VM you want to resize
- Connect the Virtual Machine to the Knoppix Live CD ISO file and make sure you enable Connected at Power On
- Power on the Virtual Machine
- Press ESC at the Bios screen to get to the Boot Menu
- Select CD-ROM as the Boot device
- Press Enter at the boot screen
- Click on the K Menu icon and then select System and then QTPartEd
- Select your original drive (usually sda) and click on the partition 1
- Select Operations from the top menu and then Resize, resize the drive so it is just less then the new drives (sdb) capacity
- Select File from the top menu and then Commit, click Yes at the warning window
- Once complete, select Cancel if you get a unmounted hard disk window and then OK at the Progress window
- Open a Konsole window and type “dd if=/dev/sda of=/dev/sdb” This copy will take a long time and will not show a status while it is running. Yyou will get an insufficient space error at the end of the copy, this is normal because the drive you’re copying from is bigger then the destination. But as long as the partition is smaller, everything will work
- Shutdown the VM and edit the VM settings, remove the original C: drive and change the SCSI ID of the new drive to match the old one (usually 0:0)
- Power on the VM and it will run a Chkdsk and you will be all set
<< Method 6 – Use Ghost or another 3rd party imaging product to shrink a disk >>
- Shutdown the virtual machine you want to resize
- Add a second virtual disk of the new smaller desired size to the VM you want to resize o Use Ghost to clone the first disks partition to your second virtual disk
- Once complete make sure the second virtual disk is ‘Active’
- Switch your disks by editing the virtual machine settings and switching the SCSI id’s (0:0 and 0:1)
- If the virtual machine boots OK and you verify that everything works then shutdown the VM and remove the larger disk and delete it
Reference:
Re-sizing Virtual Disks
Subscribe to:
Posts (Atom)