Friday, 28 February 2014

Cisco: Cisco Jabber with Cisco Unified Communication Manager ( CUCM )

Cisco Jabber lets you access presence, instant messaging (IM), voice, video, voice messaging, desktop sharing, and conferencing. Before you install the Cisco Jabber in your iPhone / Android phone, you need to configure your CUCM as follows:

Step 1   Login in to Cisco Unified Communications Manager Administration.

Step 2   Goto Device-> Phone and  Add a new phone device with Cisco Dual Mode for Android as the Phone Type.

Step 3    Enter settings for Device-Specific Information.
a. Enter the Device Name. The Device Name
  • Must be uppercase
  • Must start with BOT
  • Can contain up to 15 characters
  • Can include only the following characters: A to Z, 0 to 9, dash (-), or underscore (_)
We recommend that the device name include the username of the user so it is easily remembered. For example the device name of user jsmith would be BOTJSMITH.

b. Choose Standard Dual Mode for Android for the Phone Button Template.

c. Configure the following settings to prevent confusion for the person the user calls.
  • Media Resource Group List
  • User Hold MOH Audio Source
  • Network Hold MOH Audio Source
d. Choose desk phone as the Primary Phone if the user has a desk phone.

Step 4  Enter settings for Protocol Specific Information.
In the Device Security Profile drop-down list, select Cisco Dual Mode for Android - Standard SIP Non-Secure Profile.

In the SIP Profile drop-down list, select the appropriate SIP profile.

Values that are not described in this document are not specific to Cisco Jabber but may need to be entered for the device to work properly.

Step 5  Enter settings for the Product Specific Configuration Layout section.
a. Select the appropriate level of usage tracking in the Cisco Usage and Error Tracking drop-down list. See Usage and error tracking

b. In the Application Dial Rules URL field:-
  • For Cisco Unified Communications Manager Release 8.6 and later, leave this field blank.
  • If you are using Cisco Unified Communications Manager Release 8.5 or earlier and you want Cisco Jabber devices to apply Application Dial Rules, you must specify the path to these dial rules files, including the filenames. Use the following format: tftp://ip address of TFTP server/pathname to the XML file/XML filename. 

c. If your directory server requires authentication, enter LDAP username and password; otherwise leave these fields blank.

These credentials can be for a single read-only account for all users. These credentials are sent to the client in clear text in the TFTP file. Therefore, we strongly recommend that LDAP directory administrators generate a directory query account that has no other rights. Create this account with a value that is low enough to ensure that its credentials are semi-public (available to anyone on the local network).

d. Enter any designated emergency numbers in the Emergency Numbers field.

You can enter a comma-separated list of additional emergency numbers that will always be dialed direct for this user. These numbers must contain only numerical digits. No spaces, dashes, or other characters are permitted.

Emergency numbers as defined on the device are always dialed direct using the mobile network (never dialed using Enterprise VoIP) to allow the location of the caller to be sent automatically to emergency services personnel where this service is available. Direct-dial numbers can be useful for users who frequently travel to countries other than the country of their mobile network provider, if the emergency number differs depending on the users' location, or if your company has a dedicated security number.

e. Enter your domain in the Domain Name field if the Cisco Unified Communications Manager setting in System > Server is a hostname that does not include the domain name.

f. Enter a list of up to three SSIDs separated by forward slashes (/) in the Preset Wi-Fi Networks field.

Cisco Jabber attempts to connect to Cisco Unified Communications Manager only after the mobile device is connected to an SSID that you list here, or one that the user selects in the client. Cisco Jabber must be able to reach Cisco Unified Communications Manager when it is connected to these SSIDs. Typically, these are your corporate Wi-Fi SSIDs. SSIDs can be up to 32 characters long and are case-sensitive.

Step 6  Select Save.

Step 7  Select Apply Config.

Step 8  Select [Line n] - Add a new DN.

Step 9 Enter the Directory Number of this device.

This can be a new DN; a desk phone with the same DN is not required.

Step 10 If this device is a standalone device (not sharing a DN with a desk phone), configure these settings to forward calls when Cisco Jabber is not running and connected to the network, so callers do not receive an error message:
  • Forward Unregistered Internal
  • Forward Unregistered External
Step 11  Set the No Answer Ring Duration to 24 seconds to allow time for Cisco Jabber to ring before calls go to voicemail.

Step 12  Select Save.

Step 13  Navigate to the User Management -> End User page for the user

Step 14  Associate the Cisco Dual Mode for Android device that you just created for this user.

The device should now appear in the Controlled Devices box in either the Device Information or Device Associations section (depending on your release of Unified CM).

Step 15  If this user has a desk phone, select the desk phone as the Primary User Device.

Step 16  If the device is a standalone device that runs without an associated desk phone, you may need to enter other information that is standard for all devices in your system.


Reference:
1.  Configuring Cisco Jabber on CUCM
https://supportforums.cisco.com/docs/DOC-24130

Thursday, 27 February 2014

Cisco: Configure Cisco Unified Personal Communicator (CUPC)

<< Introduction >>
Cisco Unified Personal Communicator (CUPC) is the client application that integrates into the Cisco Unified Presence Server (CUPS). This client runs on a Windows or Macintosh desktop environment and provides for several integrated communications features such as desk phone control, Instant Messaging (IM), Presence, softphone, communication escalation, and so on. This will cover the configuration steps required to configure CUPC.

<< Prerequisites >>
  • Cisco Unified Personal Communicator
  • Cisco Unified Communication Manager

<< Configuration >>
The configuration of a user leveraging CUPC has several basic steps that need to be completed:
    Step 1. Configure user in CUCM.
    Step 2. Configure desk phone device in CUCM (optional).
    Step 3. Configure the CUPC device in CUCM.
    Step 4. Configure CUPS advanced end-user features:            
  • Voicemail
  • Conferencing
  • Lightweight Directory Access Protocol (LDAP)
    Step 5. Install CUPC software on the client machine.


Step 1:- Configuring CUPC User in CUCM
It is strongly recommended having LDAP synchronization configured in any CUCM installation. This brief section covers the steps required to configure a user in CUCMwithout LDAP integration. This is because when LDAP synchronization is enabled, the ability to add/delete users in the CUCM user interface is removed. All users are added or removed via the LDAP management interface. Follow the below steps:-
    Step 1. In CUCM Administration, select User Management > End User > Add New.
    Step 2. Fill in at least the required user information (User ID and Last Name).
    Step 3. Device Associations can be left at the default.
    Step 4. If this user will use extension mobility services, configure the required settings. Make sure to select the correct Presence group because this impacts what Presence visibility this user has.
    Step 5. Leave directory number associates at the default setting unless you already have a desk phone and directory number configured for this user.
    Step 6. The mobility section enables the user to configure single number reach access and mobile voice access (directory assistant IVR). Configure this section according to the end user's needs.
    Step 7. Ensure that the user roles include Standard CTI Enabled and Standard CTI Allow Control of All Devices..
    Step 8. Select the Save button.
    Step 9. In CUCM Administration, select System > Licensing > Capabilities Assignments.
    Step 10. Select the users recently added that will have Presence and CUPC capabilities.
    Step 11. Click both check boxes to enable CUP and CUPC features for the users.

TIP:-
The user might not show up for several minutes on the CUP server. If it is taking too long, go to Cisco Unified Serviceability > Tools > Control Center-Feature Services, select the CUP server (publisher if in a cluster), and then start or restart Cisco UP Sync Agent.

When the user has been added to CUCM, it will be synchronized over to the CUP server. There is no need to add the user separately to the CUP server. LDAP synchronization is strongly recommended so most of these steps would not be necessary, and the rest can be done when doing the phone device provisioning in CUCM.


Step 2 :- Configuring IP Phone in CUCM
A common deployment model is for a single user to have both a desk phone and have CUPC act as a softphone during communications that take place away from the desk. CUPC offers a softphone capability that enables it to act as a phone device on a computer without the requirement of a desk phone, making the desk phone an optional device in a deployment. The use of a desk phone is optional and not required when deploying and configuring CUPC. Basic steps necessary in setting up an IP Phone to be used with CUPC are:-
    Step 1. In CUCM Administration, select Device > Phone.
    Step 2. Click the Add New button.
    Step 3. Select the device for the desk phone; then click the Next button. Do notselect Cisco Unified Personal Communicator.
    Step 4. Select the protocol for the phone to use.
    Step 5. Make sure the Presence Group and SUBSCRIBE Calling Search Space are defined according to your Presence policy.

NOTE:-Presence authorization works with Presence Groups to allow or block Presence requests between groups. This enables greater granularity in offering Presence services to groups or departments.

The SUBSCRIBE calling search space determines how CUCM routes Presence requests that come from the phone. This setting enables you to apply a calling search space separate from the call-processing search space for Presence (SUBSCRIBE) requests for the phone.

    Step 6. Make sure that Allow Control of Device from CTI is checked.
    Step 7. Configure all the remaining required settings for the phone and end-user requirements.
    Step 8. Associate the user to the phone.

The phone now registers to CUCM with the proper settings and user association. Adding the phone allows users to have the option to control their phone through a computer telephony interface (CTI) with the CUPC client. This allows for the added software features offered by the CUPC client and still has a desk phone for a more reliable voice experience.


Step 3 :- Configuring a CUPC Device in CUCM
The next step is to set up a CUPC device in CUCM associated to the appropriate user and potentially connected to a desk phone. The first step in planning for the CUPC device configuration is to understand the naming convention required in CUCM. These requirements follow:
  •     Derives from the username
  •     Starts with UPC
  •     Contains only uppercase letters or numerals
  •     Contains no more than 12 additional characters after UPC

CUCM Username    Associated Softphone Device Name

abcdefghi                 UPCABCDEFGHI

abcdefg_hijklmno    UPCABCDEFGHIJKL

abcdefghijklmno      UPCABCDEFGHIJKL

abcd.hijklmno          UPCABCDHIJKLMNO


When the naming convention has been decided, the CUPC device can now be added to CUCM:-
    Step 1. In CUCM Administration, select Device > Phone.
    Step 2. Click the Add New button.
    Step 3. Select the Cisco Unified Personal Communicator.
    Step 4. The Device Name should be the CUPC name determined earlier, for example, UPCMPOPOVICH.
    Step 5. Uncheck the box for Allow Control of Device from CTI.
    Step 6. Specify the correct Presence Group and SUBSCRIBE Calling Search Space.
    Step 7. Set the Owner User ID field to the appropriate user.
    Step 8. Configure the rest of the settings according to system/user policy.
    Step 9. Click the Save button.
    Step 10. Click the Line[1] > Add a new DN link.
    Step 11. Assign the directory number to the line. If a phone device is already configured, use the same DN as the phone. If this is a CUPC-only user, enter a new DN
    Step 12. Uncheck the box for Allow Control of Device from CTI.
    Step 13. Configure the rest of the settings according to system policy.
    Step 14. Click Save.

When saved, a new screen comes up that shows what devices are associated to the DN. This field should at least have the CUCP device associated with it. If it is a shared DN with a phone device, two devices should be listed: the CUPC and the phone device.

Now that the CUPC device is set up in CUCM and the users are configured, the client can be installed, and there will be Presence, desk phone connectivity (CTI), and softphone functionality.


Reference:
1.  Configure CUPC
https://supportforums.cisco.com/docs/DOC-23462

Cisco: Translation Patterns - Cisco Unified Communication Manager ( CUCM )

Translation Patterns
Translation patterns are one of the most powerful tools in Unified CM to manipulate digits for any type of call. They follow the same general rules and use the same wildcards as route patterns. As with route patterns, you assign a translation pattern to a partition. However, when the dialed digits match the translation pattern, Unified CM does not route the call to an outside entity such as a gateway; instead, it performs the translation first and then routes the call again, this time using the calling search space configured within the translation pattern.
——————————————————————————————————————–
Translation Pattern: 5546525XXX
Called-Party Transformation Mask: 2XXX
Resulting Phone Number: 2XXX
If a call came into the DID 5546525111, CallManager would convert the dialed digits to 2111
——————————————————————————————————————–

Non-Urgent Translation Patterns
In earlier releases of Cisco Unified Communications Manager (and Cisco Unified CallManager), Cisco Unified Communications Manager prioritized translation patterns as urgent; that is, Cisco Unified Communications Manager routed the call as soon as digit analysis identified a match with the translation pattern. Because Cisco Unified Communications Manager 7.0 supports local route groups, calling party normalization, and the international escape character +, which allow you to globalize, route, and localize calling party numbers, you can configure translation patterns as urgent or non-urgent to ensure that Cisco Unified Communications Manager does not route the call before it should be routed.
For example, if a caller in the 408 area code dials 95551212, this number gets globalized to +14085551212 through the use of translation patterns; that is, digit analysis does a pattern match for that string to determine where to route the call. In this example, a translation pattern takes 9.[2-9]XXXXXX, translates that string to +1408XXXXXXX, and then maps that value to a calling search space that contains the globalized patterns. This example works as long as you do not use variable-length dialing, as is the case with international calls. If you want to route an international call, you need a translation pattern for 9011.! that disregards the predot and adds the prefix +. If you configure the translation pattern as urgent priority, 9011! matches with the first digit after the 9011, and Cisco Unified Communications Manager attempts to route the call without waiting to match more digits. As a result, international and any other variable length calls do not route correctly.

Translation patterns vs Transformation patterns
Many new Cisco CallManager administrators get the translation and transformation terms confused. Cisco CallManager allows you to create translation patterns that contain both calling- and called-party transformation masks to modify the caller ID or dialed-number information. Translation patterns are usually used to transform dialed digits, so the called-party transformation masks are more frequently used.

Transformation Masks
Dialing transformations allow the call-routing component to modify either the calling number or the dialed digits of a call.
Transformations that modify the calling number are calling-party transformations; transformations that modify the dialed digits are called-party transformations.
Calling-party transformation settings allow you to manipulate the appearance of the calling-party number for outgoing calls.
Called-party transformation settings allow you to manipulate the dialed digits, or called-party number, for outgoing calls.
Configuration Settings Table describes the available fields in the Translation Pattern Configuration window.

Field Description
Pattern Definition
Translation Pattern Enter the translation pattern, including numbers and wildcards (do not use spaces), in the Translation Pattern field. For example, for the NANP, enter 9.@ for typical local access or 8XXX for a typical private network numbering plan. Valid characters include the uppercase characters A, B, C, and D and \+, which represents the international escape character +. If you leave this field blank, you must select a partition from the Partition drop-down list box.Note Ensure that the translation pattern, which uses the chosen partition, route filter, and numbering plan combination, is unique. Check the route pattern/hunt pilot, translation pattern, directory number, call park number, call pickup number, or meet-me number if you receive a message that indicates duplicate entries. Alternatively, check the route plan report if you receive a message that indicates duplicate entries.
Partition Choose a partition. If you do not want to assign a partition, choose<None>. If you choose <None>, you must enter a value in the Translation Pattern field.You can configure the number of partitions that display in this drop-down list box by using the Max List Box Items enterprise parameter. If more partitions exist than the Max List Box Items enterprise parameter specifies, the Find button displays next to the drop-down list box. Click the Find button to display the Find and List Partitions window. Note To set the maximum list box items, choose System > Enterprise Parameters and choose CCMAdmin Parameters.Note Make sure that the combination of translation pattern, route filter, and partition is unique within the Cisco Unified Communications Manager cluster.
Description Enter a description for the translation pattern. The description can include up to 50 characters in any language, but it cannot include double-quotes (“), percentage sign (%), ampersand (&), or angle brackets (<>).
Numbering Plan Choose a numbering plan.If your translation pattern includes the @ wildcard, you may choose a numbering plan. The optional act of choosing a numbering plan restricts certain number patterns.
Route Filter Choosing an optional route filter restricts certain number patterns.The route filters that display depend on the numbering plan that you choose from the Numbering Plan drop-down list box.If more than 250 route filters exist, the Find button displays next to the drop-down list box. Click the Find button to display the Select Route Filters window. Enter a partial route filter name in the List items where Name contains field. Click the desired route filter name in the list of route filters that displays in the Select item to use box and click Add Selected.Note To set the maximum list box items, choose System > Enterprise Parameters and choose CCMAdmin Parameters.
MLPP Precedence Choose an MLPP precedence setting for this translation pattern from the drop-down list box:• Executive Override—Highest precedence setting for MLPP calls.• Flash Override—Second highest precedence setting for MLPP calls.• Flash—Third highest precedence setting for MLPP calls.
• Immediate—Fourth highest precedence setting for MLPP calls.
• Priority—Fifth highest precedence setting for MLPP calls.
• Routine—Lowest precedence setting for MLPP calls.
• Default—Does not override the incoming precedence level but rather lets it pass unchanged.
Resource-Priority Namespace Network Domain Choose an already configured Resource-Priority Namespace Network Domain from the drop-down list box.
Route Class Choose a route class setting for this translation pattern from the drop-down list box:• Default• Voice• Data
• Satellite Avoidance
• Hotline voice
• Hotline data
The route class is a DSN code that identifies the class of traffic for a call. The route class informs downstream devices about special routing or termination requirements. The Default setting uses the existing route class of the incoming call.
You should only use non-default route class settings to translate an inbound T1 CAS route class digit into a Cisco Unified Communications Manager route class value (and strip off the digit). You should not need to assign a non-default route class setting to any other inbound calls that use pattern configuration.
Calling Search Space From the drop-down list box, choose the calling search space for which you are adding a translation pattern, if necessary.You can configure the number of calling search spaces that display in this drop-down list box by using the Max List Box Items enterprise parameter. If more calling search spaces exist than the Max List Box Items enterprise parameter specifies, the Find button displays next to the drop-down list box. Click the Find button to display the Find and List Calling Search Space window. Find and choose a calling search space name Note To set the maximum list box items, choose System > Enterprise Parameters and choose CCMAdmin Parameters.
External Call Control Profile In Cisco Unified Communications Manager, you enable external call control by assigning an external call control profile to a translation pattern. If the translation pattern has an external call control profile assigned to it, when a call occurs that matches the translation pattern, Cisco Unified Communications Manager immediately sends a call-routing query to an adjunct route server, and the adjunct route server directs Cisco Unified Communications Manager on how to handle the call. From the drop-down list box, choose the external call profile that you want to assign to the translation pattern.
Route Option The Route Option designation indicates whether you want this translation pattern to be used for routing calls (such as 9.@ or 8[2-9]XX) or for blocking calls. Choose the Route this pattern or Block this pattern radio button.If you choose the Block this pattern radio button, you must choose the reason for which you want this translation pattern to block calls. Choose a value from the drop-down list box:• No Error• Unallocated Number
• Call Rejected
• Number Changed
• Invalid Number Format
• Precedence Level Exceeded
Provide Outside Dial Tone Outside dial tone indicates that Cisco Unified Communications Manager routes the calls off the local network. Check this check box for each translation pattern that you consider to be off network.
Urgent Priority If the dial plan contains overlapping patterns, Cisco Unified Communications Manager does not route the call until the interdigit timer expires (even if it is possible to dial a sequence of digits to choose a current match). Check this check box to interrupt interdigit timing when Cisco Unified Communications Manager must route a call immediately.Tip By default, the Urgent Priority check box displays as checked.Unless your dial plan contains overlapping patterns or variable length patterns that contain !, Cisco recommends that you do not uncheck the check box.
Route Next Hop By Calling Party Number Check this box to enable routing based on the calling party number, which is required for call screening based on caller ID information to work between clusters.
Calling Party Transformations
Use Calling Party’s External Phone Number Mask Check the check box if you want the full, external phone number to be used for calling line identification (CLID) on outgoing calls.
Calling Party Transform Mask Enter a transformation mask value. Valid entries for the NANP include the digits 0 through 9, and the wildcard characters asterisk (*) and octothorpe (#); the international escape character +; and blank. If this field is blank and the preceding field is not checked, no calling party transformation takes place.
Prefix Digits (Outgoing Calls) Enter prefix digits. Valid entries for the NANP include the digits 0 through 9, and the wildcard characters asterisk (*) and octothorpe (#); the international escape character +.Note The appended prefix digit does not affect which directory numbers route to the assigned device.
Calling Line ID Presentation Cisco Unified Communications Manager uses calling line ID presentation (CLIP/CLIR) as a supplementary service to allow or restrict the originating caller phone number on a call-by-call basis.Choose whether you want the Cisco Unified Communications Manager to allow or restrict the display of the calling party phone number on the called party phone display for this translation pattern.Choose Default if you do not want to change calling line ID presentation. Choose Allowed if you want Cisco Unified Communications Manager to allow the display of the calling number. Choose Restricted if you want Cisco Unified Communications Manager to block the display of the calling number.
Calling Name Presentation Cisco Unified Communications Manager uses calling name presentation (CNIP/CNIR) as a supplementary service to allow or restrict the originating caller name on a call-by-call basis.Choose whether you want the Cisco Unified Communications Manager to allow or restrict the display of the calling party name on the called party phone display for this translation pattern.Choose Default if you do not want to change calling name presentation. Choose Allowed if you want Cisco Unified Communications Manager to display the calling name information. Choose Restricted if you want Cisco Unified Communications Manager to block the display of the calling name information.
Calling Party Number Type Choose the format for the number type in calling party directory numbers.Cisco Unified Communications Manager sets the calling directory number (DN) type. Cisco recommends that you do not change the default value unless you have advanced experience with dialing plans such as NANP or the European dialing plan. You may need to change the default in Europe because Cisco Unified Communications Manager does not recognize European national dialing patterns. You can also change this setting when you are connecting to a PBX that expects the calling directory number to be encoded to a non-national numbering plan type.Choose one of the following options:• Cisco Unified Communications Manager—The Cisco Unified Communications Manager sets the directory number type.
• Unknown—The dialing plan is unknown.
• National—Use when you are dialing within the dialing plan for your country.
• International—Use when you are dialing outside the dialing plan for your country.
• Subscriber—Use when you are dialing a subscriber by using a shortened subscriber number.
Calling Party Numbering Plan Choose the format for the numbering plan in calling party directory numbers.Cisco Unified Communications Manager sets the calling DN numbering plan. Cisco recommends that you do not change the default value unless you have advanced experience with dialing plans such as NANP or the European dialing plan. You may need to change the default in Europe because Cisco Unified Communications Manager does not recognize European national dialing patterns. You can also change this setting when you are connecting to PBXs by using routing as a non-national type number.Choose one of the following options:• Cisco Unified Communications Manager—Use when the Cisco Unified Communications Manager sets the Numbering Plan in the directory number.
• ISDN—Use when you are dialing outside the dialing plan for your country.
• National Standard—Use when you are dialing within the dialing plan for your country.
• Private—Use when you are dialing within a private network.
• Unknown—Use when the dialing plan is unknown.
Connected Party Transformations
Connected Line ID Presentation Cisco Unified Communications Manager uses connected line ID presentation (COLP/COLR) as a supplementary service to allow or restrict the called party phone number on a call-by-call basis.Choose whether you want Cisco Unified Communications Manager to allow or restrict the display of the connected party phone number on the calling party phone display for this translation pattern.Choose Default if you do not want to change the connected line ID presentation. Choose Allowed if you want to display the connected party phone number. Choose Restricted if you want Cisco Unified Communications Manager to block the display of the connected party phone number.
Connected Name Presentation Cisco Unified Communications Manager uses connected name presentation (CONP/CONR) as a supplementary service to allow or restrict the called party name on a call-by-call basis.Choose whether you want Cisco Unified Communications Manager to allow or restrict the display of the connected party name on the calling party phone display for this translation pattern.Choose Default if you do not want to change the connected name presentation. Choose Allowed if you want to display the connected party name. Choose Restricted if you want Cisco Unified Communications Manager to block the display of the connected party name.
Called Party Transformations
Discard Digits Choose the discard digits instructions that you want to be associated with this translation pattern.Note The discard digits that display depend on the numbering plan that you choose from the Numbering Plan drop-down list box.
Called Party Transform Mask Enter a transformation mask value. Valid entries for the NANP include the digits 0 through 9, and the wildcard characters asterisk (*) and octothorpe (#); the international escape character +; and blank. If the field is blank, no transformation takes place. The dialed digits get sent exactly as dialed.
Prefix Digits (Outgoing Calls) Enter prefix digits. Valid entries for the NANP include the digits 0 through 9, and the wildcard characters asterisk (*) and octothorpe (#);the international escape character +; and blank.Note The appended prefix digit does not affect which directory numbers route to the assigned device.
Called Party Number Type Choose the format for the number type in called party directory numbers.Cisco Unified Communications Manager sets the called directory number (DN) type. Cisco recommends that you do not change the default value unless you have advanced experience with dialing plans such as NANP or the European dialing plan. You may need to change the default in Europe because Cisco Unified Communications Manager does not recognize European national dialing patterns. You can also change this setting when you are connecting to a PBX that expects the called directory number to be encoded to a non-national type numbering plan.Choose one of the following options:• Cisco Unified Communications Manager—Use when the Cisco Unified Communications Manager sets the directory number type.
• Unknown—Use when the dialing plan is unknown.
• National—Use when you are dialing within the dialing plan for your country.
• International—Use when you are dialing outside the dialing plan for your country.
• Subscriber—Use when you are dialing a subscriber by using a shortened subscriber number.
Called Party Numbering Plan Choose the format for the numbering plan in called party directory numbers.Cisco Unified Communications Manager sets the called DN numbering plan. Cisco recommends that you do not change the default value unless you have advanced experience with dialing plans such as NANP or the European dialing plan. You may need to change the default in Europe because Cisco Unified Communications Manager does not recognize European national dialing patterns. You can also change this setting when you are connecting to PBXs by using routing as a non-national type number.Choose one of the following options:• Cisco Unified Communications Manager—Use when the Cisco Unified Communications Manager sets the Numbering Plan in the directory number.
• ISDN—Use when you are dialing outside the dialing plan for your country.
• National Standard—Use when you are dialing within the dialing plan for your country.
• Private—Use when you are dialing within a private network.
• Unknown—Use when the dialing plan is unknown.


Reference:
1.  Translation Patterns
http://smbitsolutions.wordpress.com/2011/08/15/translation-patterns/

Apple: MacBook Running Slow / Abnormal / Hang

If your MacBook is running slow / abnormal / hang, you may try the solutions below:

1.  Manage Your Startup Items
It goes without saying that a clean startup helps speed up a Macbook that’s running slowly! Imagine a fast Mac startup! No wasted time waiting for Chrome, Firefox, or Safari to load! Instant access! Well,
when your Mac boots up, it runs a lot of unnecessary apps. These apps slow your Mac down! Take control of your Mac again! Go to your System Preferences > Users & Groups and then click on your
username. Now click on Login Items and check the box of each program you don’t immediately need when your Mac starts up.

2.  Resetting the SMC (System Management Controller) on Your Mac
a.  Perform an SMC reset on a MacBook with a removable battery.
  • Shut down your Mac.
  • Disconnect your Mac portable from its MagSafe connector.
  • Remove the battery.
  • Press and hold the power button for at least 5 seconds.
  • Release the power button.
  • Re-install the battery.
  • Reconnect the MagSafe connector.
  • Turn your Mac on.
b.  Perform an SMC reset on a MacBook without a removable battery.

  • Shut down your Mac.
  • Connect the MagSafe power adapter to your Mac and to a power outlet.
  • On the built-in keyboard (this will not work from an external keyboard), simultaneously press and hold the left shift, control, and option keys while you press the power button.
  • Release all keys at the same time.
  • Press the power button to start your Mac.

3.  Update Your OS
Typically, Macs take care of themselves. The latest software from Apple makes speeding your Mac up simple. Check the latest version of Mac OS X here. Compare it to the OS X version on your Mac by clicking on the apple icon in the top left corner of your screen. Then click About This Mac. Apple releases these updates to help speed up Mac. The latest operating system provides loads of benefits. So make sure you have the latest OS X installed!

4.  Upgrade Your Hardware
Unfortunately, upgrading your Mac hardware is costly, time-consuming, and not the easiest thing to do. Not to mention that upgrading Mac hardware sometimes isn’t even possible on certain
Macs! However, you should definitely check out this guide on “How and Why to Upgrade Your Mac’s RAM” to see if you can upgrade your Mac. Because a hardware upgrade is probably the best way to increase speed on your Mac. This guide will help you understand the costs and benefits are of upgrading your Mac hardware. 


References:
1.  How to Speed Up a Macbook

2.  Resetting the SMC (System Management Controller) on Your Mac

3.  When and How to Reset Mac SMC (System Management Controller)

4.  How to Reset a Macbook Pro

Wednesday, 26 February 2014

Apple: WebDAV Error on Apple OS X Mavericks

If you are using WebDAV on Apple OS X Mavericks version 10.9.0, you may face some errors which you may not be able to open some files in WebDAV.

In order to solve this issue, simply update the Apple OS X Mavericks version 10.9.0 to version 10.9.1 or 10.9.2. After the update, the WebDAV should be working perfectly.

Tuesday, 25 February 2014

Microsoft: Create a New SQL Database Login Account

Here are the steps to create a new SQL database login account:

1.  Launch SQL Server Management Studio and connect with the correct credential.

2.  In Object Explorer, expand the folder of the server instance in which you want to create the new login.

3.  Right-click the Security folder, point to New, and select Login….

4.  In the Login – New dialog box, on the General page, enter the name of a user in the Login name box. Alternately, click Search… to open the Select User or Group dialog box.

If you click Search…:
  • Under Select this object type, click Object Types… to open the Object Types dialog box and select any or all of the following: Built-in security principals, Groups, and Users. Built-in security principals and Users are selected by default. When finished, click OK.
  • Under From this location, click Locations… to open the Locations dialog box and select one of the available server locations. When finished, click OK.
  • Under Enter the object name to select (examples), enter the user or group name that you want to find. For more information, see Select Users, Computers, or Groups Dialog Box.
  • Click Advanced… for more advanced search options. For more information, see Select Users, Computers, or Groups Dialog Box - Advanced Page.
  • Click OK.
 
5.  To create a login based on a Windows principal, select Windows authentication. This is the default selection.

6.  To create a login that is saved on a SQL Server database, select SQL Server authentication.
  • In the Password box, enter a password for the new user. Enter that password again into the Confirm Password box.
  • When changing an existing password, select Specify old password, and then type the old password in the Old password box.
  • To enforce password policy options for complexity and enforcement, select Enforce password policy. For more information, see Password Policy. This is a default option when SQL Server authentication is selected.
  • To enforce password policy options for expiration, select Enforce password expiration. Enforce password policy must be selected to enable this checkbox. This is a default option when SQL Server authentication is selected.
  • To force the user to create a new password after the first time the login is used, select User must change password at next login. Enforce password expiration must be selected to enable this checkbox. This is a default option when SQL Server authentication is selected.

7.  To associate the login with a stand-alone security certificate, select Mapped to certificate and then select the name of an existing certificate from the list.

8.  To associate the login with a stand-alone asymmetric key, select Mapped to asymmetric key to, and then select the name of an existing key from the list.

9.  To associate the login with a security credential, select the Mapped to Credential check box, and then either select an existing credential from the list or click Add to create a new credential. To remove a mapping to a security credential from the login, select the credential from Mapped Credentials and click Remove. For more information about credentials in general, see Credentials (Database Engine).

10.  From the Default database list, select a default database for the login. Master is the default for this option.

11.  From the Default language list, select a default language for the login.

12.  Click OK.


Reference:
1.  Create a Login
http://technet.microsoft.com/en-us/library/aa337562.aspx

Microsoft: Service Manager 2012 Data Warehouse High Watermark Monitor

 << Error Message >>
Service Manager 2012 Data Warehouse High Watermark Monitor
Context details:
Value of 987 is not higher than 987

 << Cause >>
Firstly, we must do agentless monitoring of all Management and Data Warehouse servers as the underlying SCOM Agent that SCSM uses for its own processes is still based on SCOM 2007 R2 (If you didn’t know, SCSM is built from a SCOM base and then heavily customised) and although compatible you don’t get all the required functionality.

Secondly, we must have a User Account specified in the Service Manager 2012 Database Account Profile, that has Read Access to the various Databases, access to a few registry keys (ie Local Admin on the Management and Data Warehouse Servers) and be a SCSM/SCSM DW Administrator.

<< Solution >>
1.  Agentless monitoring of all Management and Data Warehouse servers.
2.  Use the same account you use for the SCSM Data Access Account for the Service Manager 2012 Database Account Profile in SCOM.


Reference:
1.  Service Manager 2012 Data Warehouse High Watermark Monitor
http://blog.msvconsultancy.co.uk/2013/05/service-manager-2012-data-warehouse-high-watermark-monitor/

Monday, 24 February 2014

Google: Send SMS with Google Spreadsheet for FREE!


 Please follow the steps below to send messages with Google Spreadsheet for FREE:

1.  Create a Gmail account by going to https://accounts.google.com/SignUp

2.  Sign-in to the Google account that you have created.

3.  Associate the phone number that you would like to send the SMS for free with Google Calendar as detailed in http://support.google.com/calendar/bin/answer.py?hl=en&answer=45351

4.  Copy the Google sheet titled Send SMS - Andres Cheah into your Google Drive by going to https://docs.google.com/spreadsheet/ccc?key=0AheF94DrPSPgdE1xWnkxREhrald1TjlocVdmUHhGSlE&newcopy=true.

5.  Put your messages in cell B2 and your email address in cell B3.

6.  You’ll find a new Send SMS menu in your Google Spreadsheet toolbar. Click Send and you’ll get a pop-up asking for authorization. Grant the necessary access. ( * Note: This step only needs for the first time. )

7.  Go to the Send SMS menu again and choose “Send” to send the messages. After you have clicked the "Send" button, here are the results that you may observe:
  • There is going to be a pop-up which indicates that you have successfully sent the messages in the Google Spreadsheet.
  • The person with the phone number that you have associated with the Google Calender will receive a SMS with the messages you have typed in the Google Spreadsheet.
  • The date, time and messages are going to be logged in the Google Spreadsheet titled Send SMS.
  • An event with the messages detail is going to be created in the Google Calender.

Google Script:

/**   Send SMS by Andres Cheah                       **/
/**   ============================================   **/

/**   Details at http://mkcheah88.blogspot.com       **/

function onOpen() {
 
  var sheet = SpreadsheetApp.getActiveSpreadsheet();
 
  var menu = [
    {name: "Send", functionName: "init"},
    {name: "✖ Uninstall (Stop GoogleScript)", functionName: "removeJobs"},
    null
  ];
 
  sheet.addMenu("➪ Send SMS", menu);  
}


function init() {  
 
  removeJobs(true);
 
  var sheet = SpreadsheetApp.getActiveSpreadsheet();
 
  var messages = sheet.getActiveSheet().getRange("B2").getValue();
 
  // Setup trigger that runs every 1 minutes
 
  ScriptApp.newTrigger("SendSMS")
  .timeBased()
  .everyMinutes(1)
  .create();
 
  sheet.toast("Your message has been sent successfully. "
              + "Send SMS with Google Spreadsheet again anytime!", "Sent", -1);

  logMessage(messages, " <<Powered by Google SMS>>");

}


function logMessage(message, google) {

  // Log messages in Google Spreadsheet
  var sheet = SpreadsheetApp.getActiveSpreadsheet().getActiveSheet();
  var time  = new Date();
 
  sheet.appendRow([time, google + " : " + message]);
 
  var alert = "Text Message: " + message + google;
 
  // Send email to the email address stated in the spreadsheet
  MailApp.sendEmail(sheet.getRange("B3").getValue(), google, alert);
 
  // Send SMS to the phone number registered in Google Calender
    time = new Date(time.getTime() + 15000);
    CalendarApp.createEvent(alert, time, time).addSmsReminder(0);
 
  return;
}


function removeJobs(quiet) {  
 
  PropertiesService.getScriptProperties().deleteAllProperties();
 
  // Delete all Script Triggers
 
  var triggers = ScriptApp.getProjectTriggers();
 
  for (i=0; i<triggers.length; i++) {
    ScriptApp.deleteTrigger(triggers[i]);
  }
 
  // Inform the user, default is "YES"
 
  if (! quiet) {
   
    SpreadsheetApp.getActiveSpreadsheet()
    .toast("The GoogleScript has been stopped. " + "Send SMS with Google Spreadsheet again anytime!", "Stopped", -1);
   
  }  
}


/**   Send SMS by Andres Cheah                       **/
/**   ============================================   **/

/**   Details at http://mkcheah88.blogspot.com       **/

Reference:
1.  Monitor your Website’s Uptime with Google Docs

Thursday, 20 February 2014

Microsoft: Microsoft OneDrive


Microsoft announced last month that it's renaming SkyDrive to OneDrive. Now the rebranding changes are finally here and it's not just about the name. Exciting new features for customers have been added as well.

We've rounded up the differences between OneDrive and SkyDrive, and have discovered how Microsoft's cloud portal has evolved.

<<The Name>>
It's becoming evident that Microsoft's "One" branding isn't just for the Xbox gaming division. Not only did it restructure its management under a "one Microsoft" in 2013, but now Microsoft's cloud efforts fall under OneDrive.

OneDrive is Microsoft's competitor to Google Drive and Apple's iCloud, attempting to be the place where customers can manage their files on the cloud from anywhere. The name change to OneDrive from SkyDrive doesn't change the overall meaning of what Microsoft is pursuing in the cloud: your one stop shop for file access - old name or new name.

<<Access>>
OneDrive is accessible from the web, desktop, mobile devices and the Xbox One and Xbox 360 consoles.

The web address has changed to onedrive.com. Additionally, updates will be pushed out to mobile devices to reflect the name change and new features.

On desktop it's a little more complicated. Windows 8.1 needs an update of its own to alter the embedded app, and Microsoft tells Pocket-lint the update is on its way.

<<Storage>>

OneDrive is free for 7GB of storage space, just like SkyDrive. Microsoft offers perks for users, like the ability to gain 3GB of extra space by enabling their smartphones to automatically upload photos. Friends who join based on referrals from a friend can also earn both the user and the friend an extra 500MB. This can be done up to seven times.

For the data hungry users, extra storage space can be purchased with 50GB costing £16 a year, 100GB £32 a year, and 200GB £64 a year.

<<The Old>>
The goal of OneDrive is to be the place where users can upload and sync files to the cloud and access them from any device. Not changing from SkyDrive, OneDrive users can still access Office Web Apps to view and edit Word, Excel, PowerPoint, and OneNote documents.

OneDrive features document embedding and integration with the desktop version of Microsoft Office to edit files saved on the cloud. There's also integration with Outlook to upload and save documents right from within the email service.

Photos are also a big part of OneDrive, as they can be uploaded as a big .zip file and can be the place to store your big collection. It also features a nifty photo slideshow feature, so you can sit back and view family vacations, a weekend out with friends, or any other moment from your life.

<<The New>>
Like we said before, the OneDrive name change also brings new features - ones that you'll probably enjoy.

The biggest, is that OneDrive users can now collaborate on documents in real time like on Google Drive, from any device. In the past, multiple people had access to documents, but had to edit them solo, creating a tag team effect, and making it inefficient to work on documents together. Now, you can see who is editing what, as you type.

Additionally, the OneDrive Android application has gained the ability to set a handset's camera application to automatically upload all photos to the cloud service, something iOS and Windows Phone 8 versions have been able to do for a while. This makes for an easy way to have a backup of all your photos. But be careful, this is an easy way to eat into your 7GB free data allotment.

Lastly, video uploads have been given a dramatic change in OneDrive, improving the ability to share and view them. Within OneDrive sits a new engine that encodes video on the fly so that once you've uploaded a video to your OneDrive storage and share it to friends or family, the version streamed to their device will take into account the speed and bandwidth of their connection. For example, your video might have been uploaded at 720p, but they might view it a 360p on a mobile phone using a 3G connection. Plans are that there will no longer be any buffering timeouts or spinning wheels.

In summary, OneDrive is improving on SkyDrive. If you were a SkyDrive user in the past, you probably won't mind the rebranding and new features. If you're not a OneDrive user, you may want to check it out, especially if you find yourself embedded in Microsoft's ecosystem - including Windows 8.1, Windows Phone 8, and the Xbox One.


Reference:
1.  OneDrive

Wednesday, 19 February 2014

Microsoft: Alternative to TechNet

For those of you who don't know, TechNet is known as a one-stop shop for Microsoft users and administrators where they can learn about products, share design knowledge, and assist in troubleshooting. Along with that, the company included an annual subscription service for IT professionals so they could download and evaluate any Microsoft title. For Windows desktop and server administrators, TechNet was perfect, because for $349 a year, an IT department could build an in-house test lab where security patches and major network changes could be validated before any changes were actually performed in production.

When Microsoft abruptly announced they were sunsetting TechNet subscriptions, administrators felt that this dealt a huge blow to loyal Windows techs as there were seemingly no alternatives for use in lab environments. But in reality, there are three alternatives to TechNet subscriptions that administrators can choose from that will likely fit the bill.

1. Time-limited evaluations 
Previous TechNet subscriptions allowed users to download, install, evaluate, or test Microsoft products using free and never-ending keys. And while this was great for Windows administrators that built long-term test labs that mirrored production, it also caused a great deal of piracy as individuals and businesses would simply buy a TechNet subscription, then build-out entire organizations using TechNet licensing. This licensing loophole likely cost Microsoft millions of dollars annually.

To put a stop to that, MS is doing away with never-ending licensing and will instead offer time-limited evaluation software that ranges anywhere from 30 to 180 days depending on the application. This trial software will be free and for some administrators, time-limited licensing will be enough. But for persistent validation labs, it's not an ideal choice.


2. MSDN
The Microsoft Developer Network (MSDN) is a subscription-based service that closely resembles TechNet subscriptions. Purchasing an MSDN subscription allows administrators to build in-house labs using MSDN license keys that also never expire. It's interesting to point out that very few IT shops used MSDN subscriptions, instead opting to use TechNet for the simple fact that TechNet was considerably cheaper compared to MSDN. For example, an administrator could build out a Microsoft Exchange lab for $349 in TechNet licensing per year. That same lab would set you back $6,119 using an MSDN subscription.

But here's an interesting fact: TechNet subscriptions were originally meant for evaluation purposes as stated in the terms of service agreement. The agreement states, "The software provided with TechNet Subscriptions is designed for hands-on IT Professionals to evaluate Microsoft software and plan deployments. The software provided with MSDN subscriptions is available for evaluation, development, and testing purposes." So in actuality, if companies wanted to build out a test lab, they should have always been doing so using MSDN subscription licensing.


3. Azure
The last alternative to TechNet subscriptions is to move your test lab into the cloud using Microsoft's Azure cloud service. Many industry analysts believe that Microsoft's true motive for shuttering TechNet subscriptions is to force administrators to use the Azure cloud -- which is part of the company's shift in focus away from physical to virtual in the datacenter.

If that's the case, it's probably going to be successful as Azure allows for the greatest amount of flexibility for Windows software testing. Entire Windows networks can be built, modified, and torn down in a matter of minutes. They can last as long as you'd like and can be modified to exactly mirror a production network as it changes.


4. Microsoft DreamSpark ( formerly known as MSDN AA )
For education sector, Microsoft DreamSpark may be a good choice for you. DreamSpark is a Microsoft Program that supports technical education by providing access to Microsoft software for learning, teaching and research purposes.
  • DreamSpark is simple: it's all about giving students Microsoft professional-level developer and designer tools at no cost so that students can chase their dreams and create the next big breakthrough in technology - or just get a head start on their career.
  • DreamSpark helps educators teach the latest technologies and experiment in research. Microsoft knows that to make learning more motivating, relevant, and engaging for today's students requires a diverse set of resources. DreamSpark gives educators the resources to ensure their classrooms always have the latest technologies to challenges, motivate, and keep students engaged in new ways.
  • DreamSpark is also a subscription for Academic Institutions: it provides a cost-effective way to put Microsoft developer tools, platforms and servers in labs and classrooms, and on their students’ and faculty’s computers for learning and research purposes. It reduces lab costs and teaching budgets.

References:
1.  Some Alternatives Now That TechNet Is Ending
http://www.enterpriseefficiency.com/author.asp?section_id=1076&doc_id=265609

2.  Microsoft DreamSpark
https://www.dreamspark.com/

VMware: Network Adapter Not Found After Windows Server 2012 Upgrade

The network adapter is not found after I have upgraded the Windows Server 2008 R2 Datacenter to Windows Server 2012 R2 Datacenter. For your information, the server is a virtual machine.

After I have gone through the VMware documentation, I have found that the network adapter VMXNET 2 ( Enhanced ) I have been using is not supported by Windows Server 2012 R2 Datacenter. Thus, I have to change the network adapter to VMXNET 3.


<<VMXNET 2 (Enhanced)>>
The VMXNET 2 adapter is based on the VMXNET adapter but provides some high-performance features commonly used on modern networks, such as jumbo frames and hardware offloads. This virtual network adapter is available only for some guest operating systems on ESXi/ESX 3.5 and later. Because operating system vendors do not provide built-in drivers for this card, you must install VMware Tools to have a driver for the VMXNET 2 network adapter available.

VMXNET 2 is supported only for a limited set of guest operating systems:
  • 32- and 64-bit versions of Microsoft Windows 2003 and 2008 (Enterprise, Datacenter, and Standard Editions). Note: You can use enhanced VMXNET adapters with other versions of the Microsoft Windows 2003 operating system, but a workaround is required to enable the option in the VMware Infrastructure (VI) Client or vSphere Client. If Enhanced VMXNET is not offered as an option, see Enabling enhanced vmxnet adapters for Microsoft Windows Server 2003 (1007195).
  • 32-bit version of Microsoft Windows XP Professional
  • 32- and 64-bit versions of Red Hat Enterprise Linux 5.0
  • 32- and 64-bit versions of SUSE Linux Enterprise Server 10
  • 64-bit versions of Red Hat Enterprise Linux 4.0
  • 64-bit versions of Ubuntu Linux
In ESX 3.5 Update 4 or higher, these guest operating systems are also supported:
  • Microsoft Windows Server 2003, Standard Edition (32-bit)
  • Microsoft Windows Server 2003, Standard Edition (64-bit)
  • Microsoft Windows Server 2003, Web Edition
  • Microsoft Windows Small Business Server 2003
* Note: Jumbo frames are not supported in the Solaris Guest OS for VMXNET 2.


<<VMXNET 3>>
The VMXNET 3 adapter is the next generation of a paravirtualized NIC designed for performance, and is not related to VMXNET or VMXNET 2. It offers all the features available in VMXNET 2, and adds several new features like multiqueue support (also known as Receive Side Scaling in Windows), IPv6 offloads, and MSI/MSI-X interrupt delivery. For information about the performance of VMXNET 3, see Performance Evaluation of VMXNET3 Virtual Network Device. Because operating system vendors do not provide built-in drivers for this card, you must install VMware Tools to have a driver for the VMXNET 3 network adapter available.

VMXNET 3 is supported only for virtual machines version 7 and later, with a limited set of guest operating systems:
  • 32- and 64-bit versions of Microsoft Windows 7, XP, 2003, 2003 R2, 2008, 2008 R2, and Server 2012
  • 32- and 64-bit versions of Red Hat Enterprise Linux 5.0 and later
  • 32- and 64-bit versions of SUSE Linux Enterprise Server 10 and later
  • 32- and 64-bit versions of Asianux 3 and later
  • 32- and 64-bit versions of Debian 4
  • 32- and 64-bit versions of Debian 5
  • 32- and 64-bit versions of Debian 6
  • 32- and 64-bit versions of Ubuntu 7.04 and later
  • 32- and 64-bit versions of Sun Solaris 10 and later
* Notes:
  • In ESXi/ESX 4.1 and earlier releases, jumbo frames are not supported in the Solaris Guest OS for VMXNET 2 and VMXNET 3. The feature is supported starting with ESXi 5.0 for VMXNET 3 only. For more information, see Enabling Jumbo Frames on the Solaris guest operating system (2012445).
  • Fault Tolerance is not supported on a virtual machine configured with a VMXNET 3 vNIC in vSphere 4.0, but is fully supported on vSphere 4.1.
  • Windows Server 2012 is supported with e1000, e1000e, and VMXNET 3 on ESXi 5.0 Update 1 or higher.

Reference:
1.  Available Network Adapters
http://kb.vmware.com/selfservice/microsites/search.do?language=en_US&cmd=displayKC&externalId=1001805

Microsoft: Upgrade Windows Server 2008 R2 To Windows Server 2012

In this post, you will see how to upgrade Windows Server 2008 R2 to Windows Server 2012. If you were to upgrade your existing Windows Server 2008 R2 Enterprise server to Windows Server 2012, you would first choose the edition and then you would check the upgrade paths. Please go to the link below for the upgrade options:
http://mkcheah88.blogspot.com/2014/02/microsoft-upgrade-options-for-windows.html

Lets take a look at the hardware requirements for upgrading your server to Windows Server 2012. Windows Server 2012 requires minimum of 16 GB to 32 GB of disk space. When you install Windows Server 2012, it occupies 15.1 GB of space approximately but its good to allocate at least 32 GB of drive space for Windows Server 2012. You would require 1.4 GHz 64-bit processor, 512 MB of RAM, 32 GB of disk space, DVD Drive, Super VGA (800×600) or higher resolution monitor, keyboard and mouse.

In this post, you will be shown how to upgrade a Windows Server 2008 R2 Enterprise SP1 to Windows Server 2012 Datacenter. Note that do not consider this post to upgrade your domain controller to Windows Server 2012.

Please follow the steps below for the in-place upgrade:
1.  Insert the Windows Server 2012 DVD into the DVD-ROM and click on Run Setup.exe.

2.  On the Windows Setup screen, click on Install now.
 

3.  If you want to get security updates and latest drivers for your operating system select Go online to install updates now. You can also do a windows update once the upgrade is completed, so select No, Thanks.

4.  Enter your product key for Windows Server 2012 and click on Next.
 

5.  Server core installation has no Server Manager or any other MMCs to manage roles and features. The management must be done either remotely from a client machine or through the command prompt or Powershell at the console. There is no Start menu, no desktop Explorer shell, no Microsoft Management Console, and virtually no graphical applications. All you see when you start the computer is a single window with a command prompt. In this step, you may select the second installation mode, Windows Server 2012 Datacenter (Server with a GUI). Click on Next.

6.  Select Upgrade: Install Windows and Keep files, settings and applications. This will keep existing files, settings and applications and upgrade your server to Windows 2012.

7.  The upgrade will take close to 20 minutes. Sit back and relax until the upgrade is complete.

 8.  The upgrade from Windows Server 2008 R2 Enterprise to Windows Server 2012 Datacenter is complete. Let’s login to the server and check for the edition.

* Note: You may need to upgrade your drivers if any of your devices are not functioning.


Reference:
1.  How To Upgrade Windows Server 2008 R2 To Windows Server 2012
http://prajwaldesai.com/how-to-upgrade-windows-server-2008-r2-to-windows-server-2012/

Microsoft: Upgrade Options for Windows Server 2012 R2

The table below briefly summarizes which already licensed (that is, not evaluation) Windows operating systems can be upgraded to which editions of Windows Server 2012 R2.

Note the following general guidelines for supported paths:
  • In-place upgrades from 32-bit to 64-bit architectures are not supported. All editions of Windows Server 2012 R2 are 64-bit only.
  • In-place upgrades from one language to another are not supported.
  • In-place upgrades from one build type (fre to chk, for example) are not supported.
  • If the server is a domain controller, see http://technet.microsoft.com/library/hh994618.aspx for important information.
  • Upgrades from pre-release versions of Windows Server 2012 R2 are not supported. Perform a clean installation to Windows Server 2012 R2.
  • Upgrades that switch from a Server Core installation to the Server with a GUI mode of Windows Server 2012 R2 in one step (and vice versa) are not supported. However, after upgrade is complete, Windows Server 2012 R2 allows you to switch freely between Server Core and Server with a GUI modes. For more information about these installation options, how to convert between them, and how to use the new Minimal Server Interface and Features on Demand, see http://technet.microsoft.com/en-us/library/hh831786.
If you do not see your current version in the left column, upgrading to this release of Windows Server 2012 R2 is not supported.

If you see more than one edition in the right column, upgrade to either edition from the same starting version is supported.


Reference:
1.  Upgrade Options for Windows Server 2012 R2
http://technet.microsoft.com/en-us/library/dn303416.aspx

Microsoft: Memory Limits for Windows Server 2008 R2

The following table specifies the limits on physical memory for Windows Server 2008 R2. Windows Server 2008 R2 is available only in 64-bit editions.
  • Windows Server 2008 R2 Datacenter - 2 TB (Limit on X64)
  • Windows Server 2008 R2 Enterprise - 2 TB (Limit on X64)
  • Windows Server 2008 R2 for Itanium-Based Systems - 2 TB (Limit on IA64)
  • Windows Server 2008 R2 Foundation - 8 GB (Limit on X64)
  • Windows Server 2008 R2 Standard - 32 GB (Limit on X64)
  • Windows HPC Server 2008 R2 - 128 GB (Limit on X64)
  • Windows Web Server 2008 R2 - 32 GB (Limit on X64)

Reference:
Memory Limits for Windows Releases
http://msdn.microsoft.com/en-us/library/windows/desktop/aa366778%28v=vs.85%29.aspx#physical_memory_limits_windows_server_2008_r2

Microsoft: Configure Maximum Cache Size Limit (IIS 7)

Set the maximum output cache size when you want to limit the amount of memory IIS uses for output caching. Maximum cache size is the maximum size, in megabytes, of the output cache. When the default value of 0 is set, IIS automatically manages the cache memory size.

* Note: Setting a value that is too high could lead to the output cache using too much memory and may aversely affect performance of the server and application components. Exercise caution when you configure this value.

You can perform this procedure by using the user interface (UI) or by running Appcmd.exe commands in a command-line window.


<<User Interface>>
1.  Open IIS Manager and navigate to the level you want to manage.

2.  In Features View, double-click Output Caching.

3.  On the Output Caching page, in the Actions pane, click Edit feature settings.

4.  In the Edit Output Cache Settings dialog box, enter the maximum cache size, in megabytes, in the Cache size limit (in MB) box.

5.  Click OK.


<<Command Line>>
To <do_something>, use the following syntax:

appcmd command object parameter:value | parameter:variable | parameter:option1 | option2

The variable <variable_name> is <description_of_variable>. For example, to <do_something_specific>, type the following at the command prompt, and then press ENTER:

appcmd <exact_command_to_accomplish_the_procedure>


* Note: When you use Appcmd.exe to configure the <element_name> element at the global level in IIS 7, you must specify /commit:WEBROOT in the command so that configuration changes are made to the root Web.config file instead of ApplicationHost.config.


References:
1.  How to increase memory and cache size for application pool in IIS 7 efficiently
http://stackoverflow.com/questions/16162524/how-to-increase-memory-and-cache-size-for-application-pool-in-iis-7-efficiently

2.  Configure the Maximum Cache Size Limit (IIS 7)
http://technet.microsoft.com/en-us/library/cc772095%28v=ws.10%29.aspx

Tuesday, 18 February 2014

VMware: Change Hardware Serial Number for Mac OS X

There was an interesting question that was asked the other day about changing the hardware serial number for an Apple Mac OS X guest as the generated serial number is not compatible with services such as Apple Caching Service or iMessage.

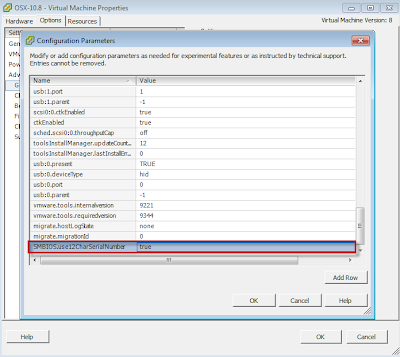
In order to solve the compatibility issues, we have a facility to generate a "short" serial number which should be suitable for recent Apple software. The option is enabled by default for OS X 10.9 guests.  To enable it for earlier guest OS versions, you'll need to power off your virtual machine and edit its configuration to add the following option:
SMBIOS.use12CharSerialNumber = "TRUE"

If you are running Mac OS X VM prior to 10.9 (Mavericks), you will need to add the following advanced VM setting by first powering it off and then add the above setting. There are two recommended ways of performing this change using either the vSphere C# Client or vSphere Web Client and instructions are listed below.

* Note: Though you can also edit the VMX configuration file by hand, for those that are not familiar on how to reload the configuration file, it is best you use the UI.

vSphere C# Client:
Edit Settings -> VM Options -> Advanced -> Edit Configurations

vSphere Web Client:
Edit Settings -> Options -> Advanced -> General -> Configuration Parameters

Once you have added the advanced setting, you can now power back on your Mac OS X VM and when you click on the "About this Mac" option on the upper left hand side of the Apple icon you should see the Mac OS X version string. Click on the version string twice and you should now see the serial number that is generated which should not be longer than 12 characters.


Reference:
1.  How to change hardware serial number for Mac OS X Guest?
http://www.virtuallyghetto.com/2013/10/how-to-change-hardware-serial-number.html

Monday, 17 February 2014

IT Technology: Running OS X 10.9 Mavericks VMware Image Within Windows OS and Intel Processor

Follow these steps to download and install working OS X 10.9 Mavericks pre-installed VMware image for Windows 7, 8 or 8.1 on Intel processor computers. Doing a fresh installation of OS X 10.9 on VMware workstation by Apple’s original DMG file is not so easy. Sysprobs already published a guide about how to install Mavericks on VMware from DMG file. Instead of going through those difficult tasks, you can simply download this pre-installed and configured image and use it quickly. Because of  this is made by vanilla kernel (without modifying the original kernel), future software updates also possible with it. The steps are as follows:

1.  Make sure that your physical computer supports hardware virtualization technology (vt-x). Mostly all the recent desktop and laptop computers support virtualization technology nowadays. In some computers this feature is already activated, in others it should be activated manually in computer BIOS settings. Please refer to the link below for more information:
http://www.sysprobs.com/disable-enable-virtualization-technology-bios

2.  Download Mavericks retail image from the link below:
http://pastebin.com/raw.php?i=PsJWZS6x

3.  After downloading and extracting, go to VMware Unlocker - Mac OS X Guest folder. Right click on install.cmd file and select run as administrator option. ( or you can start the command prompt as administrator in Windows 7 computer and execute install.cmd from command prompt)

4.  Open the vmx file of retail Mavericks virtual machine.

5.  Before starting virtual machine, you can modify the settings in next screen. I have increased the RAM to 2GB and number of processors to 2.

6.  Power on VM now. If VT-X is enabled properly and unlocker worked fine, you could see the initial configuration screen without any issues.

7.  After doing few configurations, you will land on well working Mavericks virtual machine.
* Note: Sound and network work fine in this method without installing VMware tools. It is already having multiple screen resolution options which normally come only after VM tools installation. Also, full screen mode and auto adjust screen size did not work after installing tools. Therefore, I do not see any valid reasons for VMware tools on OS X 10.9 except VMware shared folder. If you need VMware shared folders on Mavericks with Windows 8 or 8.1 or 7 to share Windows OS folders and drives with guest OS, then continue the installation.

8.  Mount the (attach to VM’s CD drive) darwin.iso file which is included in same folder.

9.  When CD drive opens automatically, double click ‘Install VMware Tools’ and begin the installation.

10.  After restarting, to make sure that VMware tools have been installed properly, go to VM in menu and see for below option. If ‘Reinstall VMware tools’ option is available, that means it’s already installed and working inside virtual machine.

11.  Go to settings of virtual machine and add a Windows 8 or 7 host folder/partition. While setting up, you can select ‘Read Only’ if you like to protect the host data.
* Note: VMware shared folder doesn’t require any network connectivity or configuration between host and guest. This purely works with VMware tools and integration services. So, it is very simple to configure and use without network connectivity.

12.  Inside Mavericks guest OS, you can access VMware shared folder in Computer as shown below.

Alright! Your Mavericks is good to go now!


References:
1.  Working OS X 10.9 Mavericks VMware Image For Windows OS and Intel Processor
http://www.sysprobs.com/working-os-x-10-9-mavericks-vmware-image-for-windows-os-intel-processor

2.  VMware Workstation 10, 9 and 8 Unlocker to Run Mac OS X Guests in Windows 8 and 7
http://www.sysprobs.com/vmware-workstation-8-0-8-0-1-unlocker-to-run-mac-os-x-guest-in-windows-7