I have finally passed the five Google Apps Education exams and earned the certificate of Google Apps Education Individual Qualification (IQ).
If you are interested in testing your new knowledge acquired in the Training Center you can take all five exams. Passing all five exams will give you the honor of being “Google Apps Education Qualified” and earn you a certificate. Google Apps Certificate The exams are $15 dollars each and you will need to pass each exam with a score of 80% or higher. You can make a bundle purchase as well which is $75 dollars.
Reference:
Google Testing Center
https://google.starttest.com/
Saturday, 25 January 2014
Thursday, 23 January 2014
Microsoft: Redirect HTTP to HTTPS on IIS
Here are the steps to redirect your website from HTTP to HTTPS:
(Pre-requisites: HTTP Redirect module is installed and the website has a valid HTTPS binding in place.
1. Launch the IIS Manager.
2. Go to the HTTP Redirect module.
3. Fill the details as per the requirement as shown below:
Reference:
HTTP to HTTPS redirects on IIS 7.x and higher
http://blogs.msdn.com/b/kaushal/archive/2013/05/23/http-to-https-redirects-on-iis-7-x-and-higher.aspx
(Pre-requisites: HTTP Redirect module is installed and the website has a valid HTTPS binding in place.
1. Launch the IIS Manager.
2. Go to the HTTP Redirect module.
3. Fill the details as per the requirement as shown below:
Reference:
HTTP to HTTPS redirects on IIS 7.x and higher
http://blogs.msdn.com/b/kaushal/archive/2013/05/23/http-to-https-redirects-on-iis-7-x-and-higher.aspx
Microsoft: Enable Basic Authentication for WebDAV on Windows 7
If you are having difficulty using Windows 7 to connect to a Web-based application on an Apache/Linux-based WebDAV server, you may need to enable support for Basic Authentication for WebDAV on your Windows 7 computer. To do this, open Registry Editor and create the following new registry entry under HKLM\SYSTEM\CurrentControlSet\Services\WebClient\Parameters:
Name: BasicAuthLevel
Type: DWORD (32-bit) Value
Value: 2
If you do this, you should make sure the Web-application uses SSL since the Basic Auth password is sent in cleartext.
Note that the possible values you can assign to this new registry entry are:
0 - Basic authentication disabled
1 - Basic authentication enabled for Secure Sockets Layer (SSL) shares only
2 or greater - Basic authentication enabled for SSL shares and for non-SSL shares
The following Windows command can help you to automate the change:
Reference:
Enable Basic Auth for WebDAV on Windows 7
http://www.windowsnetworking.com/kbase/WindowsTips/Windows7/AdminTips/Security/EnableBasicAuthforWebDAVonWindows7.html
Name: BasicAuthLevel
Type: DWORD (32-bit) Value
Value: 2
If you do this, you should make sure the Web-application uses SSL since the Basic Auth password is sent in cleartext.
Note that the possible values you can assign to this new registry entry are:
0 - Basic authentication disabled
1 - Basic authentication enabled for Secure Sockets Layer (SSL) shares only
2 or greater - Basic authentication enabled for SSL shares and for non-SSL shares
The following Windows command can help you to automate the change:
@echo ##############################################
@echo ##### WebDAV Script by Andres Cheah #####
@echo ##############################################
@echo ##### #####
@echo ## ##
@echo # #
@echo off
REG ADD HKEY_LOCAL_MACHINE\SYSTEM\CurrentControlSet\services\WebClient\Parameters /v BasicAuthLevel /t REG_DWORD /d 0x2
net stop webclient
net start webclient
@echo ###You are ready to map the WebDAV drive!###
pause
Reference:
Enable Basic Auth for WebDAV on Windows 7
http://www.windowsnetworking.com/kbase/WindowsTips/Windows7/AdminTips/Security/EnableBasicAuthforWebDAVonWindows7.html
Microsoft: Error for Adding SSL Binding in IIS
<<Problem>>
Below is a snapshot of the error message while trying to add the SSL binding in IIS.
<<Cause>>
The most common scenario is when the users use the IIS MMC to import a certificate and they uncheck the option “Allow this certificate to be exported”. This results in a broken keyset and thus results in the problem.
<<Solution>>
There are two ways to fix this problem. Before we start off, delete/remove the existing certificate from the store.
Reference:
Error HRESULT: 0x80070520 when adding SSL binding in IIS
http://blogs.msdn.com/b/kaushal/archive/2012/10/07/error-hresult-0x80070520-when-adding-ssl-binding-in-iis.aspx
Below is a snapshot of the error message while trying to add the SSL binding in IIS.
<<Cause>>
The most common scenario is when the users use the IIS MMC to import a certificate and they uncheck the option “Allow this certificate to be exported”. This results in a broken keyset and thus results in the problem.
<<Solution>>
There are two ways to fix this problem. Before we start off, delete/remove the existing certificate from the store.
- If using IIS MMC to import the certificate, then ensure that the “Allow this certificate to be exported” is checked.
- If making the private key exportable is not an option, then use the Certificates MMC to import the certificate. Please go through the following KB on how to import a certificate using the MMC: http://support.microsoft.com/kb/232137
Reference:
Error HRESULT: 0x80070520 when adding SSL binding in IIS
http://blogs.msdn.com/b/kaushal/archive/2012/10/07/error-hresult-0x80070520-when-adding-ssl-binding-in-iis.aspx
Microsoft: Setup HTTPS / SSL for a Website on IIS
Please follow the steps below to setup the HTTPS / SSL for your website:
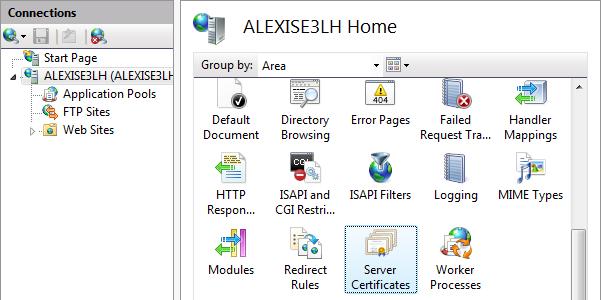
1. Select the server node in the tree view and double-click the Server Certificates feature in the list view:
2. Click Import... in the Actions pane.
3. Browser the certificate and type in the correct password. Then, import.
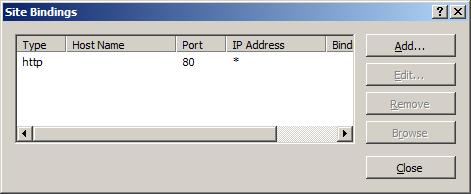
4. Once the certificate is imported, select a site in the tree view and click Bindings... in the Actions pane. This brings up the bindings editor that lets you create, edit, and delete bindings for your Web site. Click Add... to add your new SSL binding to the site.
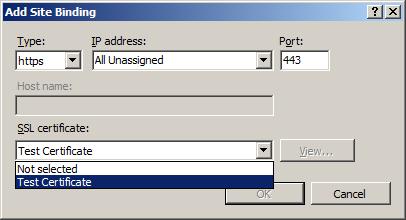
5. The default settings for a new binding are set to HTTP on port 80. Select https in the Type drop-down list. Select the self-signed certificate you created in the previous section from the SSL Certificate drop-down list and then click OK.
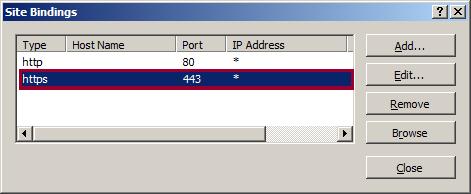
6. Now you have a new SSL binding on your site and all that remains is to verify that it works.
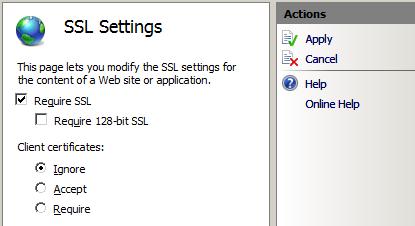
7. Configure SSL settings if you want your site to require SSL, or to interact in a specific way with client certificates. Click the site node in the tree view to go back to the site's home page. Double-click the SSL Settings feature in the middle pane.
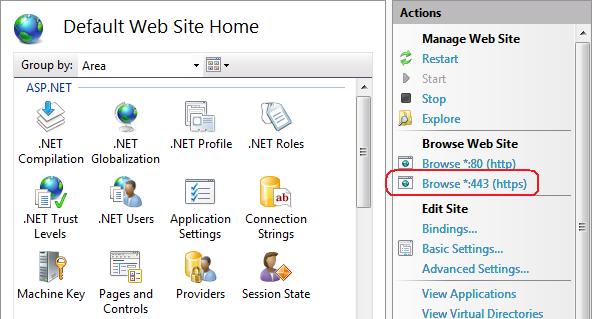
8. In the Actions pane, under Browse Web Site, click the link associated with the binding you just created.
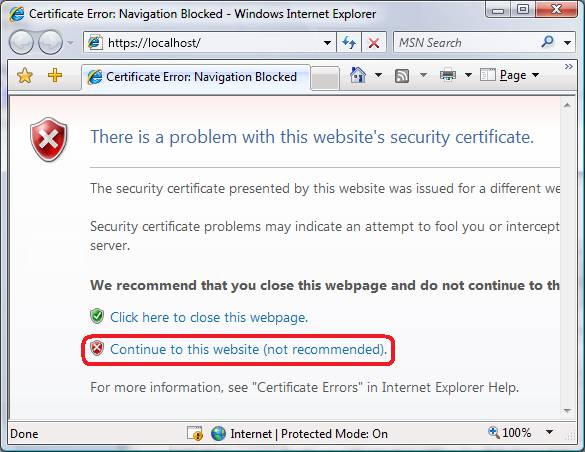
9. Internet Explorere (IE) 7 and above will display an error page because the self-signed certificate was issued by your computer, not by a trusted Certificate Authority (CA). IE 7 and above will trust the certificate if you add it to the list of Trusted Root Certification Authorities in the certificates store it on the local computer, or in Group Policy for the domain. Click Continue to this website (not recommended).
Reference:
How to Set Up SSL on IIS 7
http://www.iis.net/learn/manage/configuring-security/how-to-set-up-ssl-on-iis
1. Select the server node in the tree view and double-click the Server Certificates feature in the list view:
2. Click Import... in the Actions pane.
3. Browser the certificate and type in the correct password. Then, import.
4. Once the certificate is imported, select a site in the tree view and click Bindings... in the Actions pane. This brings up the bindings editor that lets you create, edit, and delete bindings for your Web site. Click Add... to add your new SSL binding to the site.
5. The default settings for a new binding are set to HTTP on port 80. Select https in the Type drop-down list. Select the self-signed certificate you created in the previous section from the SSL Certificate drop-down list and then click OK.
6. Now you have a new SSL binding on your site and all that remains is to verify that it works.
7. Configure SSL settings if you want your site to require SSL, or to interact in a specific way with client certificates. Click the site node in the tree view to go back to the site's home page. Double-click the SSL Settings feature in the middle pane.
8. In the Actions pane, under Browse Web Site, click the link associated with the binding you just created.
9. Internet Explorere (IE) 7 and above will display an error page because the self-signed certificate was issued by your computer, not by a trusted Certificate Authority (CA). IE 7 and above will trust the certificate if you add it to the list of Trusted Root Certification Authorities in the certificates store it on the local computer, or in Group Policy for the domain. Click Continue to this website (not recommended).
Reference:
How to Set Up SSL on IIS 7
http://www.iis.net/learn/manage/configuring-security/how-to-set-up-ssl-on-iis
Wednesday, 22 January 2014
Microsoft: Publish DFS with WebDAV
<<Server>>
For your information, I setup the WebDAV server on Windows Server 2008 R2. Here are the steps for you to setup a WebDAV server to publish the DFS.
1. On the taskbar, click Start, point to Administrative Tools, and then click Server Manager.
2. In the Server Manager hierarchy pane, expand Roles, and then click Web Server (IIS).
3. In the Web Server (IIS) pane, scroll to the Role Services section, and then click Add Role Services.
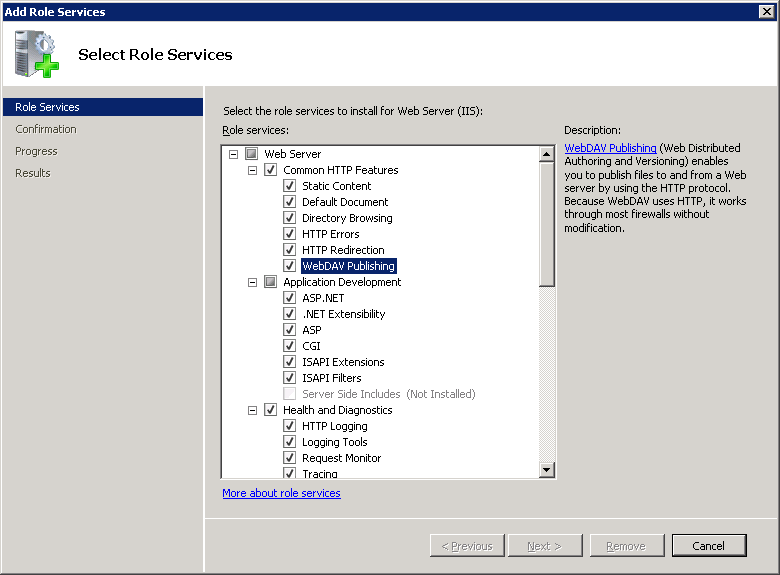
4. On the Select Role Services page of the Add Role Services Wizard, expand Common HTTP Features, select WebDAV Publishing, and then click Next.
5. On the Confirm Installation Selections page, click Install.
6. On the Results page, click Close.
7. In IIS Manager, in the Connections pane, expand the Sites node in the tree, then click the Default Web Site.
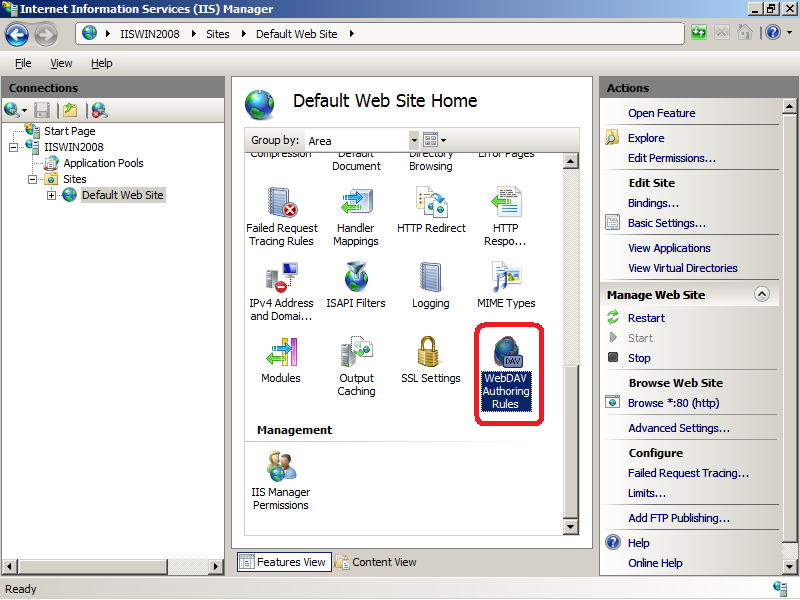
8. As shown in the image below, double-click the WebDAV Authoring Rules feature.
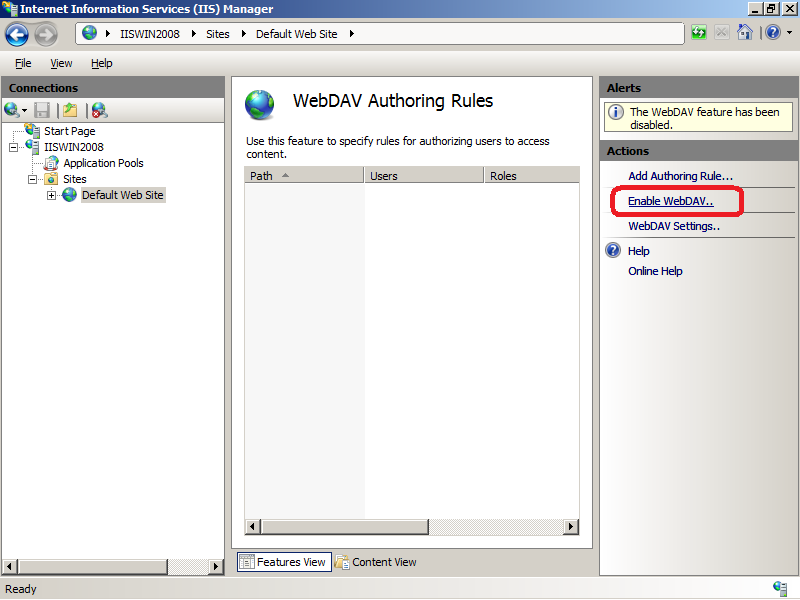
9. When the WebDAV Authoring Rules page is displayed, click the Enable WebDAV task in the Actions page.
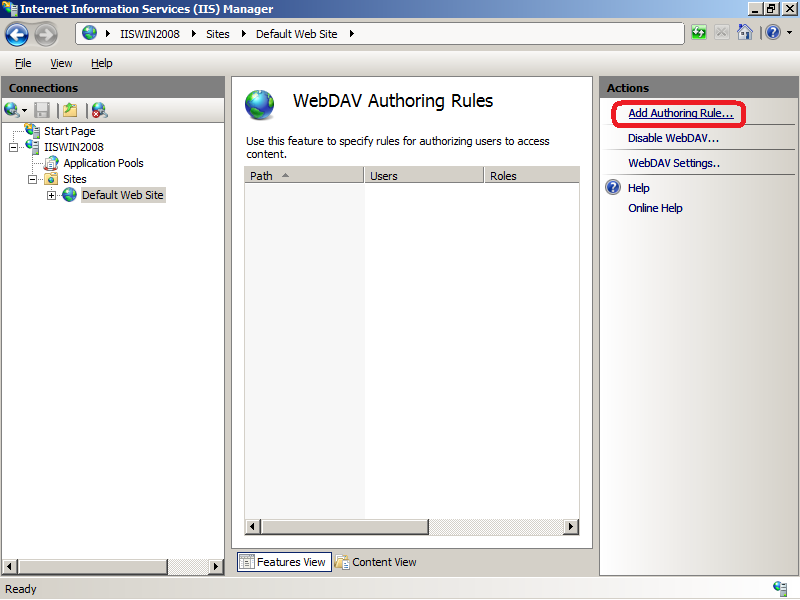
10. Once WebDAV has been enabled, click the Add Authoring Rule task in the Actions pane.
11. When the Add Authoring Rule dialog appears:
12. In IIS Manager, in the Connections pane, expand the Sites node in the tree, then click the Default Web Site.
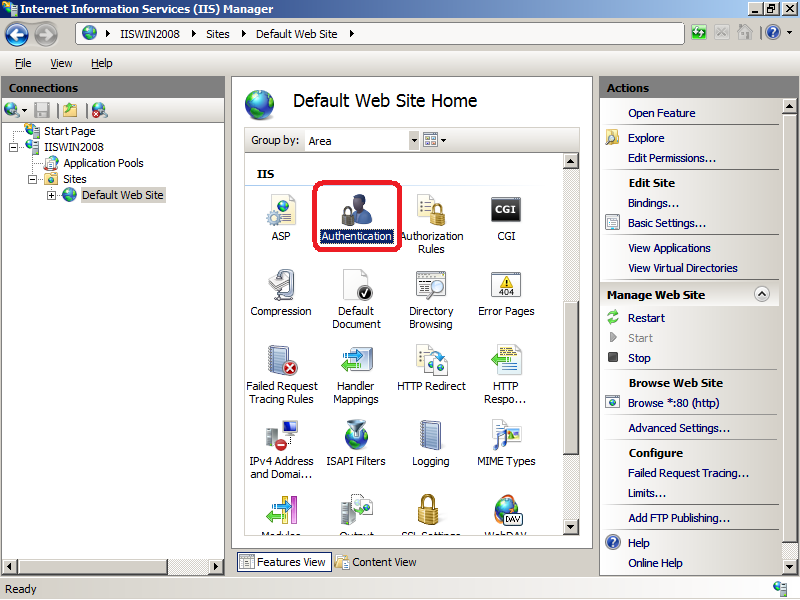
13. Double-click the Authentication feature.
14. When the Authentication feature opens, make sure only the Basic Authentication is enabled. (Note: If Basic Authentication is not available in the options, please go to Roles > Web Server (IIS) > Add Role Services > Security > Basic Authentication and install the role.)
15. In IIS Manager, click the Default Web Site under the Sites node in the tree.
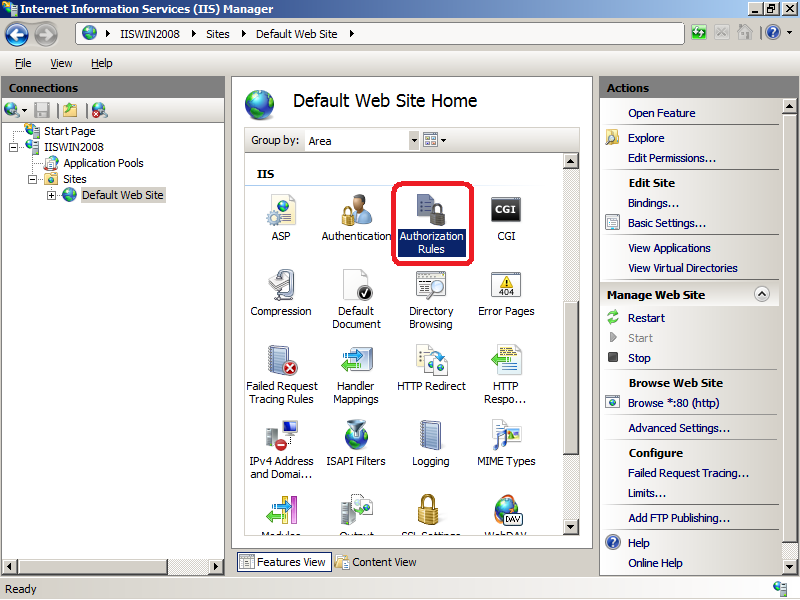
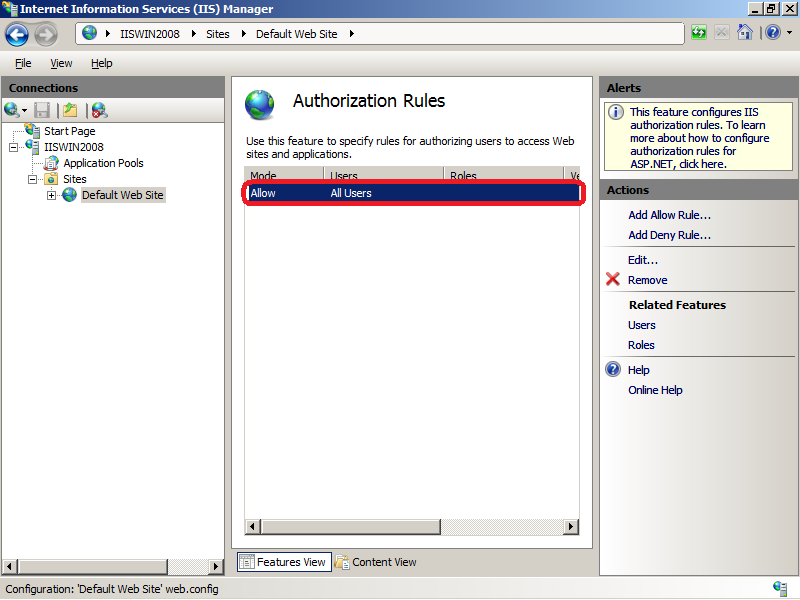
16. Double-click the Authorization feature. (Note: If Authentication Rules is not available in the manager, please go to Roles > Web Server (IIS) > Add Role Services > Security > URL Authorization and install the role.)
17. When the Authorization feature opens, make sure that an Allow rule is defined that includes all users.
18. On your WebDAV server, open a command prompt session.
19. Type the following command to connect to your WebDAV server:
net use * http://localhost/
(Note: If you are not able to connect to your WebDAV server, you may want to go to Features > Add Features > Desktop Experience and install the feature.)
20. Once you are able to connect to your WebDAV server, please proceed with the directory setup. Right click at the Default Web Site and select Manage Web Site > Advanced Settings...
21. Please type in the domain admin account that can grant the full access on the web site at the Physical Path Credentials and click OK.
22. Right click at the Default Web Site and select Add Virtual Directory...
23. Type in the preferred Alias and the DFS path / UNC (Uniform Naming Convention). Then, click OK. Now, your WebDAV server is completed.
<<Client>>
You may setup the client now as follows:
1. Open any browser and type in the respective URL (eg. http://<server name>/share). After that, type in the user name and password that you have used to log in to DFS. (Note: Please include the domain name in your user name.)
2. For Mac OS X, go to Connect to Server and type in the respective URL (eg. http://<server name>/share). After that, type in the user name and password that you have used to log in to DFS. (Note: Please include the domain name in your user name.)
3. For Windows, open the command prompt and type in the following command:
net use * http://<server name>/share <password> /user:<domain name/user name>
Reference:
Installing and Configuring WebDAV on IIS 7
http://www.iis.net/learn/install/installing-publishing-technologies/installing-and-configuring-webdav-on-iis
For your information, I setup the WebDAV server on Windows Server 2008 R2. Here are the steps for you to setup a WebDAV server to publish the DFS.
1. On the taskbar, click Start, point to Administrative Tools, and then click Server Manager.
2. In the Server Manager hierarchy pane, expand Roles, and then click Web Server (IIS).
3. In the Web Server (IIS) pane, scroll to the Role Services section, and then click Add Role Services.
4. On the Select Role Services page of the Add Role Services Wizard, expand Common HTTP Features, select WebDAV Publishing, and then click Next.
5. On the Confirm Installation Selections page, click Install.
6. On the Results page, click Close.
7. In IIS Manager, in the Connections pane, expand the Sites node in the tree, then click the Default Web Site.
8. As shown in the image below, double-click the WebDAV Authoring Rules feature.
9. When the WebDAV Authoring Rules page is displayed, click the Enable WebDAV task in the Actions page.
10. Once WebDAV has been enabled, click the Add Authoring Rule task in the Actions pane.
11. When the Add Authoring Rule dialog appears:
- Click All content to specify that the rule applies to all content types.
- Choose "All users".
- Select Read, Source, and Write for the permissions.
- When you have completed these items, click OK.
12. In IIS Manager, in the Connections pane, expand the Sites node in the tree, then click the Default Web Site.
13. Double-click the Authentication feature.
14. When the Authentication feature opens, make sure only the Basic Authentication is enabled. (Note: If Basic Authentication is not available in the options, please go to Roles > Web Server (IIS) > Add Role Services > Security > Basic Authentication and install the role.)
15. In IIS Manager, click the Default Web Site under the Sites node in the tree.
16. Double-click the Authorization feature. (Note: If Authentication Rules is not available in the manager, please go to Roles > Web Server (IIS) > Add Role Services > Security > URL Authorization and install the role.)
17. When the Authorization feature opens, make sure that an Allow rule is defined that includes all users.
18. On your WebDAV server, open a command prompt session.
19. Type the following command to connect to your WebDAV server:
net use * http://localhost/
(Note: If you are not able to connect to your WebDAV server, you may want to go to Features > Add Features > Desktop Experience and install the feature.)
20. Once you are able to connect to your WebDAV server, please proceed with the directory setup. Right click at the Default Web Site and select Manage Web Site > Advanced Settings...
21. Please type in the domain admin account that can grant the full access on the web site at the Physical Path Credentials and click OK.
22. Right click at the Default Web Site and select Add Virtual Directory...
23. Type in the preferred Alias and the DFS path / UNC (Uniform Naming Convention). Then, click OK. Now, your WebDAV server is completed.
<<Client>>
You may setup the client now as follows:
1. Open any browser and type in the respective URL (eg. http://<server name>/share). After that, type in the user name and password that you have used to log in to DFS. (Note: Please include the domain name in your user name.)
2. For Mac OS X, go to Connect to Server and type in the respective URL (eg. http://<server name>/share). After that, type in the user name and password that you have used to log in to DFS. (Note: Please include the domain name in your user name.)
3. For Windows, open the command prompt and type in the following command:
net use * http://<server name>/share <password> /user:<domain name/user name>
Reference:
Installing and Configuring WebDAV on IIS 7
http://www.iis.net/learn/install/installing-publishing-technologies/installing-and-configuring-webdav-on-iis
Friday, 20 December 2013
IT Technology: Warmest Greetings from Apple and Google
Apple and Google come out with the fabulous ideas for this festival season.
<<Apple: 12 Days of Gifts>>
This year will be the first Apple has included the U.S. in its annual giveaway tradition, which was previously limited to iOS device users in Europe and Canada. As in past years, Apple will be giving away a free downloadable song, app, book, movie or TV show each day from Dec. 26 though Jan. 6. Offers can be claimed through the app and are valid for 24 hours.
<<Google: Let's Go Caroling>>
Reference:
12 Days of Gifts
https://itunes.apple.com/us/app/id777716569?mt=8
<<Apple: 12 Days of Gifts>>
This year will be the first Apple has included the U.S. in its annual giveaway tradition, which was previously limited to iOS device users in Europe and Canada. As in past years, Apple will be giving away a free downloadable song, app, book, movie or TV show each day from Dec. 26 though Jan. 6. Offers can be claimed through the app and are valid for 24 hours.
<<Google: Let's Go Caroling>>
In any event, when you search Google now for [Let's Go Caroling], you get a bunch of different carols to choose from and click on. You also get a bunch of festive people dressed in Google colors singing (like a karaoke machine).
Reference:
12 Days of Gifts
https://itunes.apple.com/us/app/id777716569?mt=8
Subscribe to:
Posts (Atom)